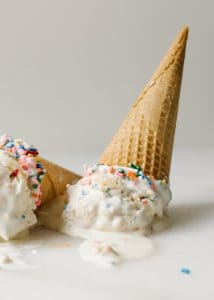
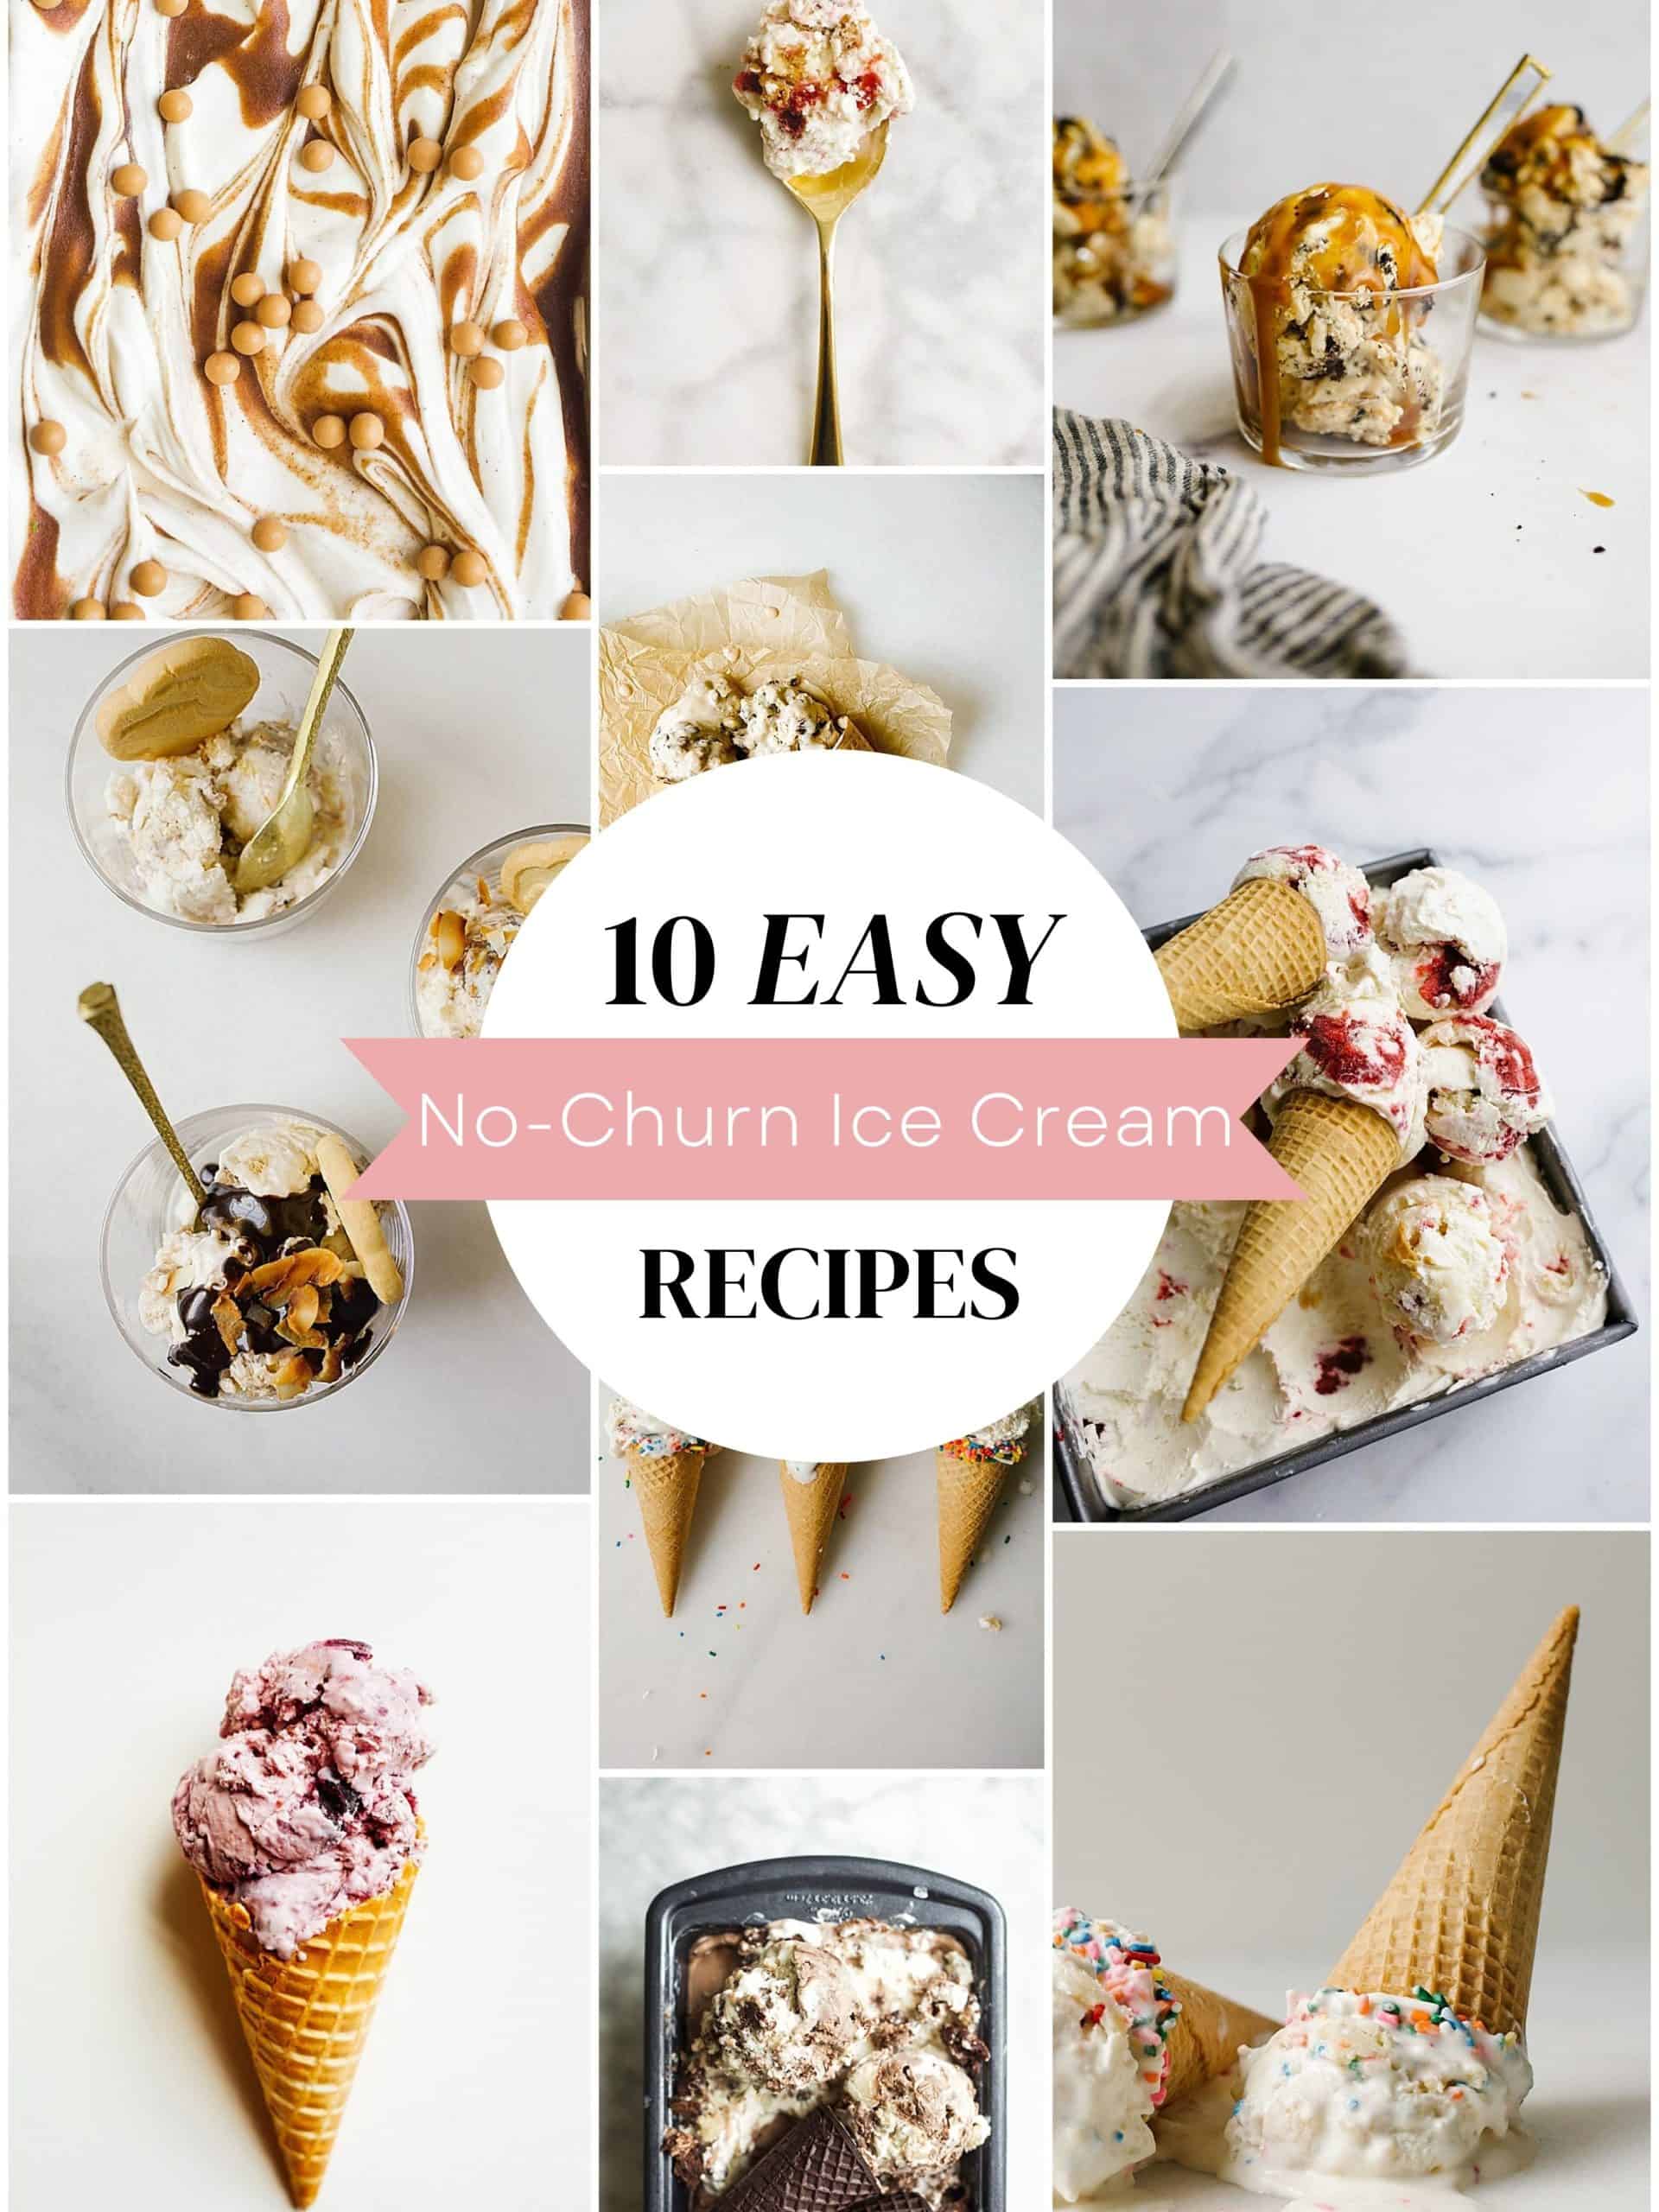
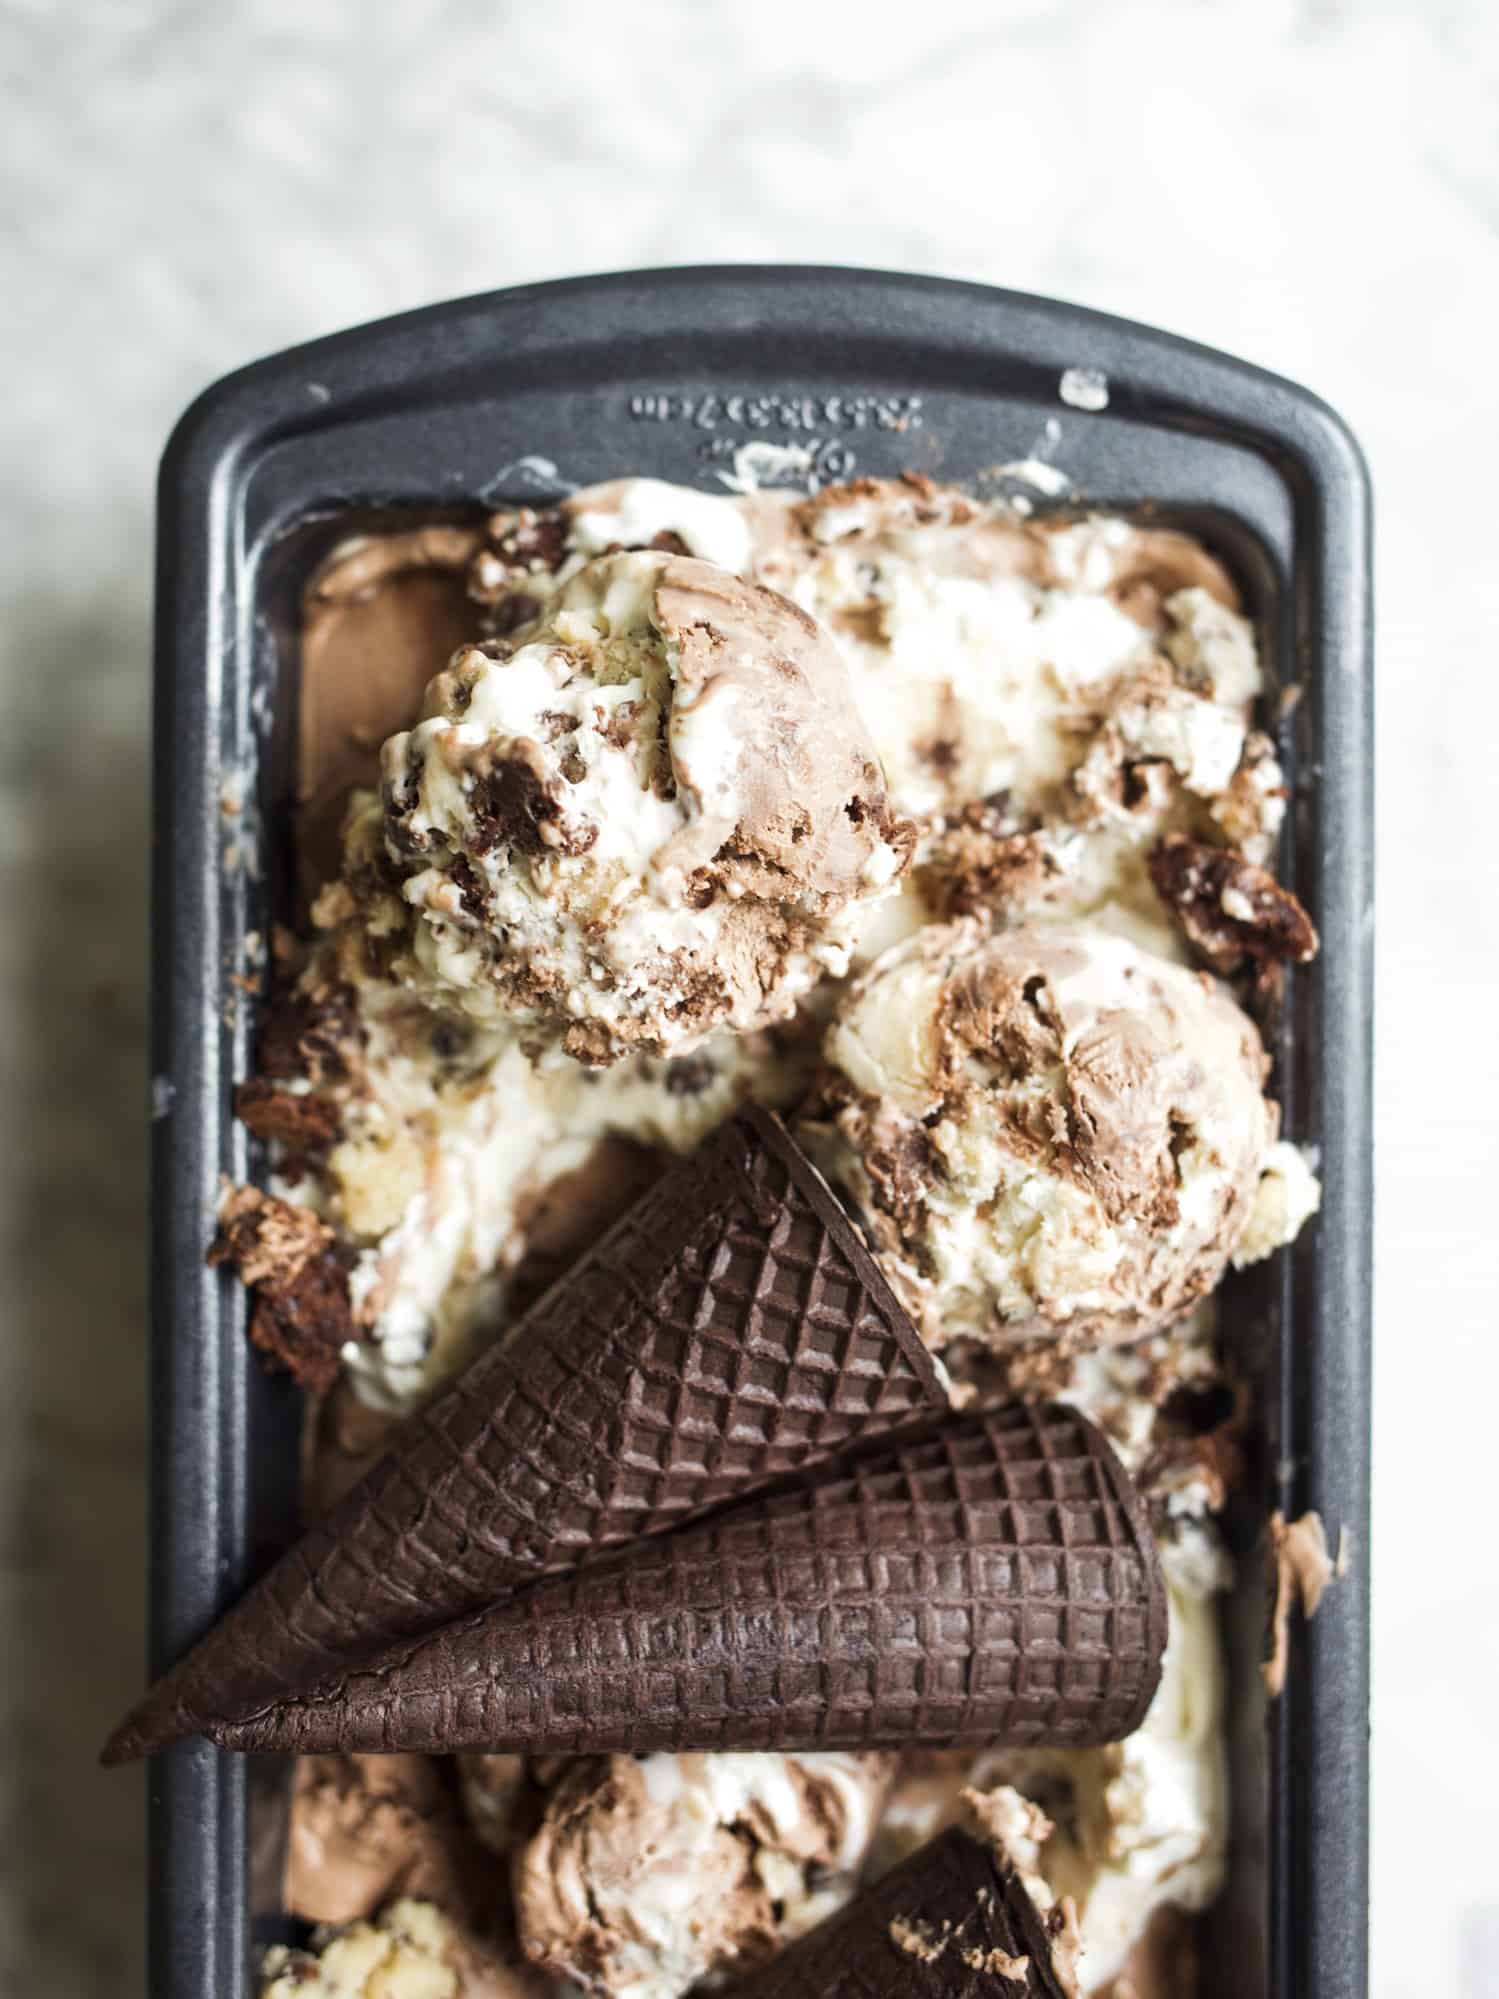
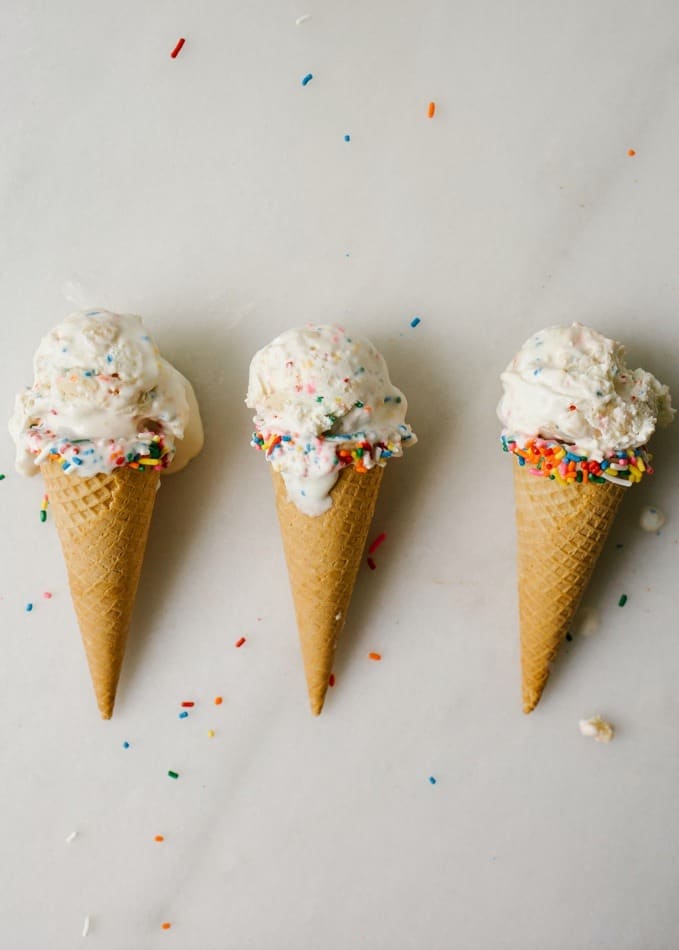
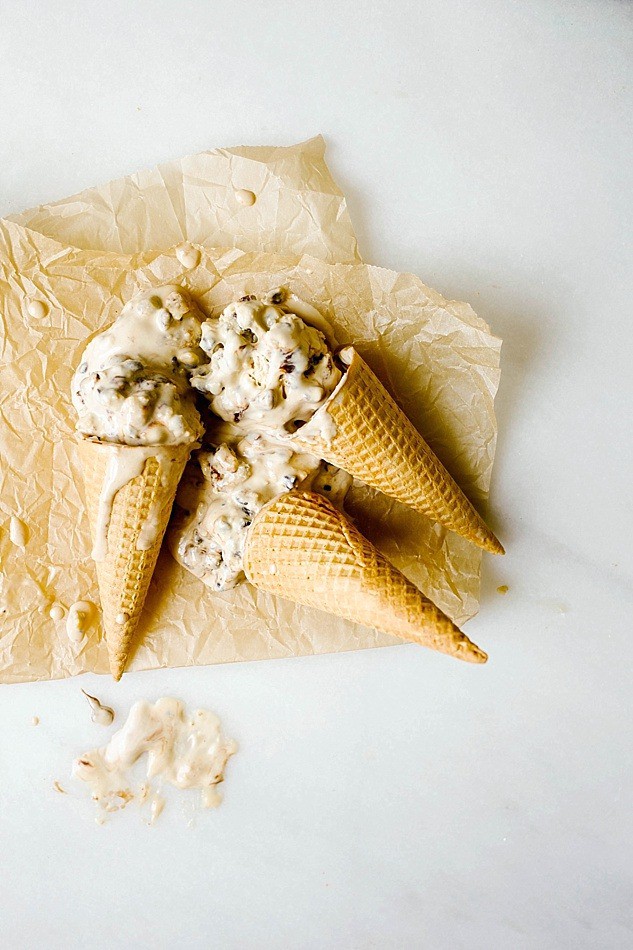
If you’ve been positively sweltering these past few weeks, today’s post is for you! These are the yummiest no-churn frozen treats on this site, and even without a fancy ice cream machine, you can have delicious homemade ice cream in no time.
What is No-Churn Ice Cream?
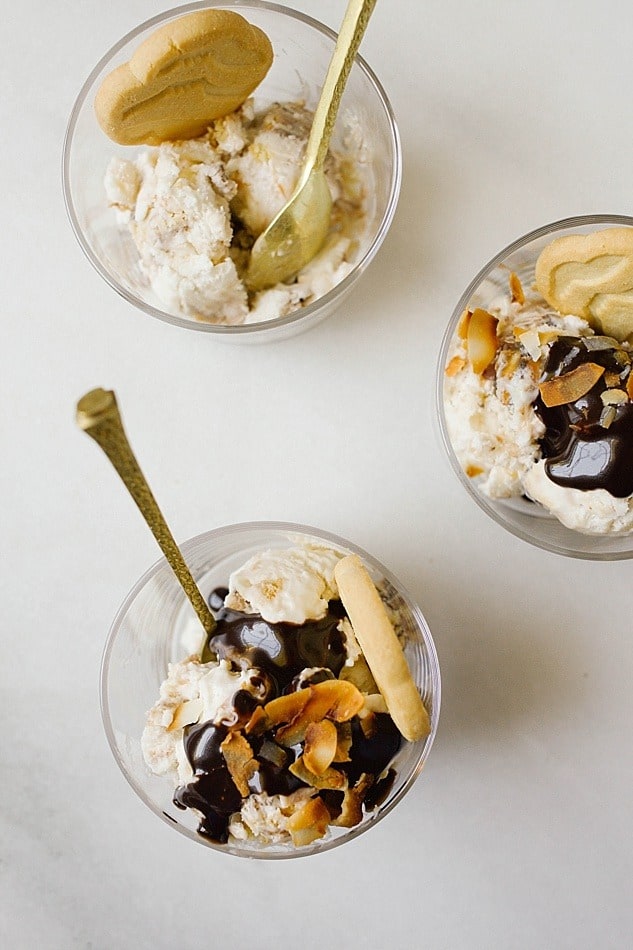
No-churn ice cream is as simple as it sounds. Unlike traditional ice creams that require a machine or churn, no-churn ice creams come together with just two ingredients and a bit of mixing. Once you have a standard base recipe, the opportunities for ice cream flavors are endless! Just swirl in your favorite sauces, sprinkles, cookies, or toppings, and watch the magic happen.
How to Make It
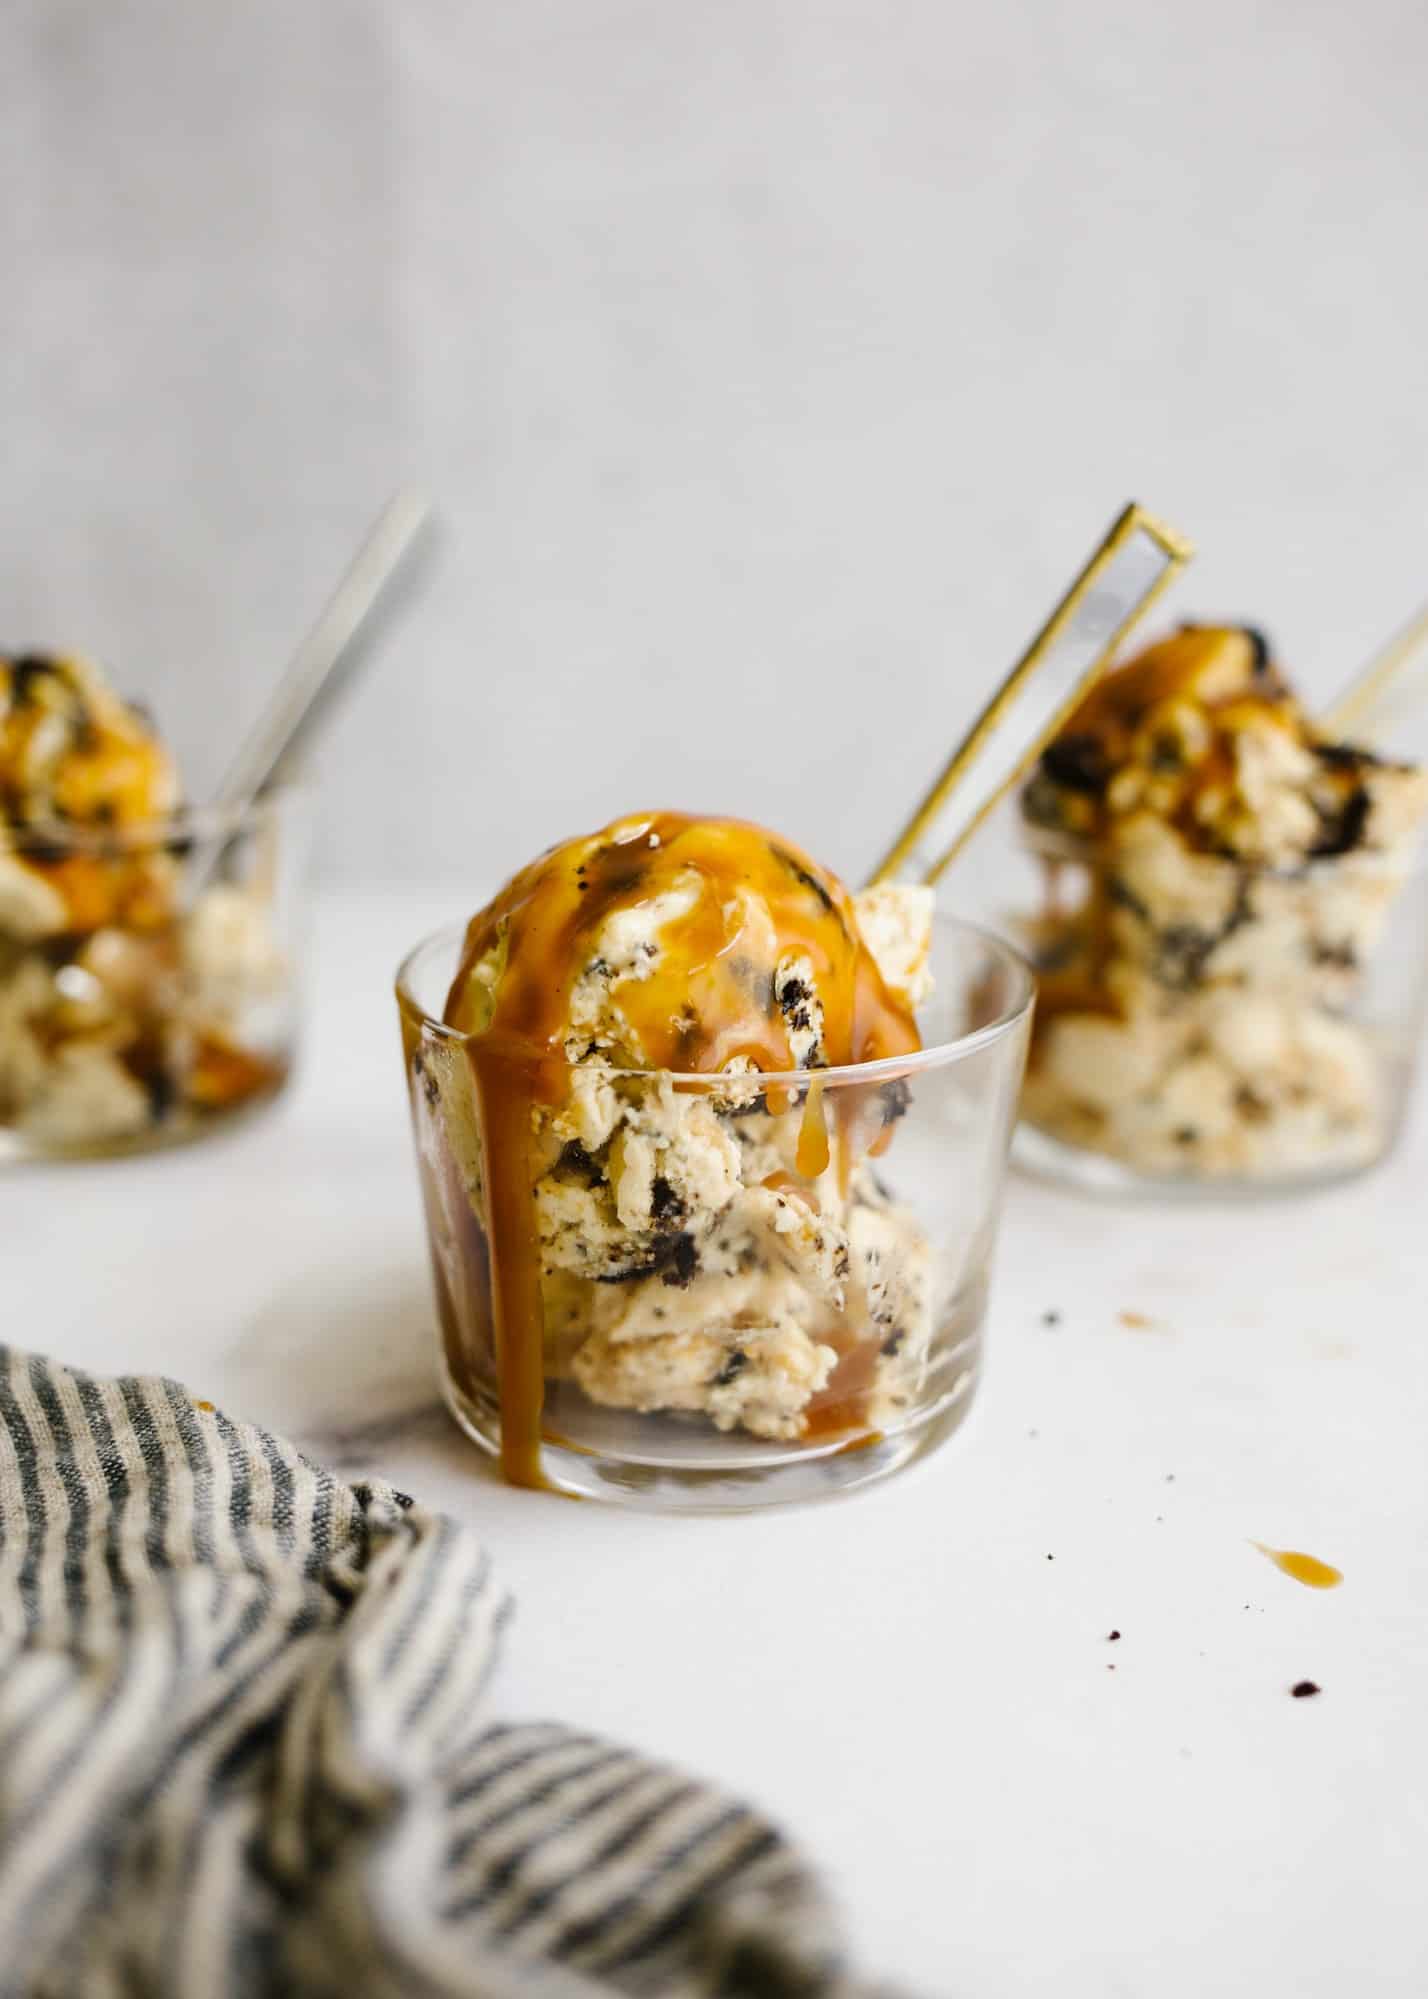
Most no-churn ice creams start with heavy whipping cream and sweetened condensed milk. Two cups of heavy whipping cream are whipped on low speed until fluffy and thickened. After that, a 14-ounce can of sweetened condensed milk is folded in, and voila- an ice cream that is ready for the freezer. To make vanilla ice cream, simply add a splash of vanilla extract or vanilla bean. On the other hand, for chocolate, stir in a bit of cocoa powder into the milk. In the end, most recipes include the basic ingredients of 14 ounces of sweetened condensed milk and 2 cups of heavy whipping cream.
In addition, you can opt to use whipped coconut cream and cream of coconut or even dairy-free whipped topping. Today, we’re looking at the traditional method in 10 of my very favorite original recipes. Someone, start the countdown!
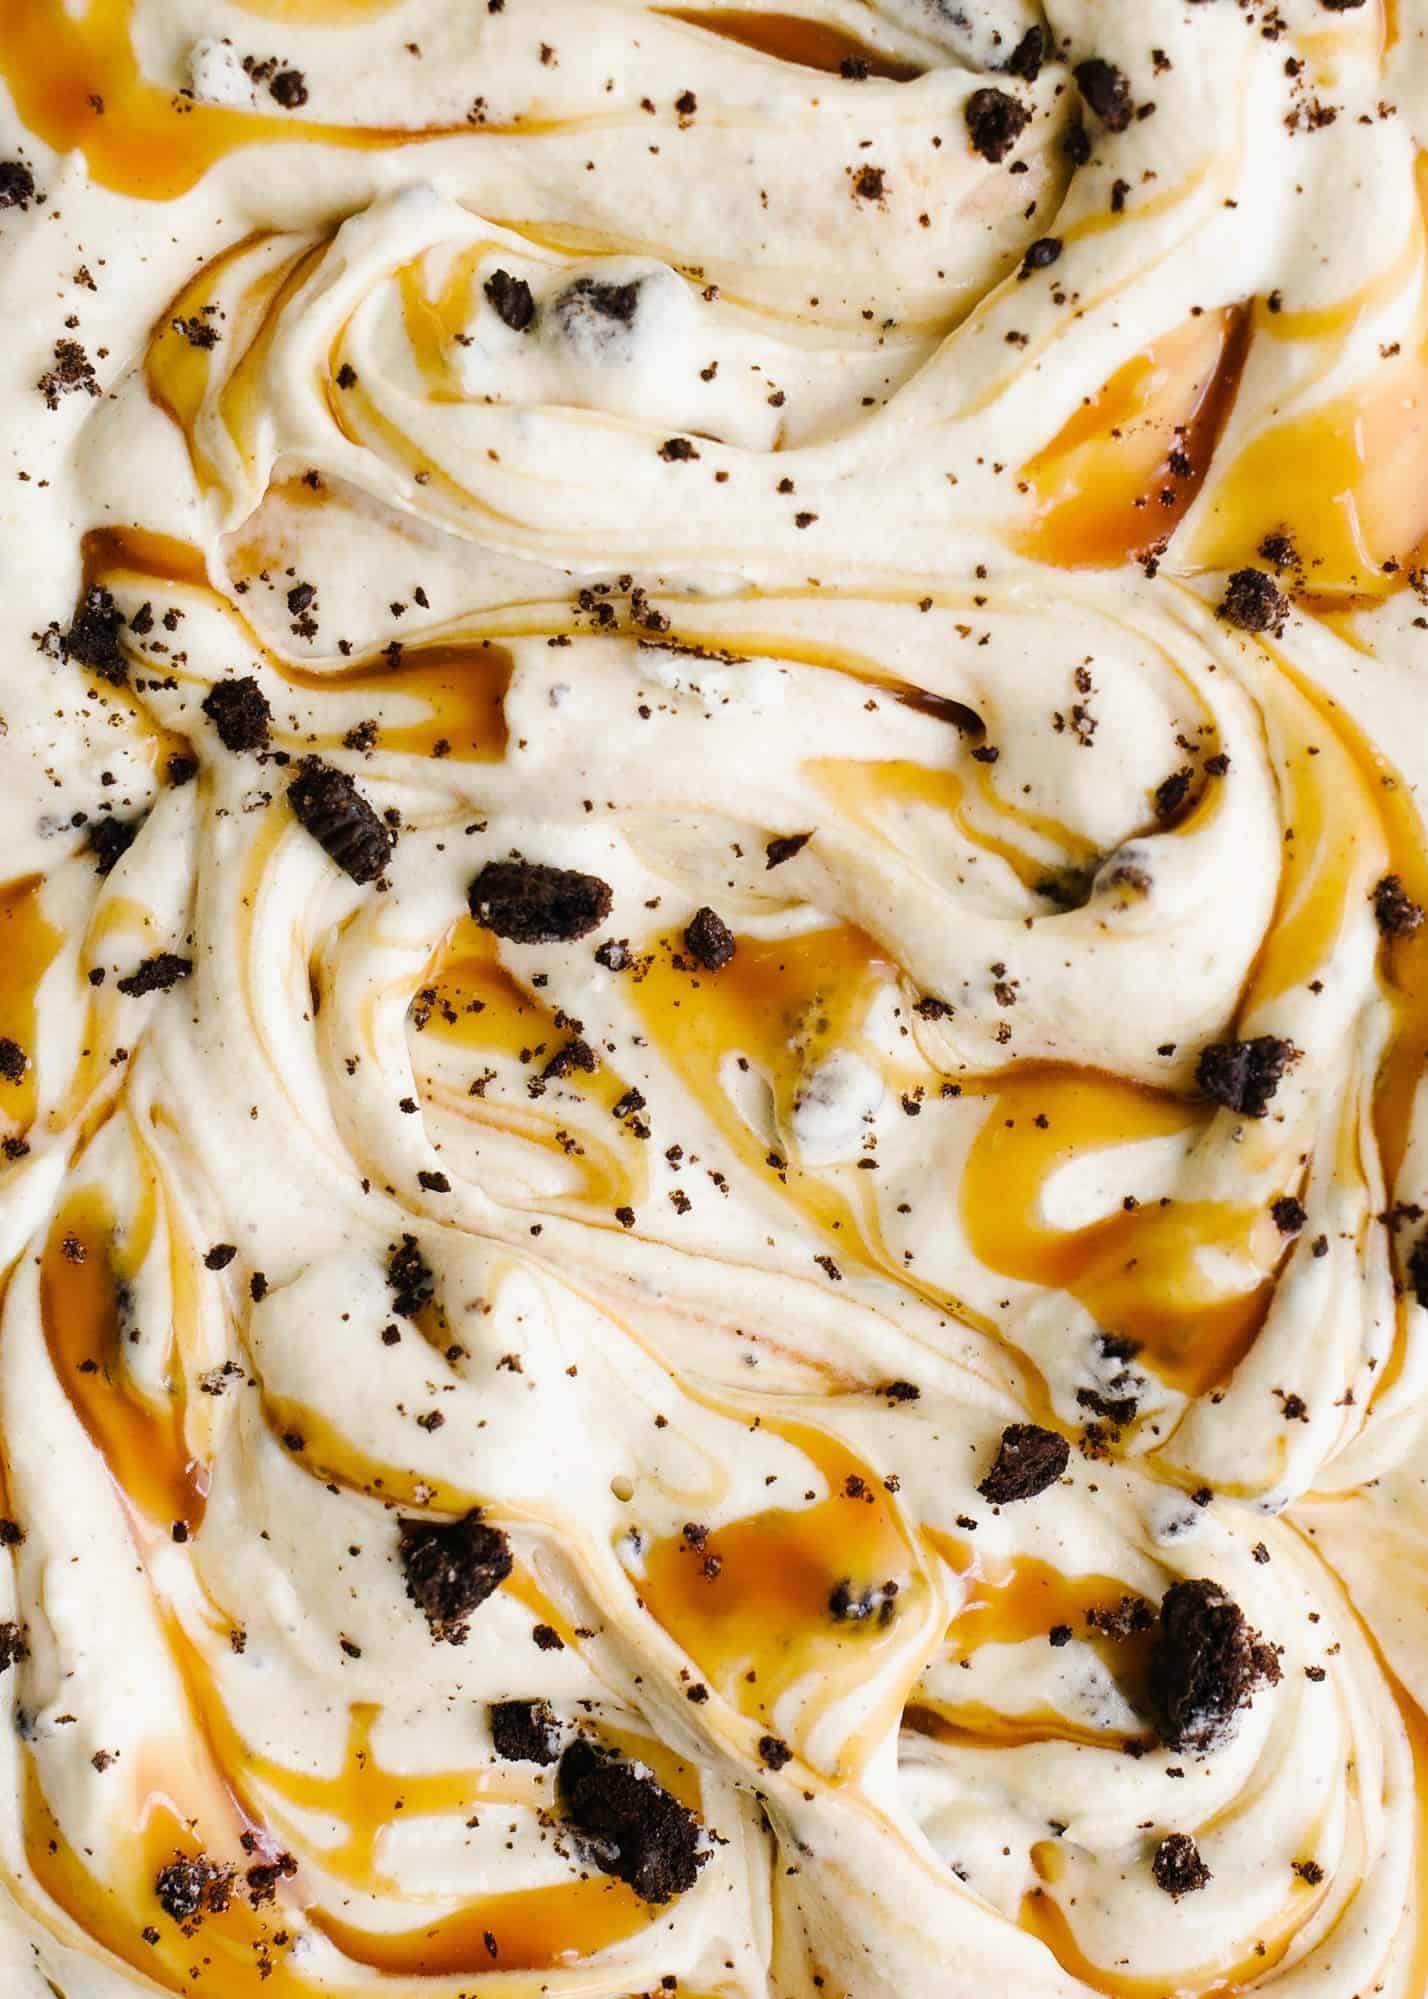
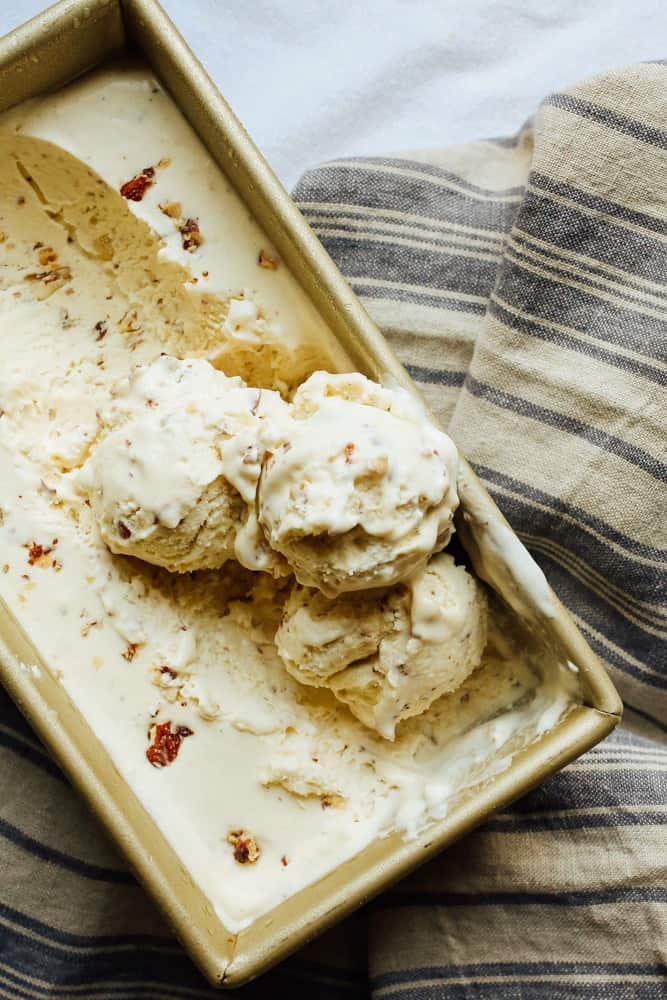
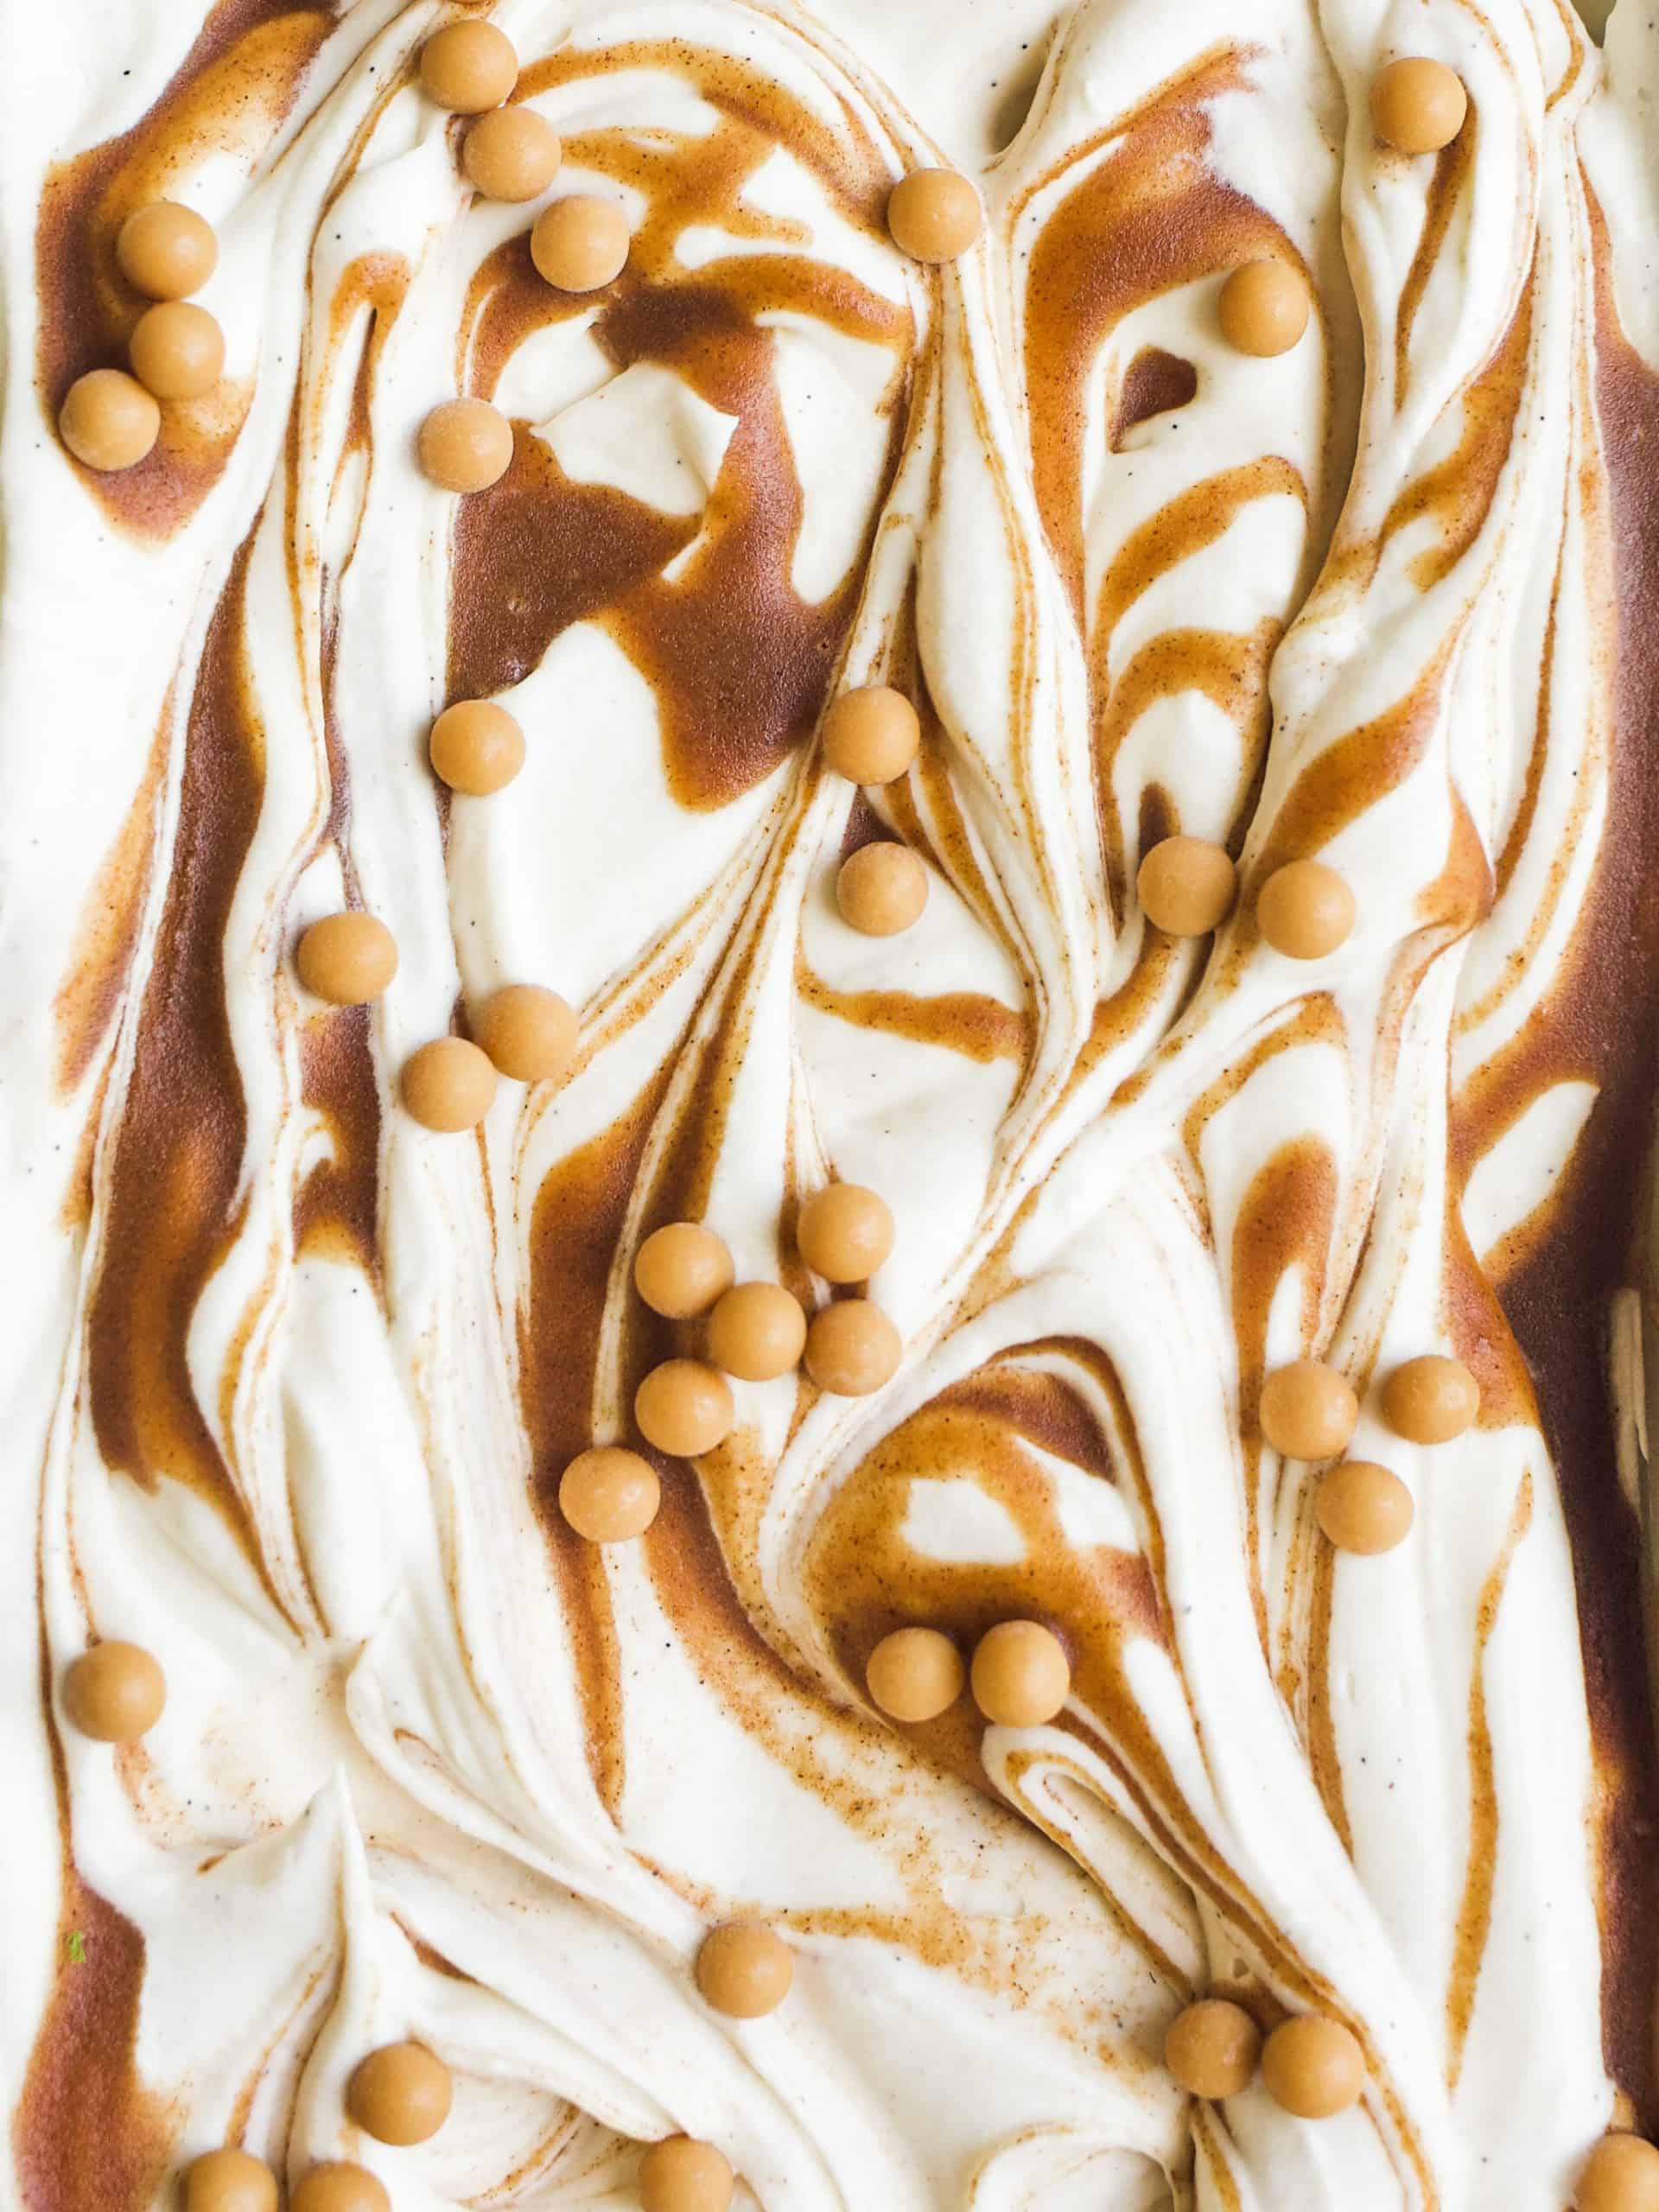
Attention all peanut butter lovers! This peanut butter caramel ice cream has bits of chocolate sandwich cookies and is, to this day, one of my all-time faves.
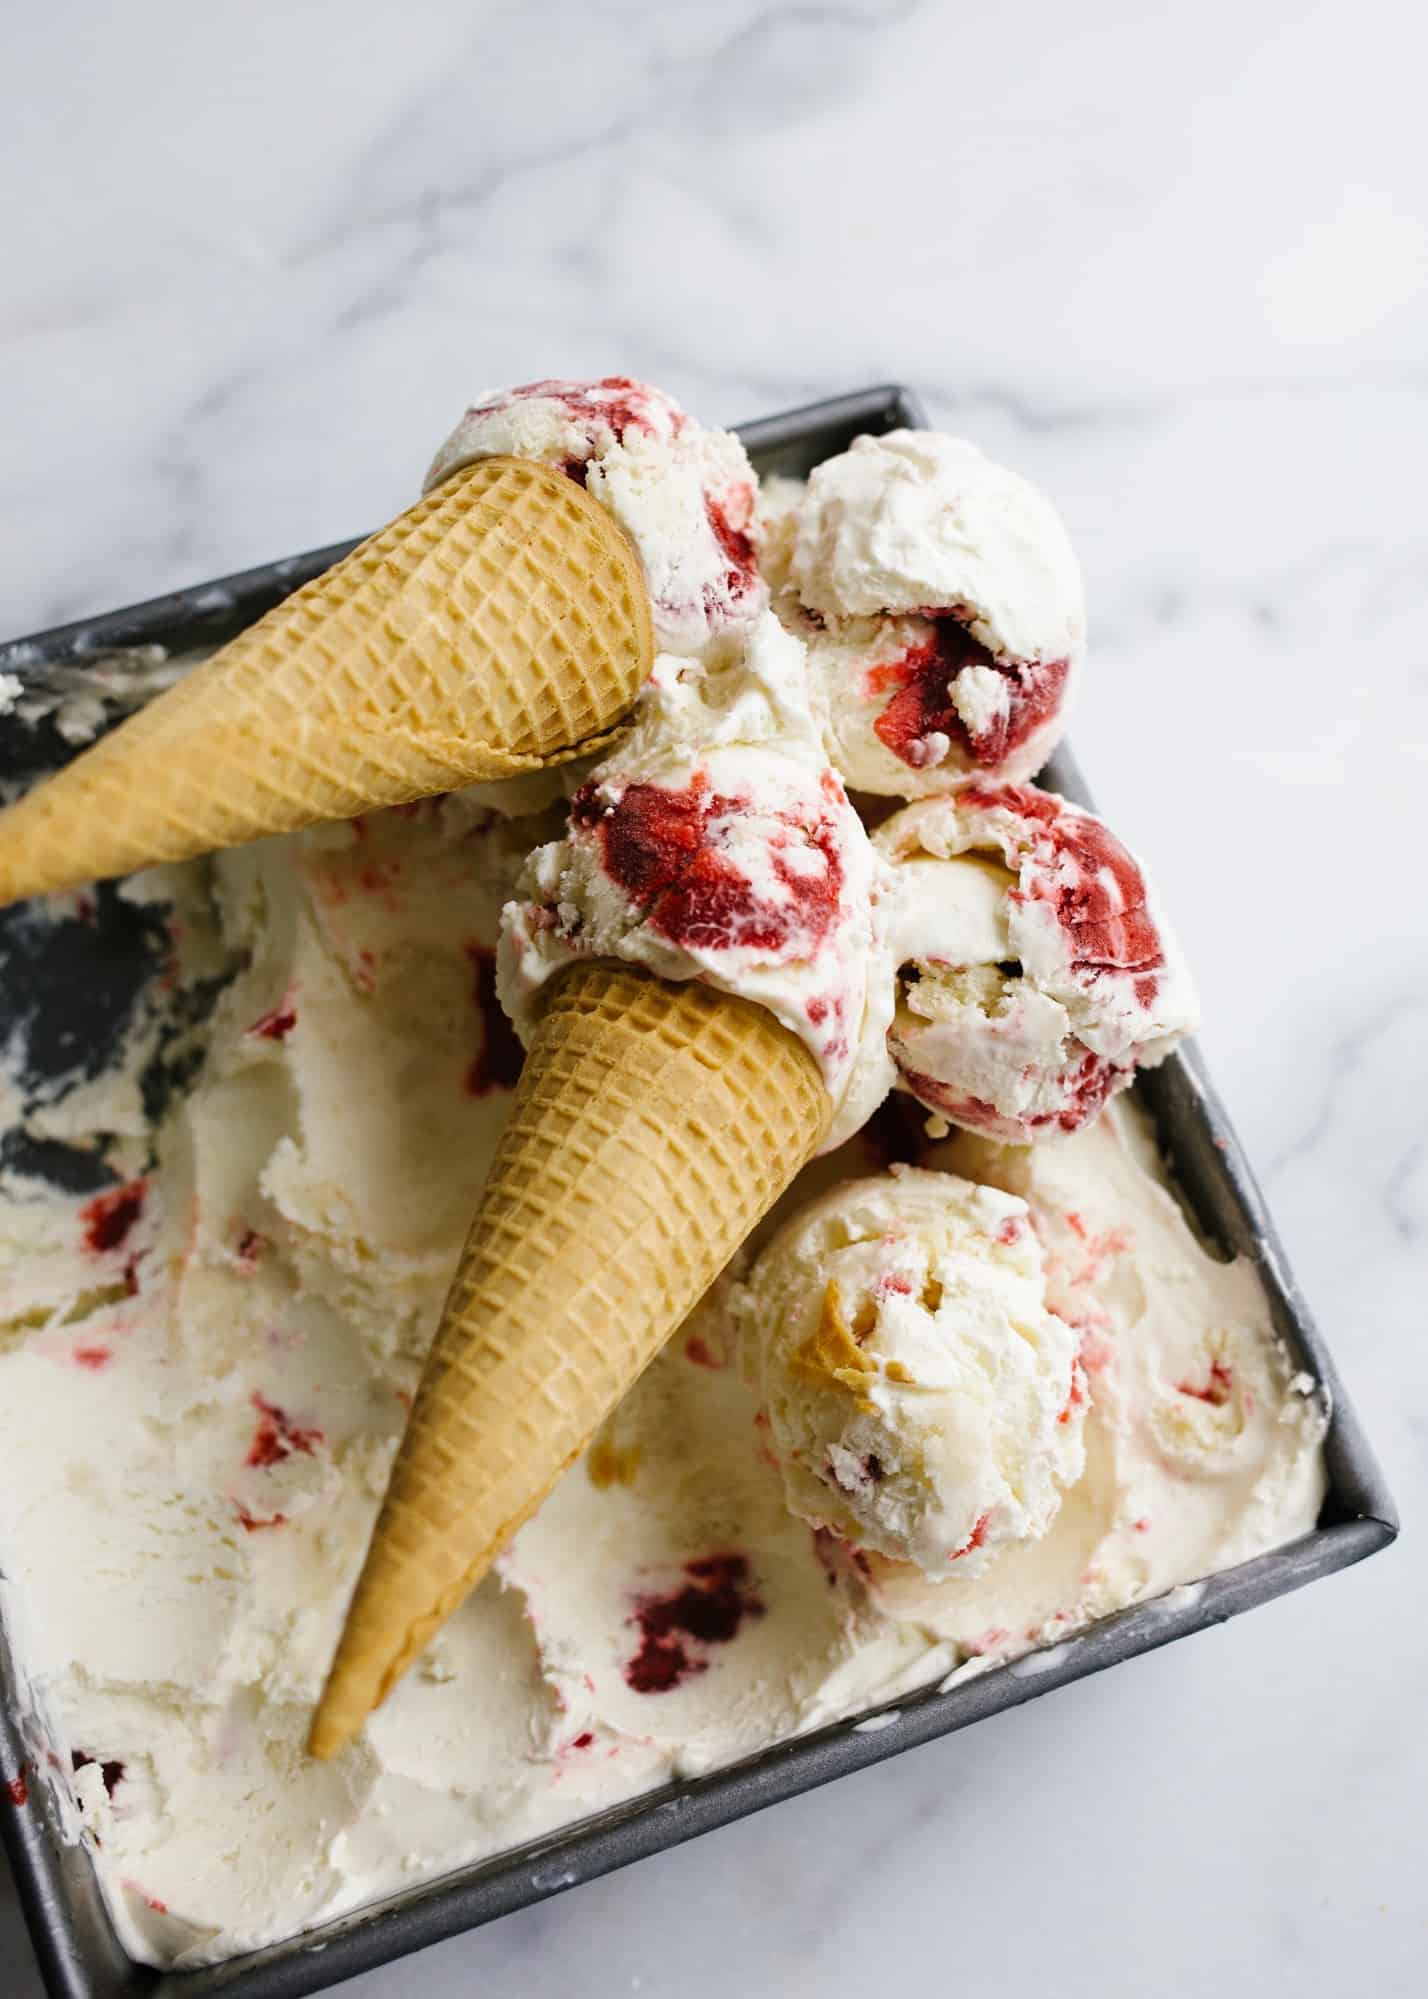
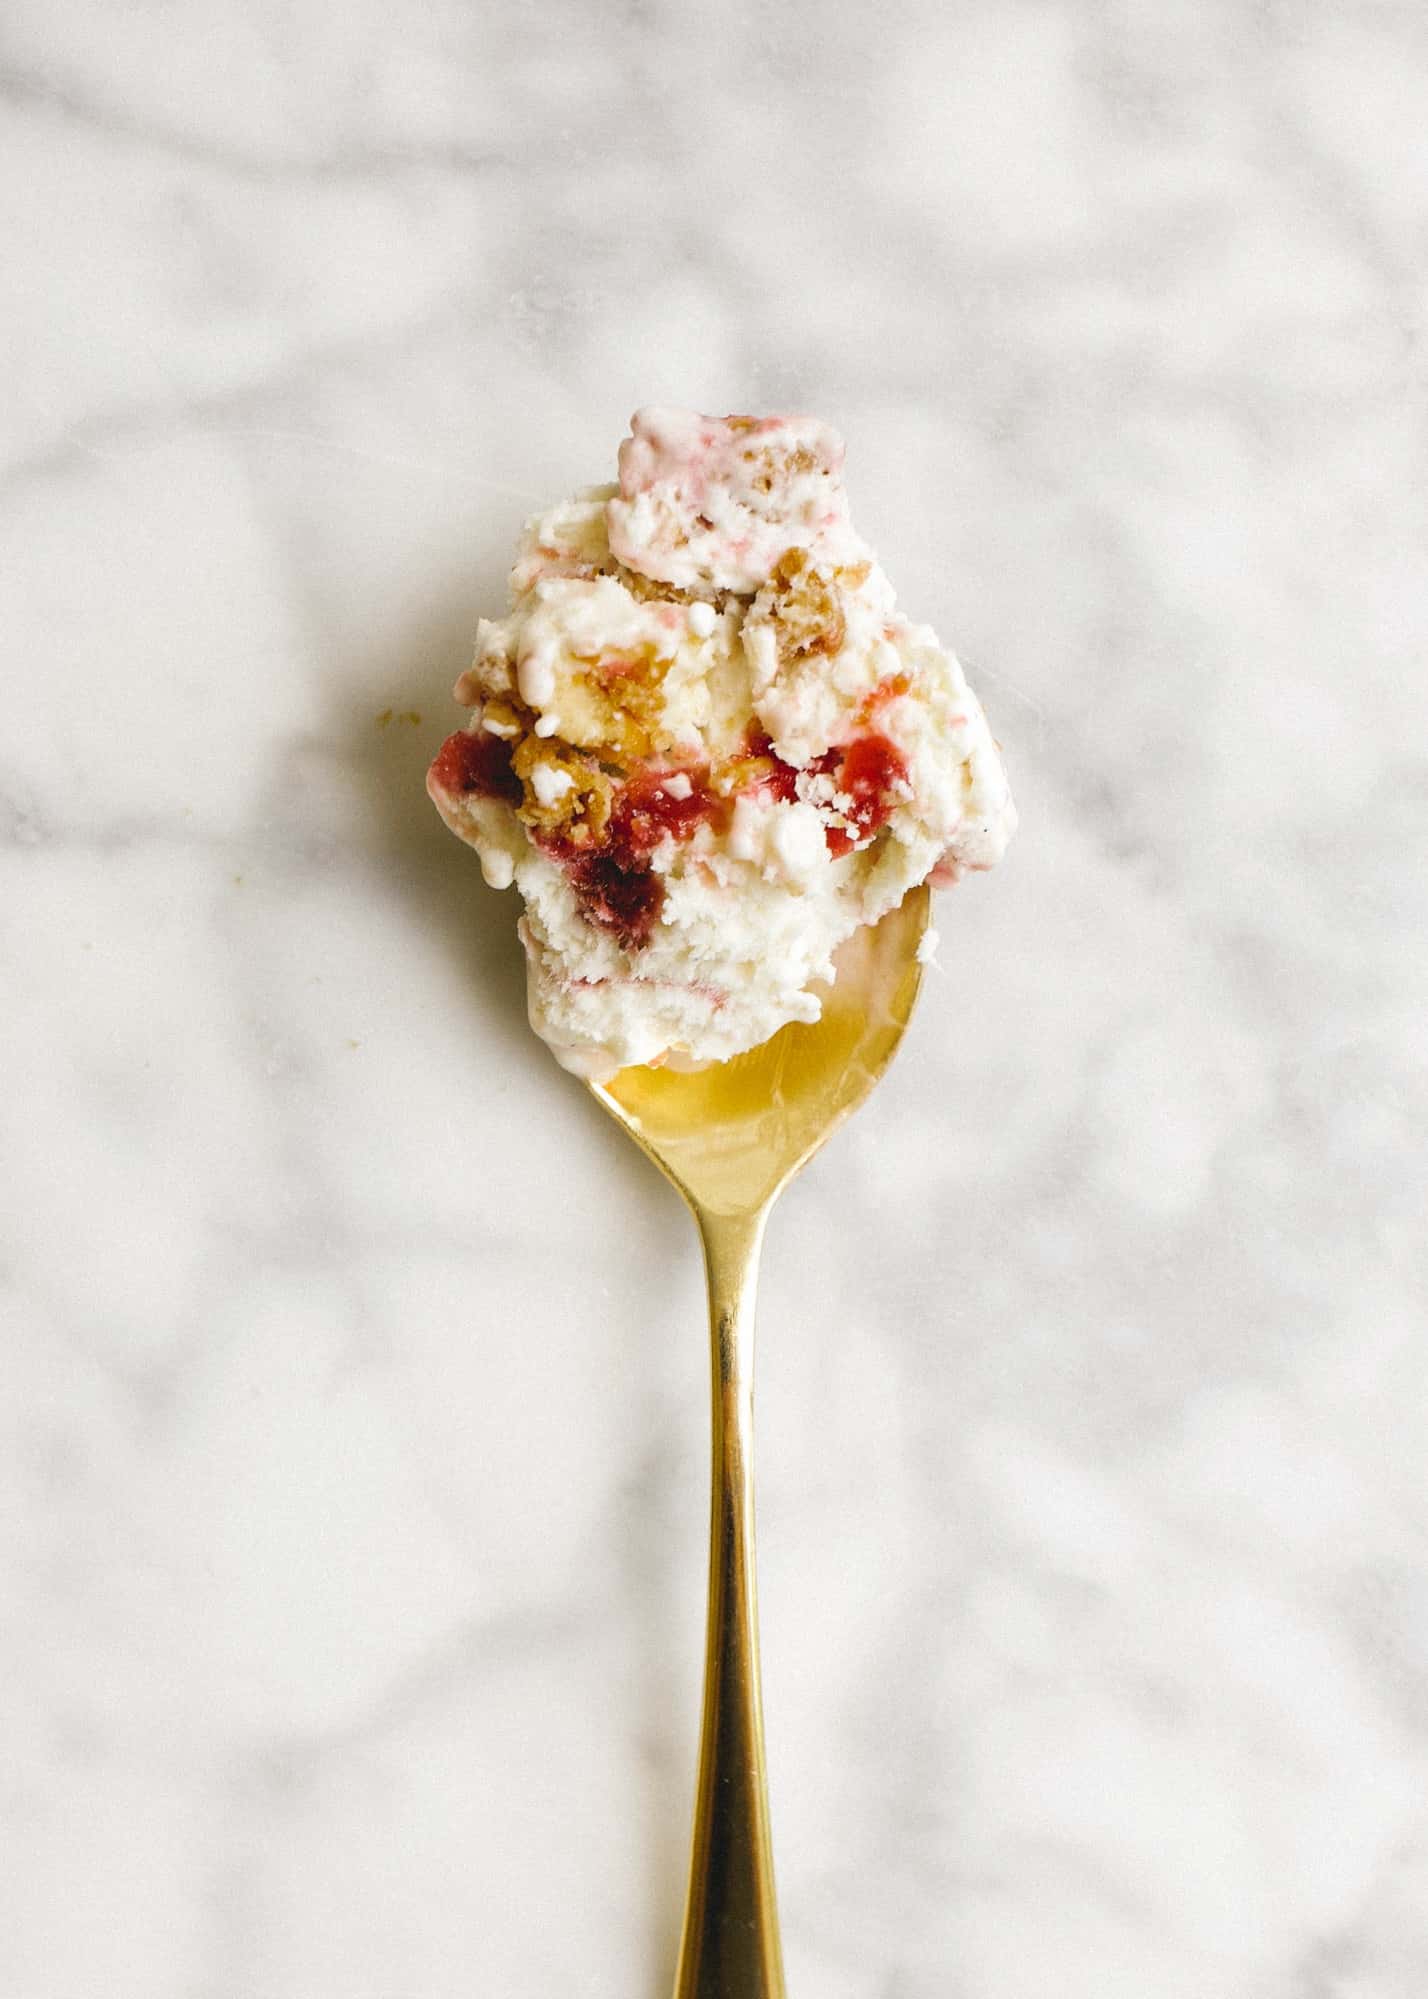
For this Girl Scouts inspired treat, chocolate sauce, coconut flakes, and bits of shortbread cookies combine to create a dream of a no-churn ice cream!
No-churn ice creams are a great way to start making homemade frozen desserts. If you have a favorite of your own, please share them with me! In the meantime, happy baking!
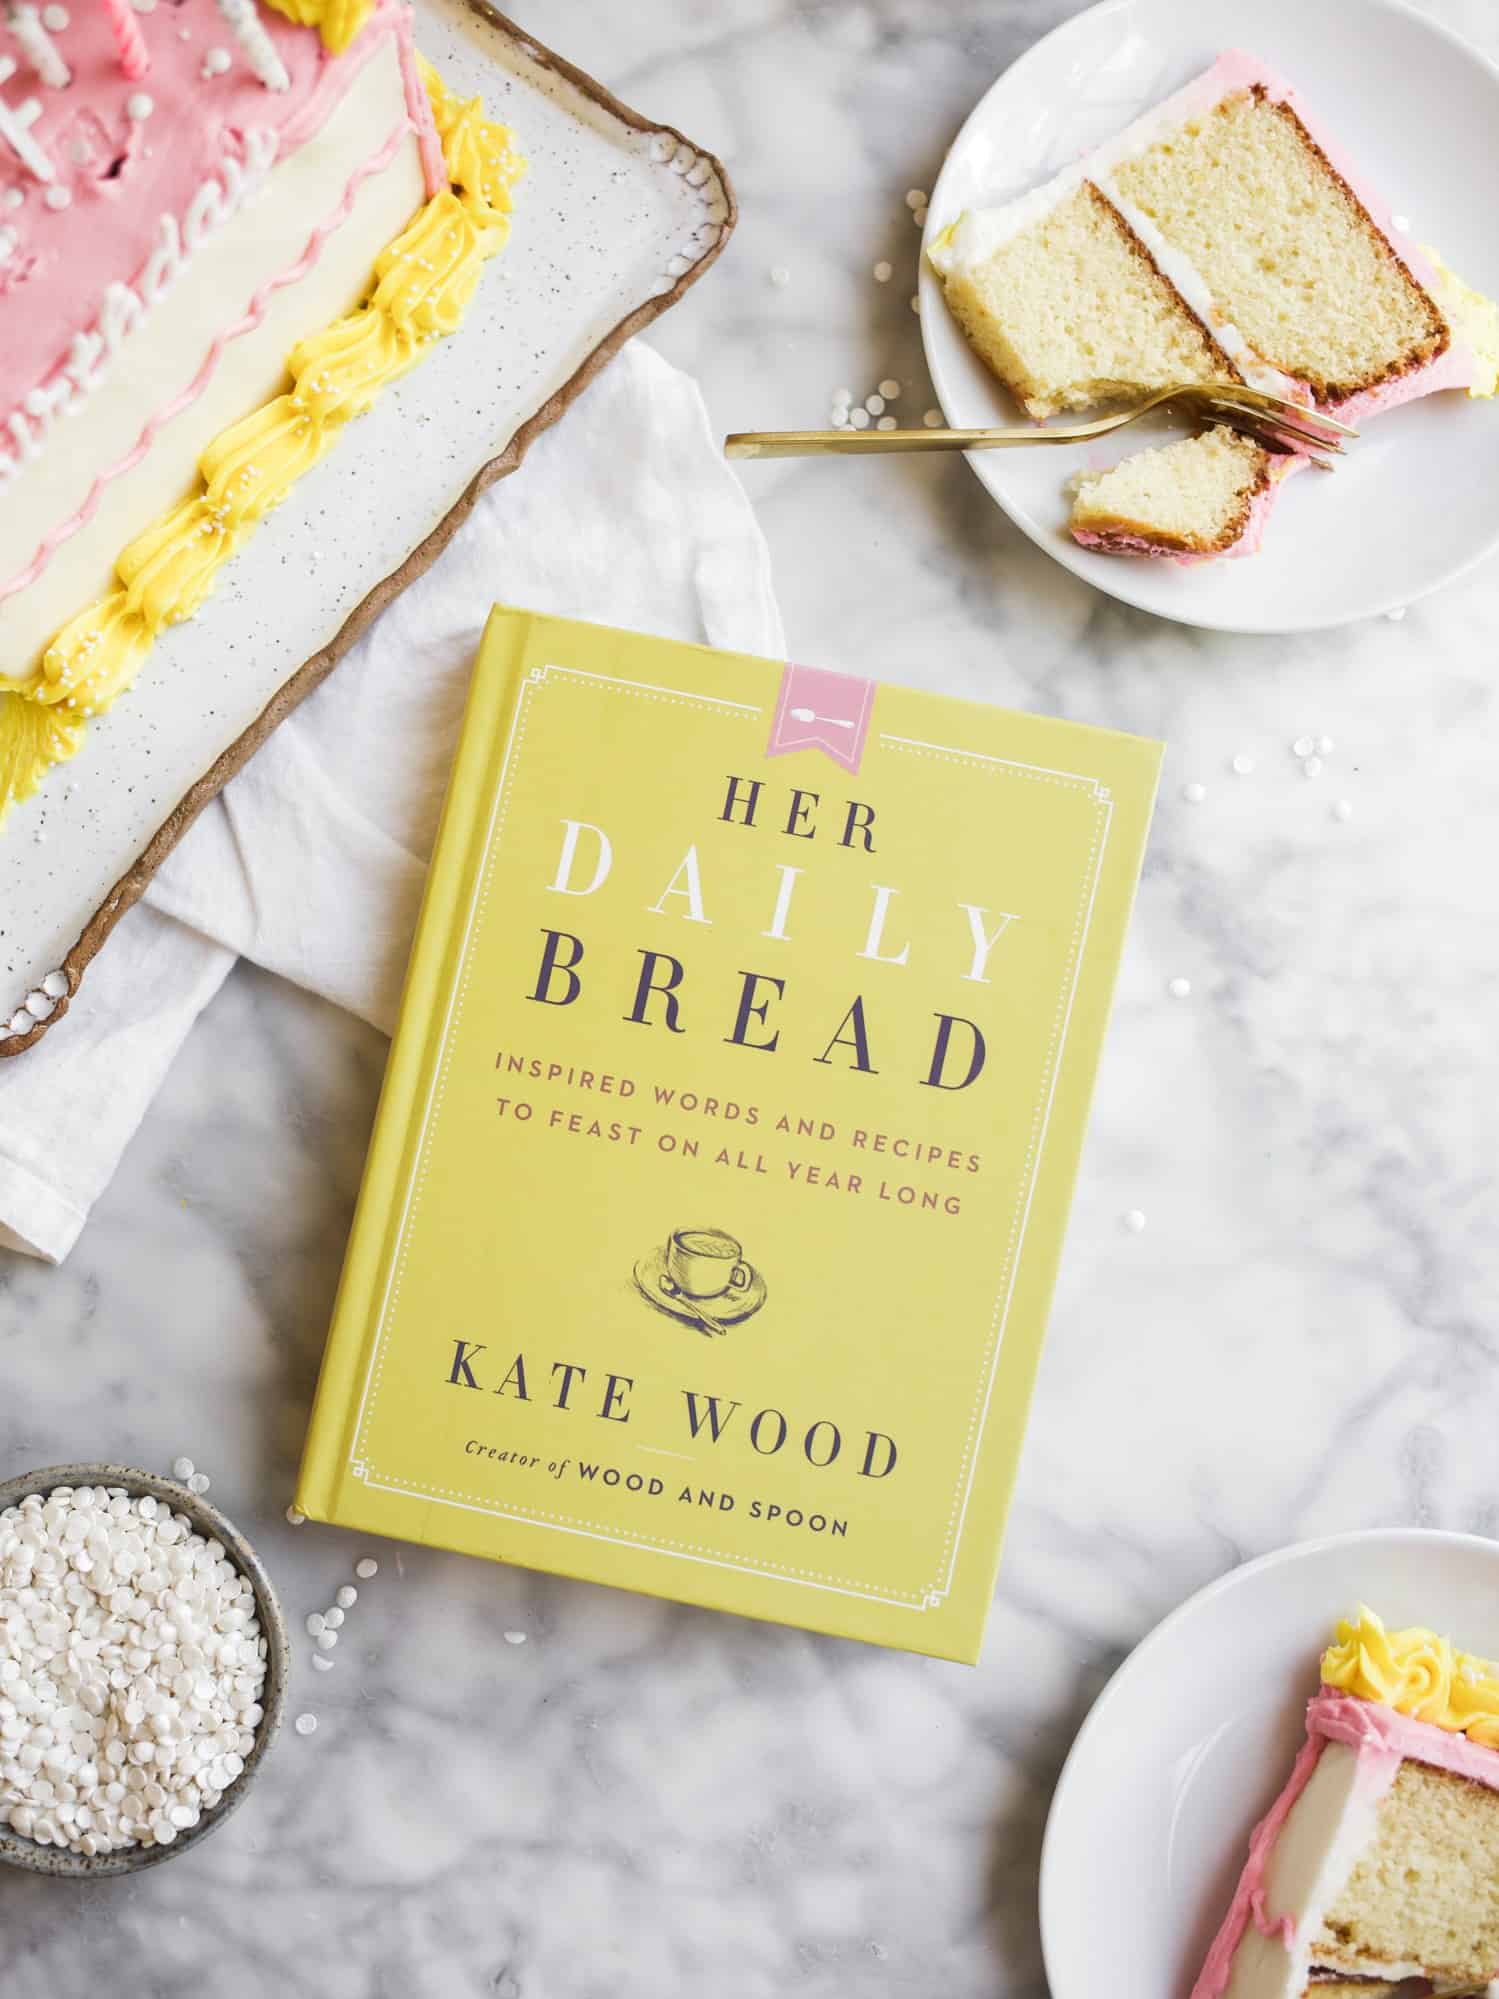
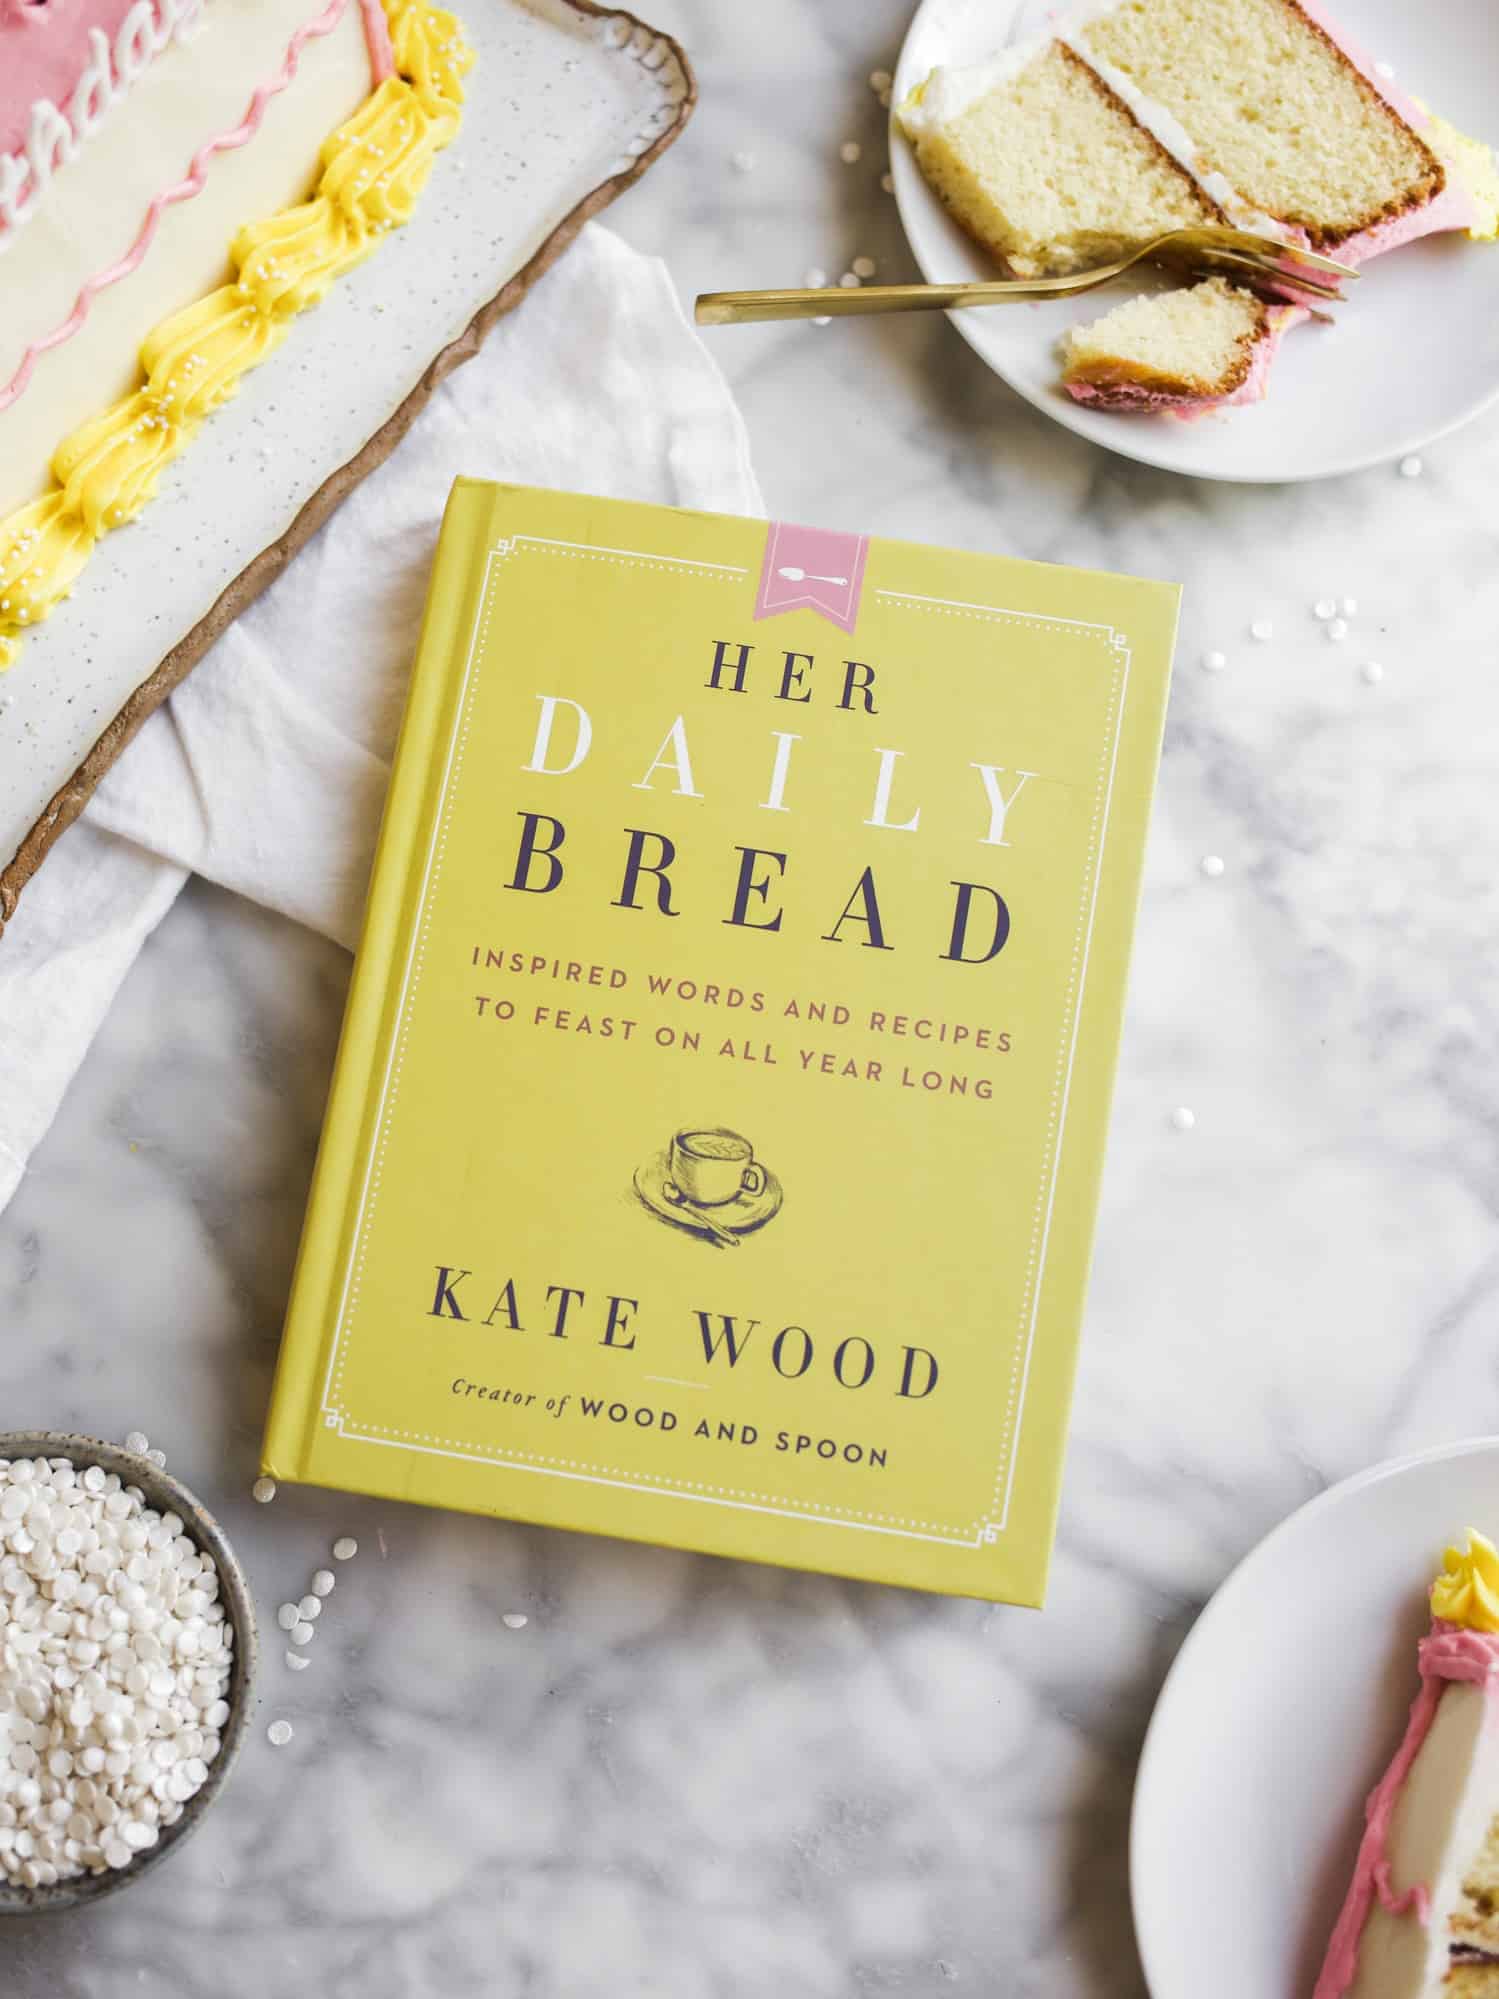
There’s been no shortage of celebration around here. With the school year ending, Mother’s Day, my anniversary, and a few family birthdays, we have been partying non-stop. Honestly, it’s been wonderful and exhausting. I’m simultaneously excited for a lull in our calendar and chomping at the bit to begin planning Charlie’s 3rd birthday. That’s kinda just how things work in our house, and I’m positive I’m not alone in that boat. There are certain types of people who live to honor the everyday (and not-so-everyday!) occasions. If that’s you, you’re going to love today’s post. I’m sharing a terrific half birthday cake tutorial and recipe in honor of this week’s celebration, the half birthday of my first book, Her Daily Bread. Cheers!
Say it with me: HAPPY BIRTHDAY!
Yes, my baby book is already 6 months old. Writing, editing, and releasing the book was such a labor of love that the aftermath has had a few baby blues attached to it. What should I be doing to help the book along? What in the world do I do next? Like any beginner in most things, I’m just kinda feeling this whole thing out, and that means occasional uncertainty and a few wobbly steps. The truth is, I probably haven’t done this all perfectly, so I’m currently focused on two things: first, learning from this experience in hopes that next time (PLEASE LET THERE BE A NEXT TIME!!) I’ll do it even better, and second, celebrating where I am in the process. So that’s us today: celebrating the process.
Half Birthday Cake
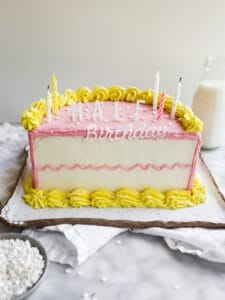
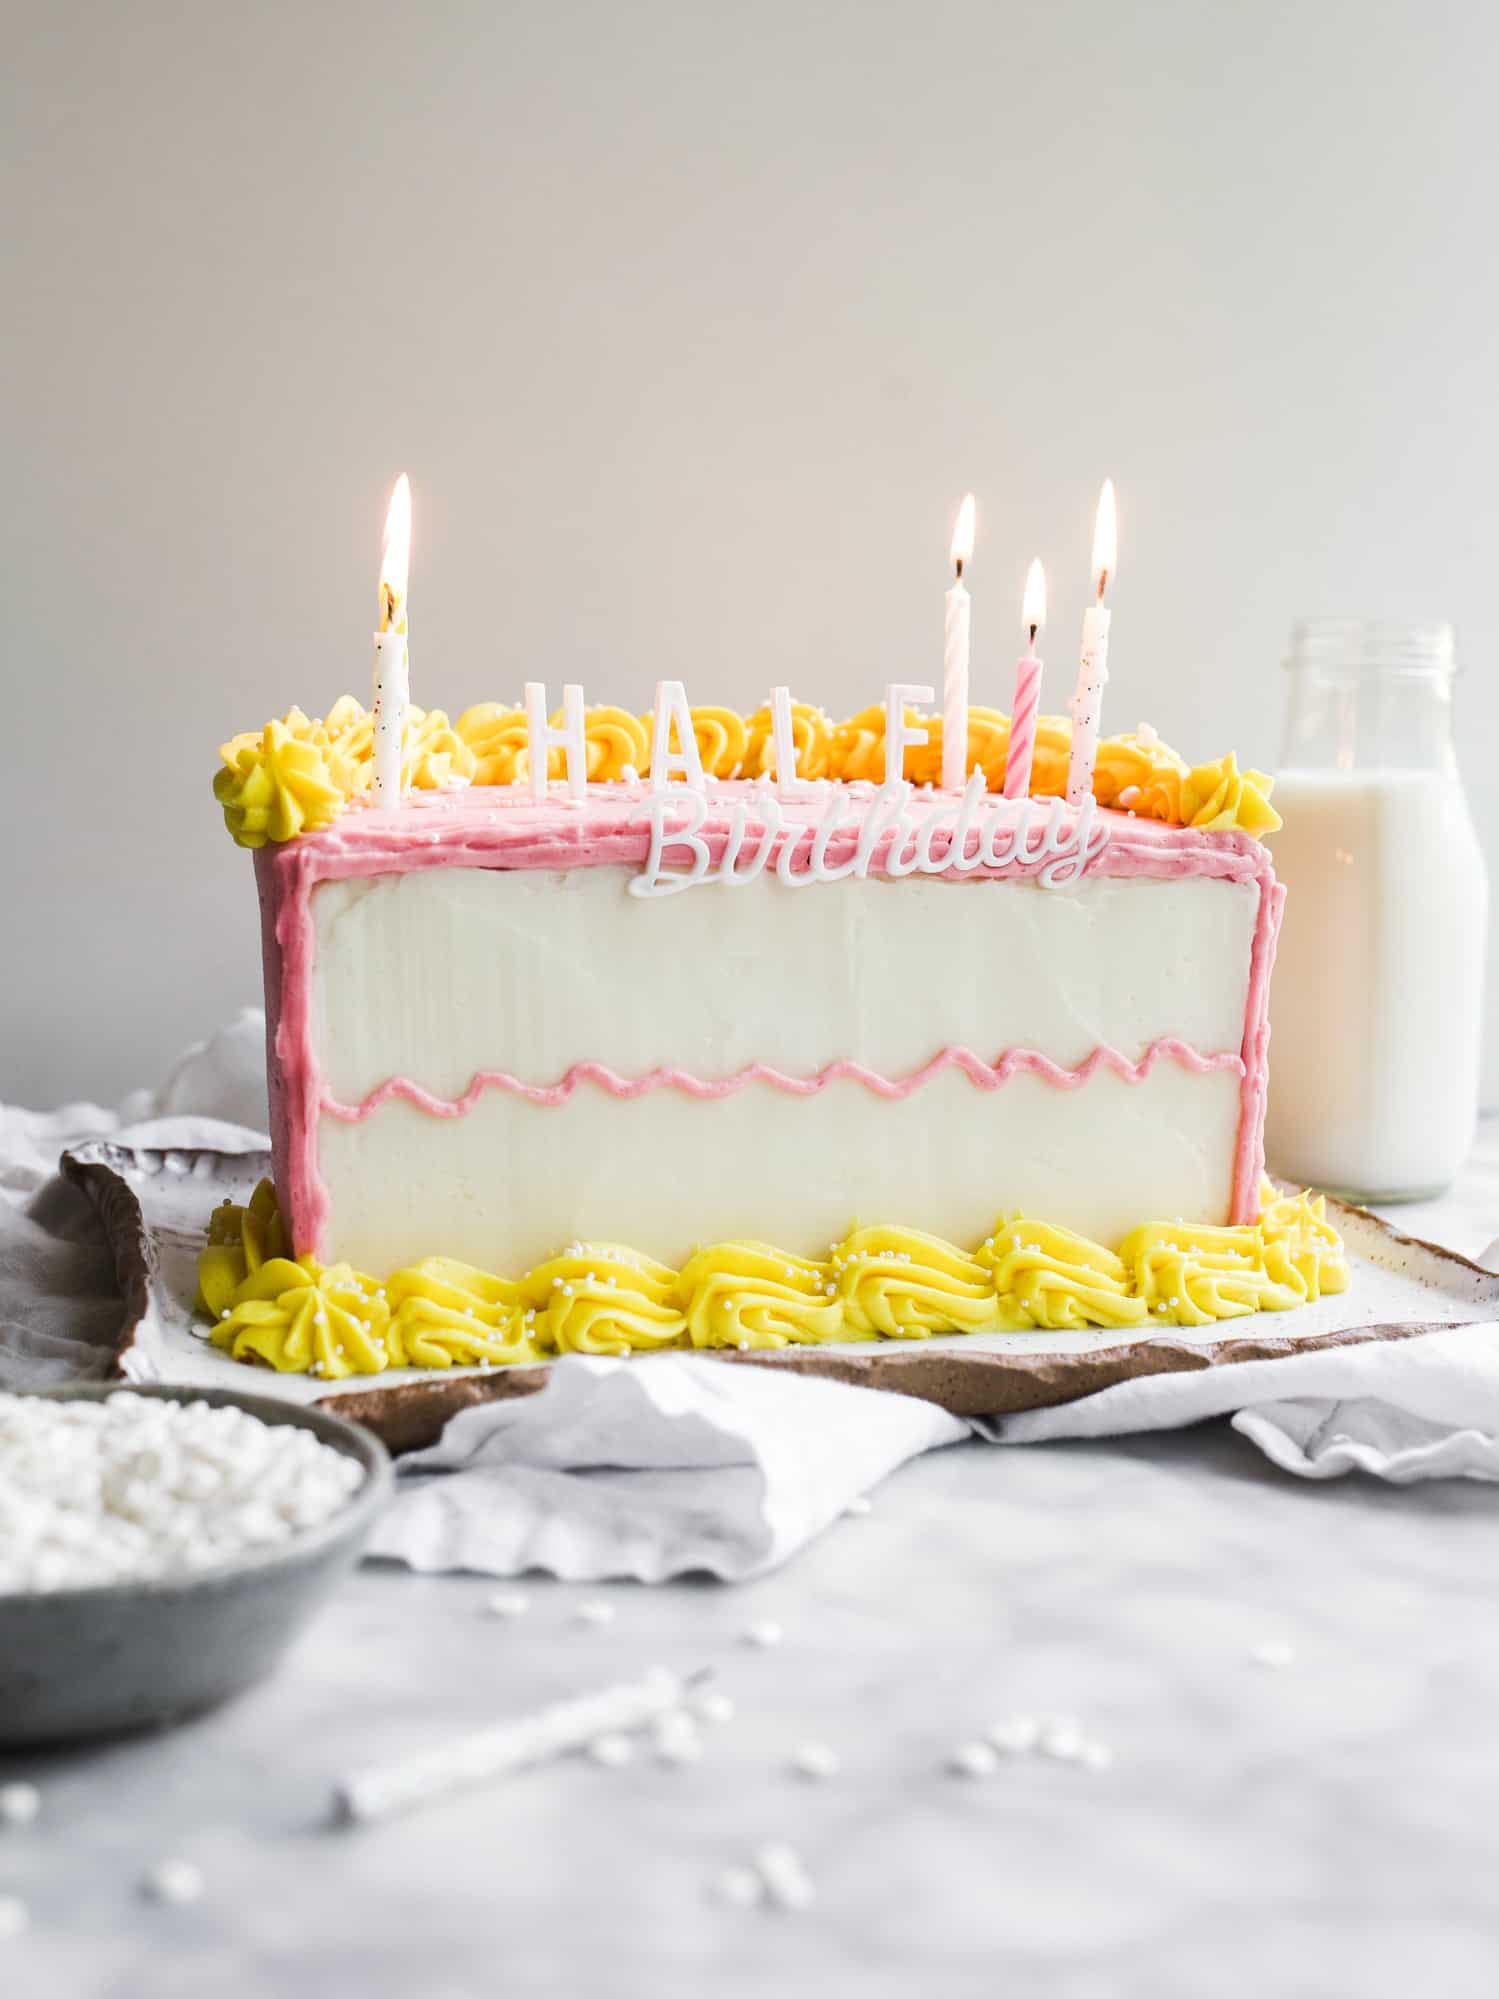
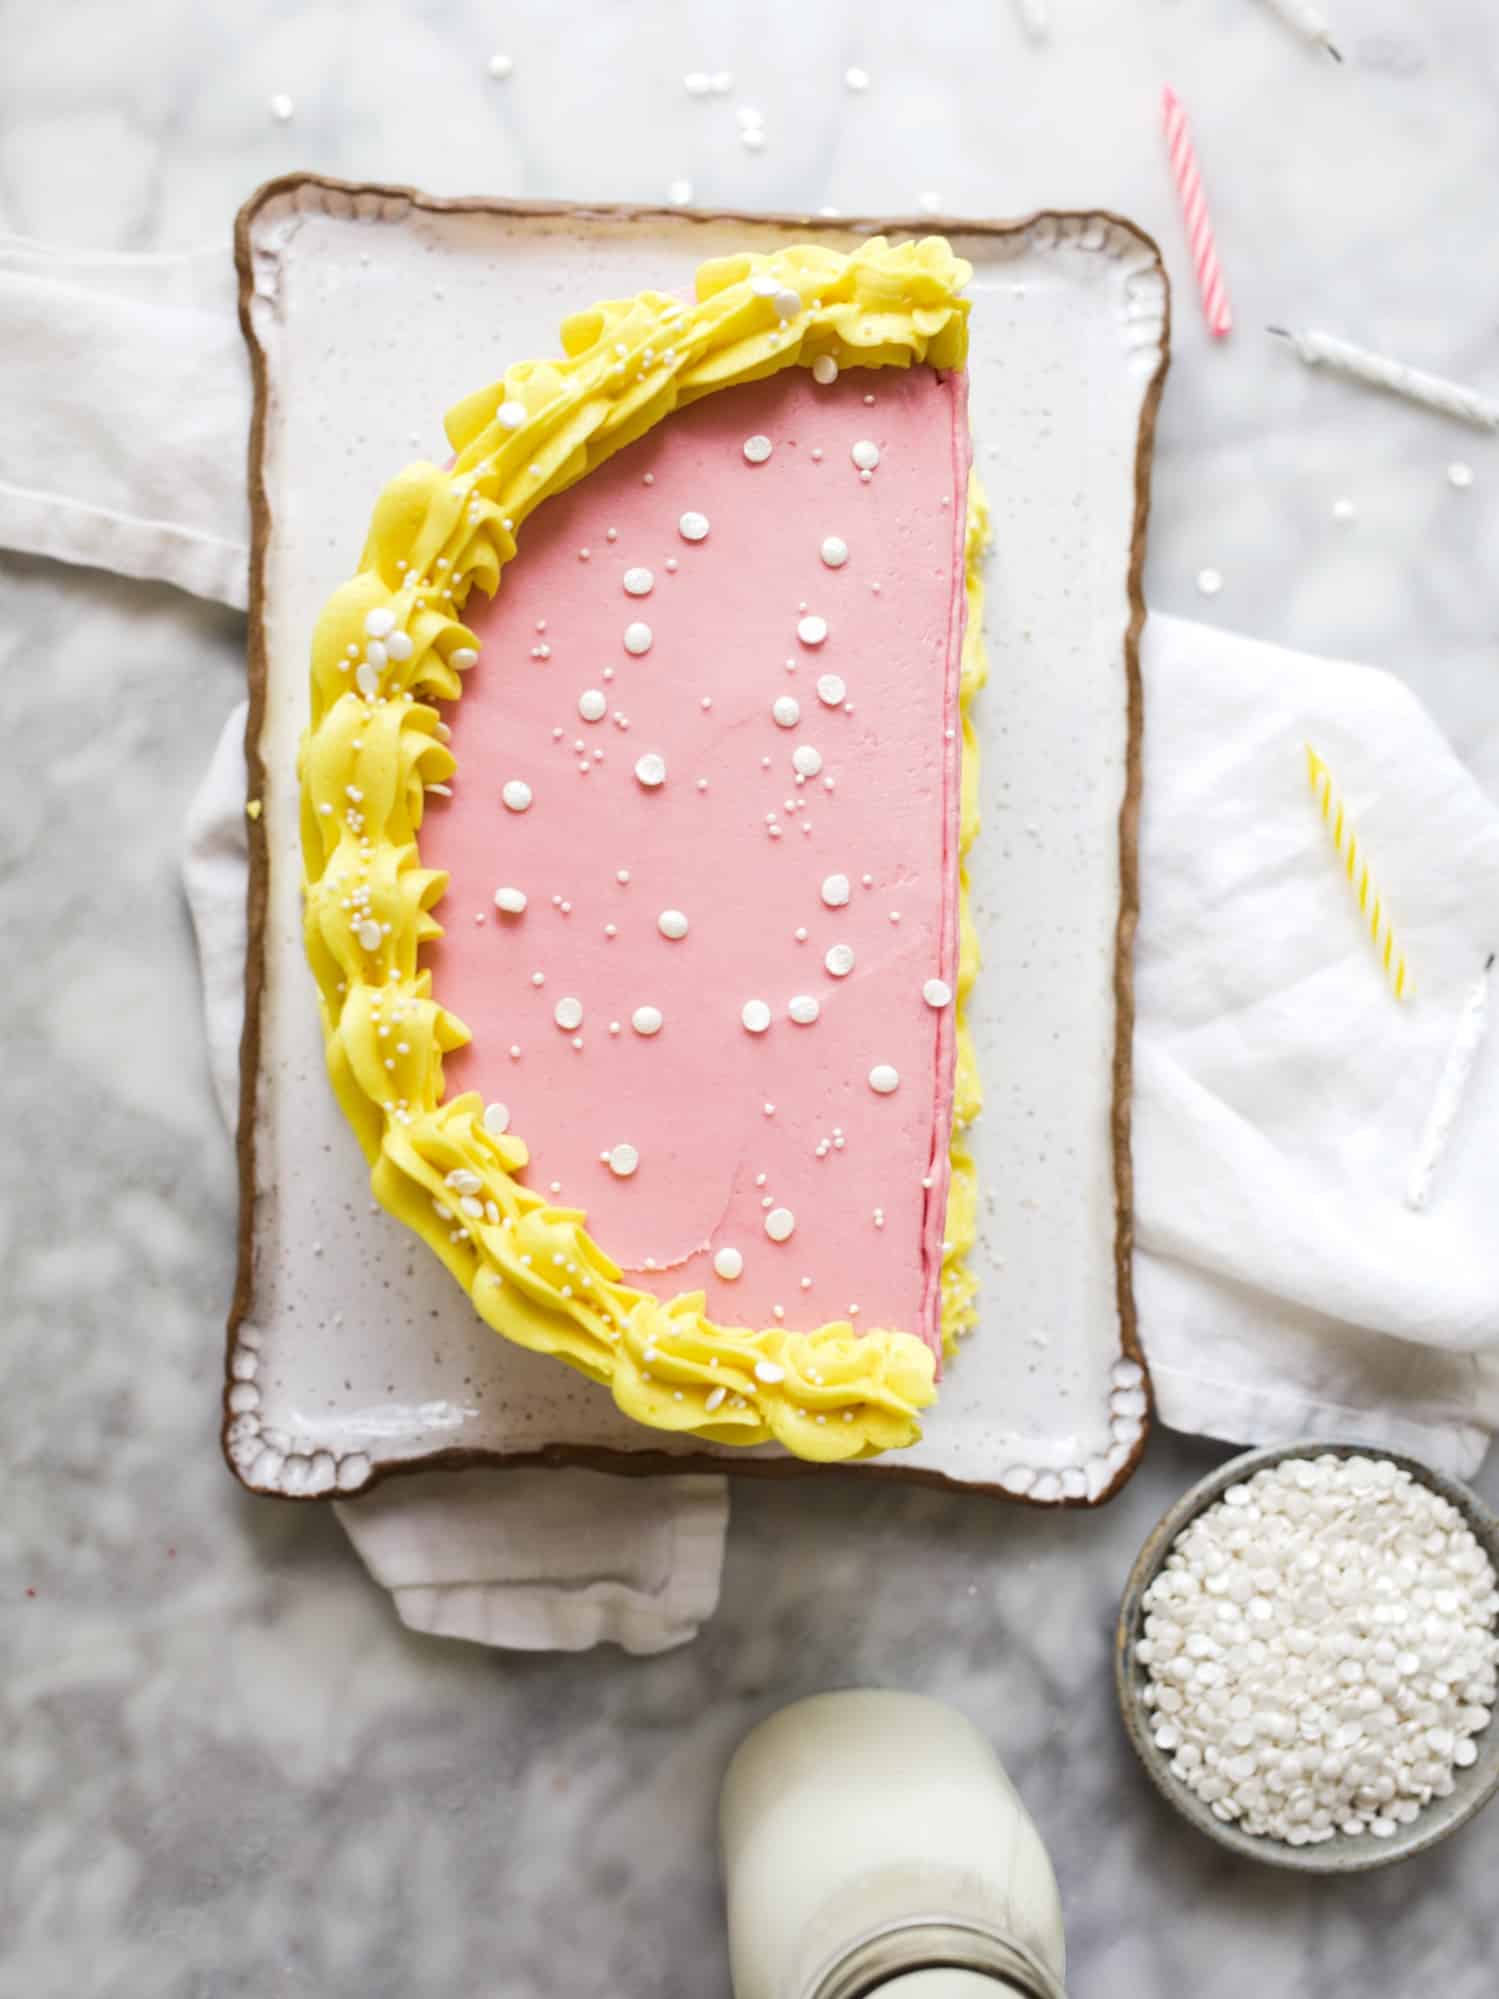
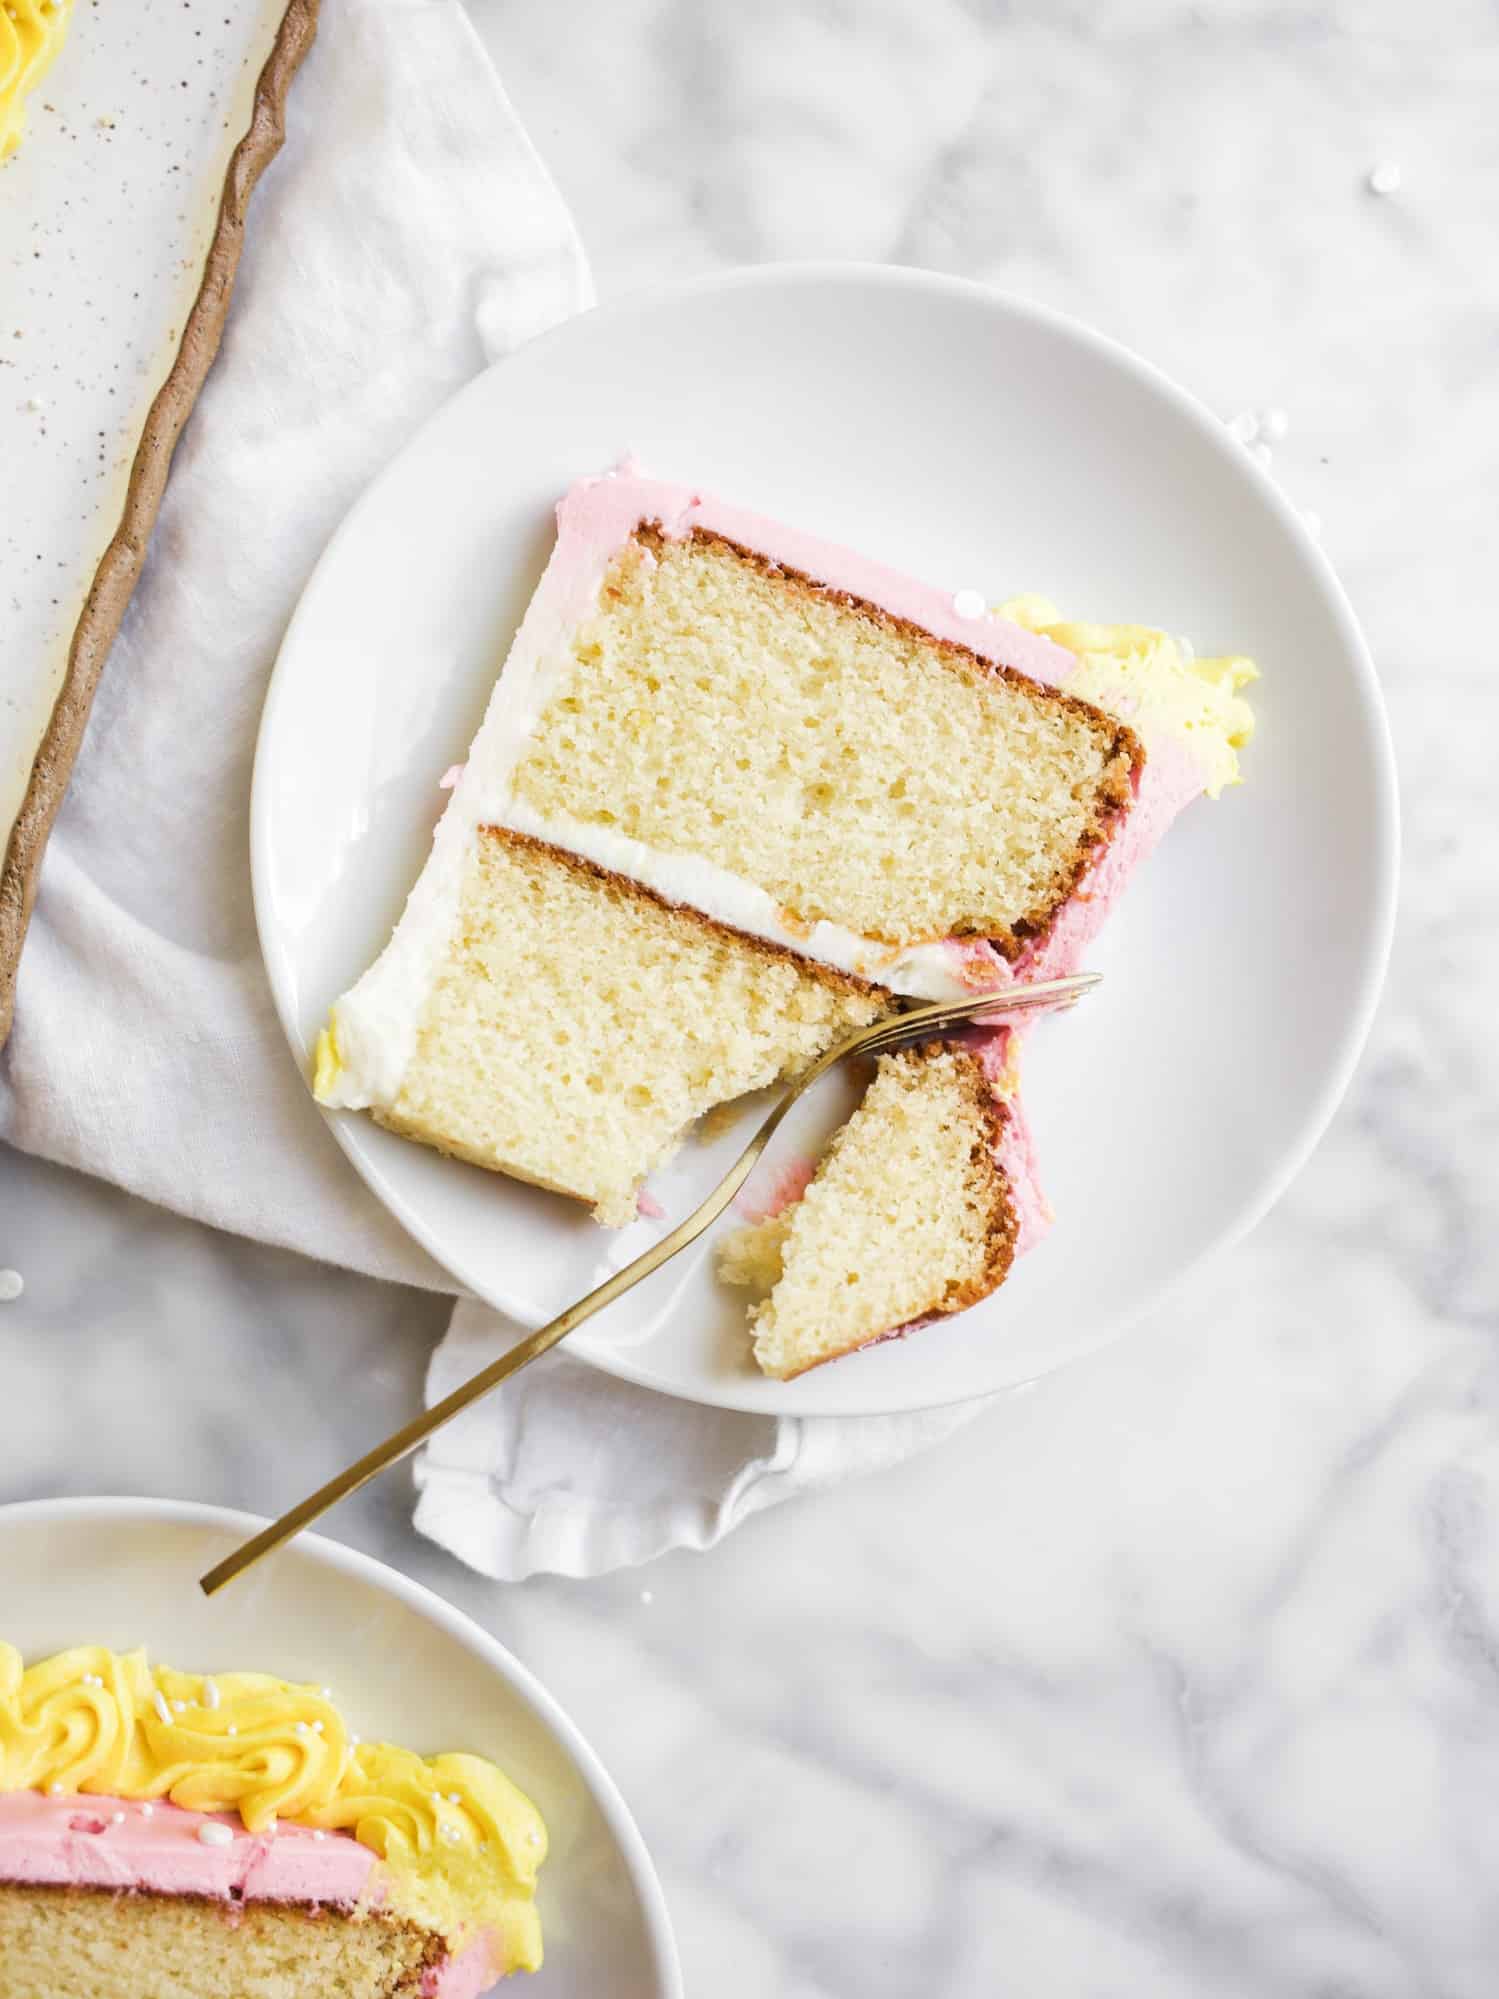
Today marks a half of a year with my book, and we’re celebrating with a half birthday cake. For a long time now, I have loved the idea of a half birthday, and, truthfully, this recipe has been a long time coming. Whether you’re celebrating 6 months with your newborn or honoring the 182nd day of the year, this happy little cake is the perfect way to do it. With just a single round vanilla cake and a bowl full of frosting, you can honor whatever (or whoever!) you have in process.
How to Make It
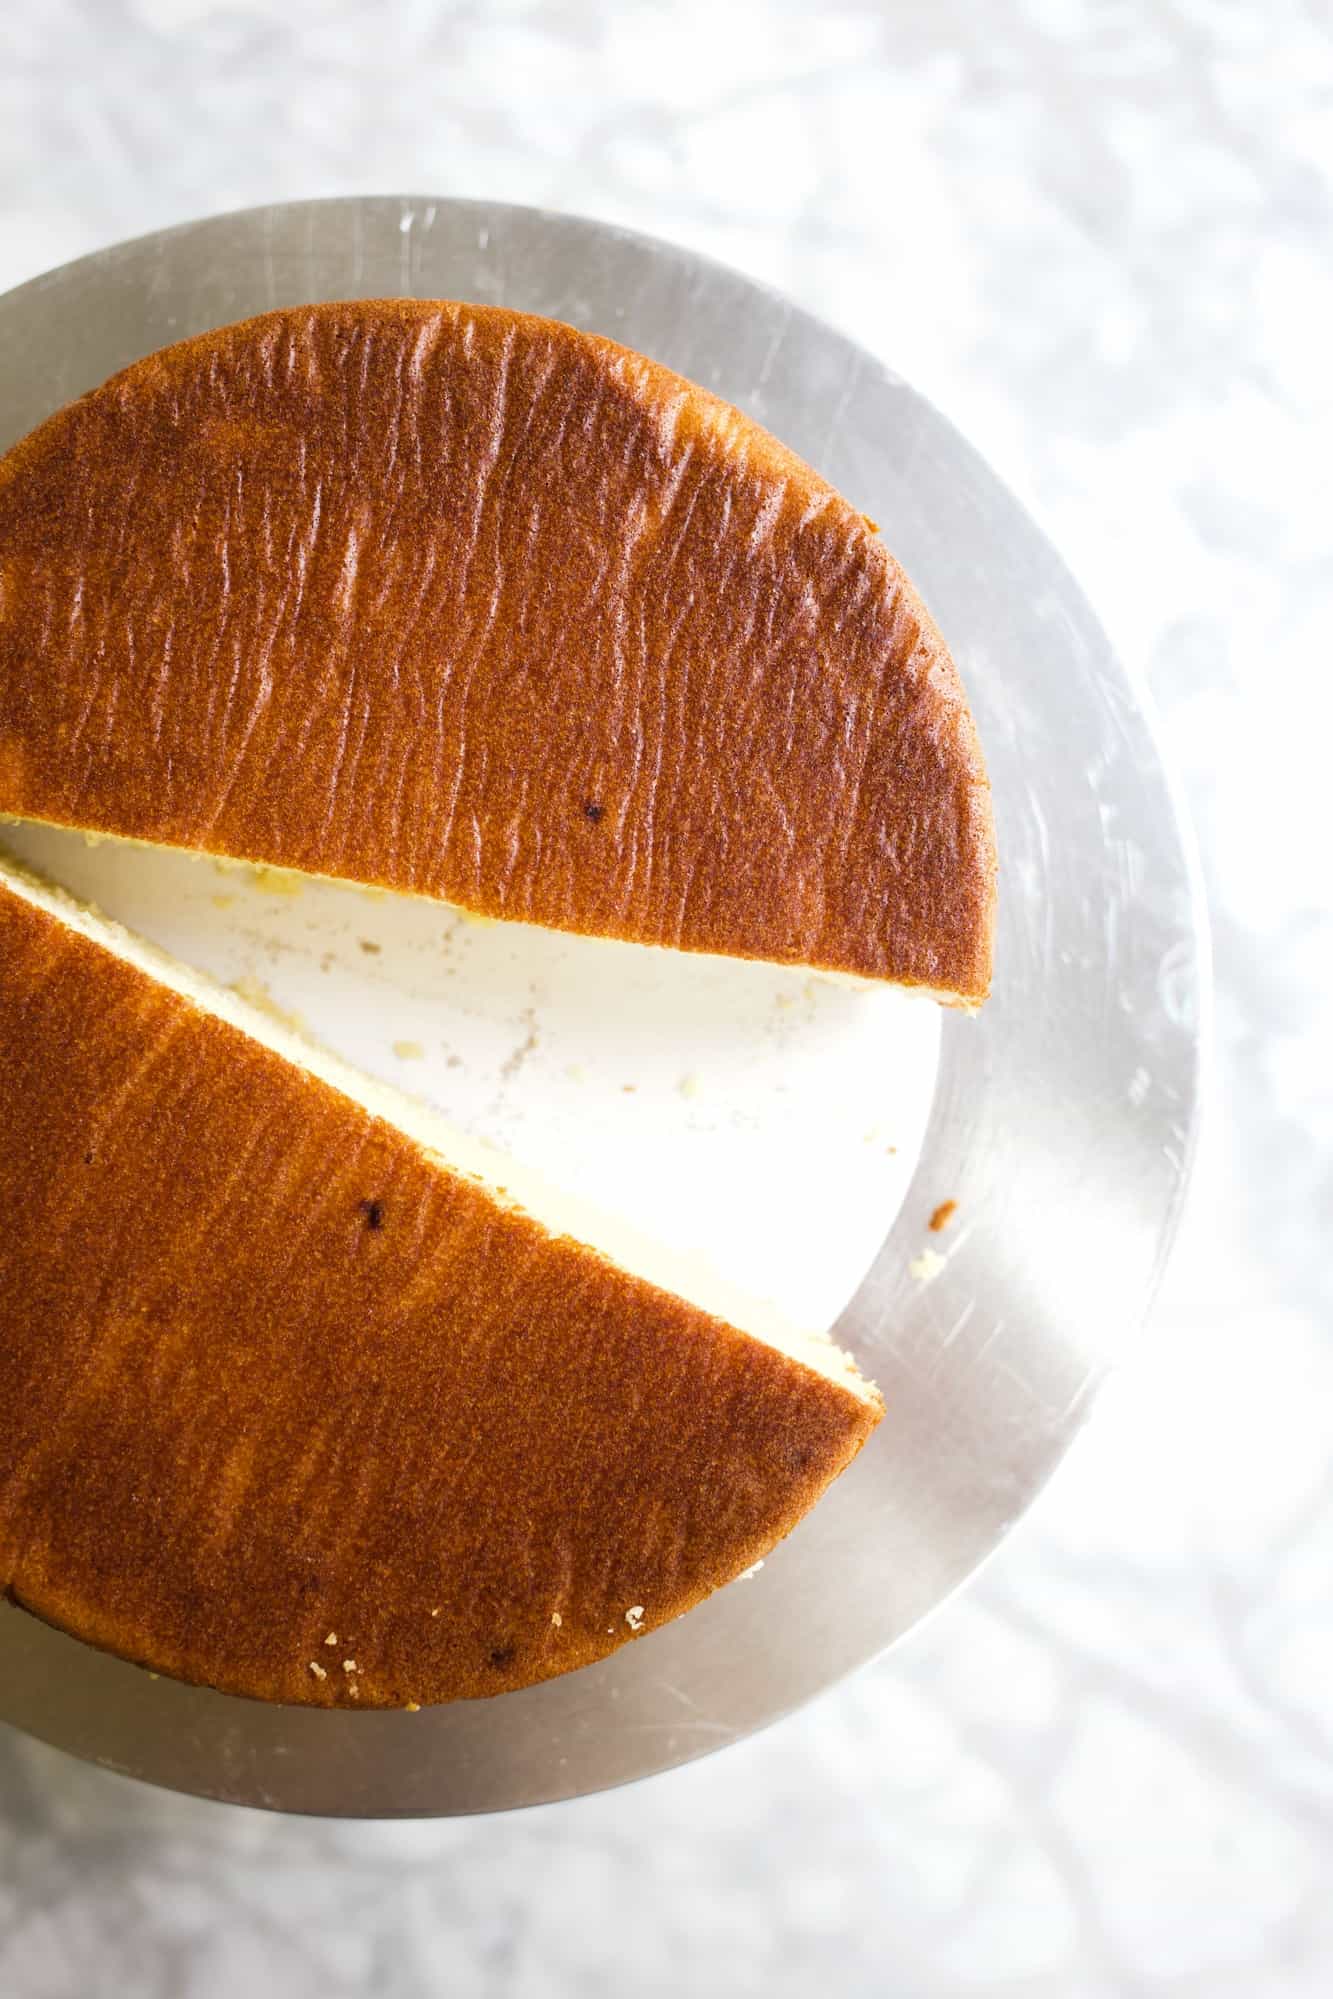
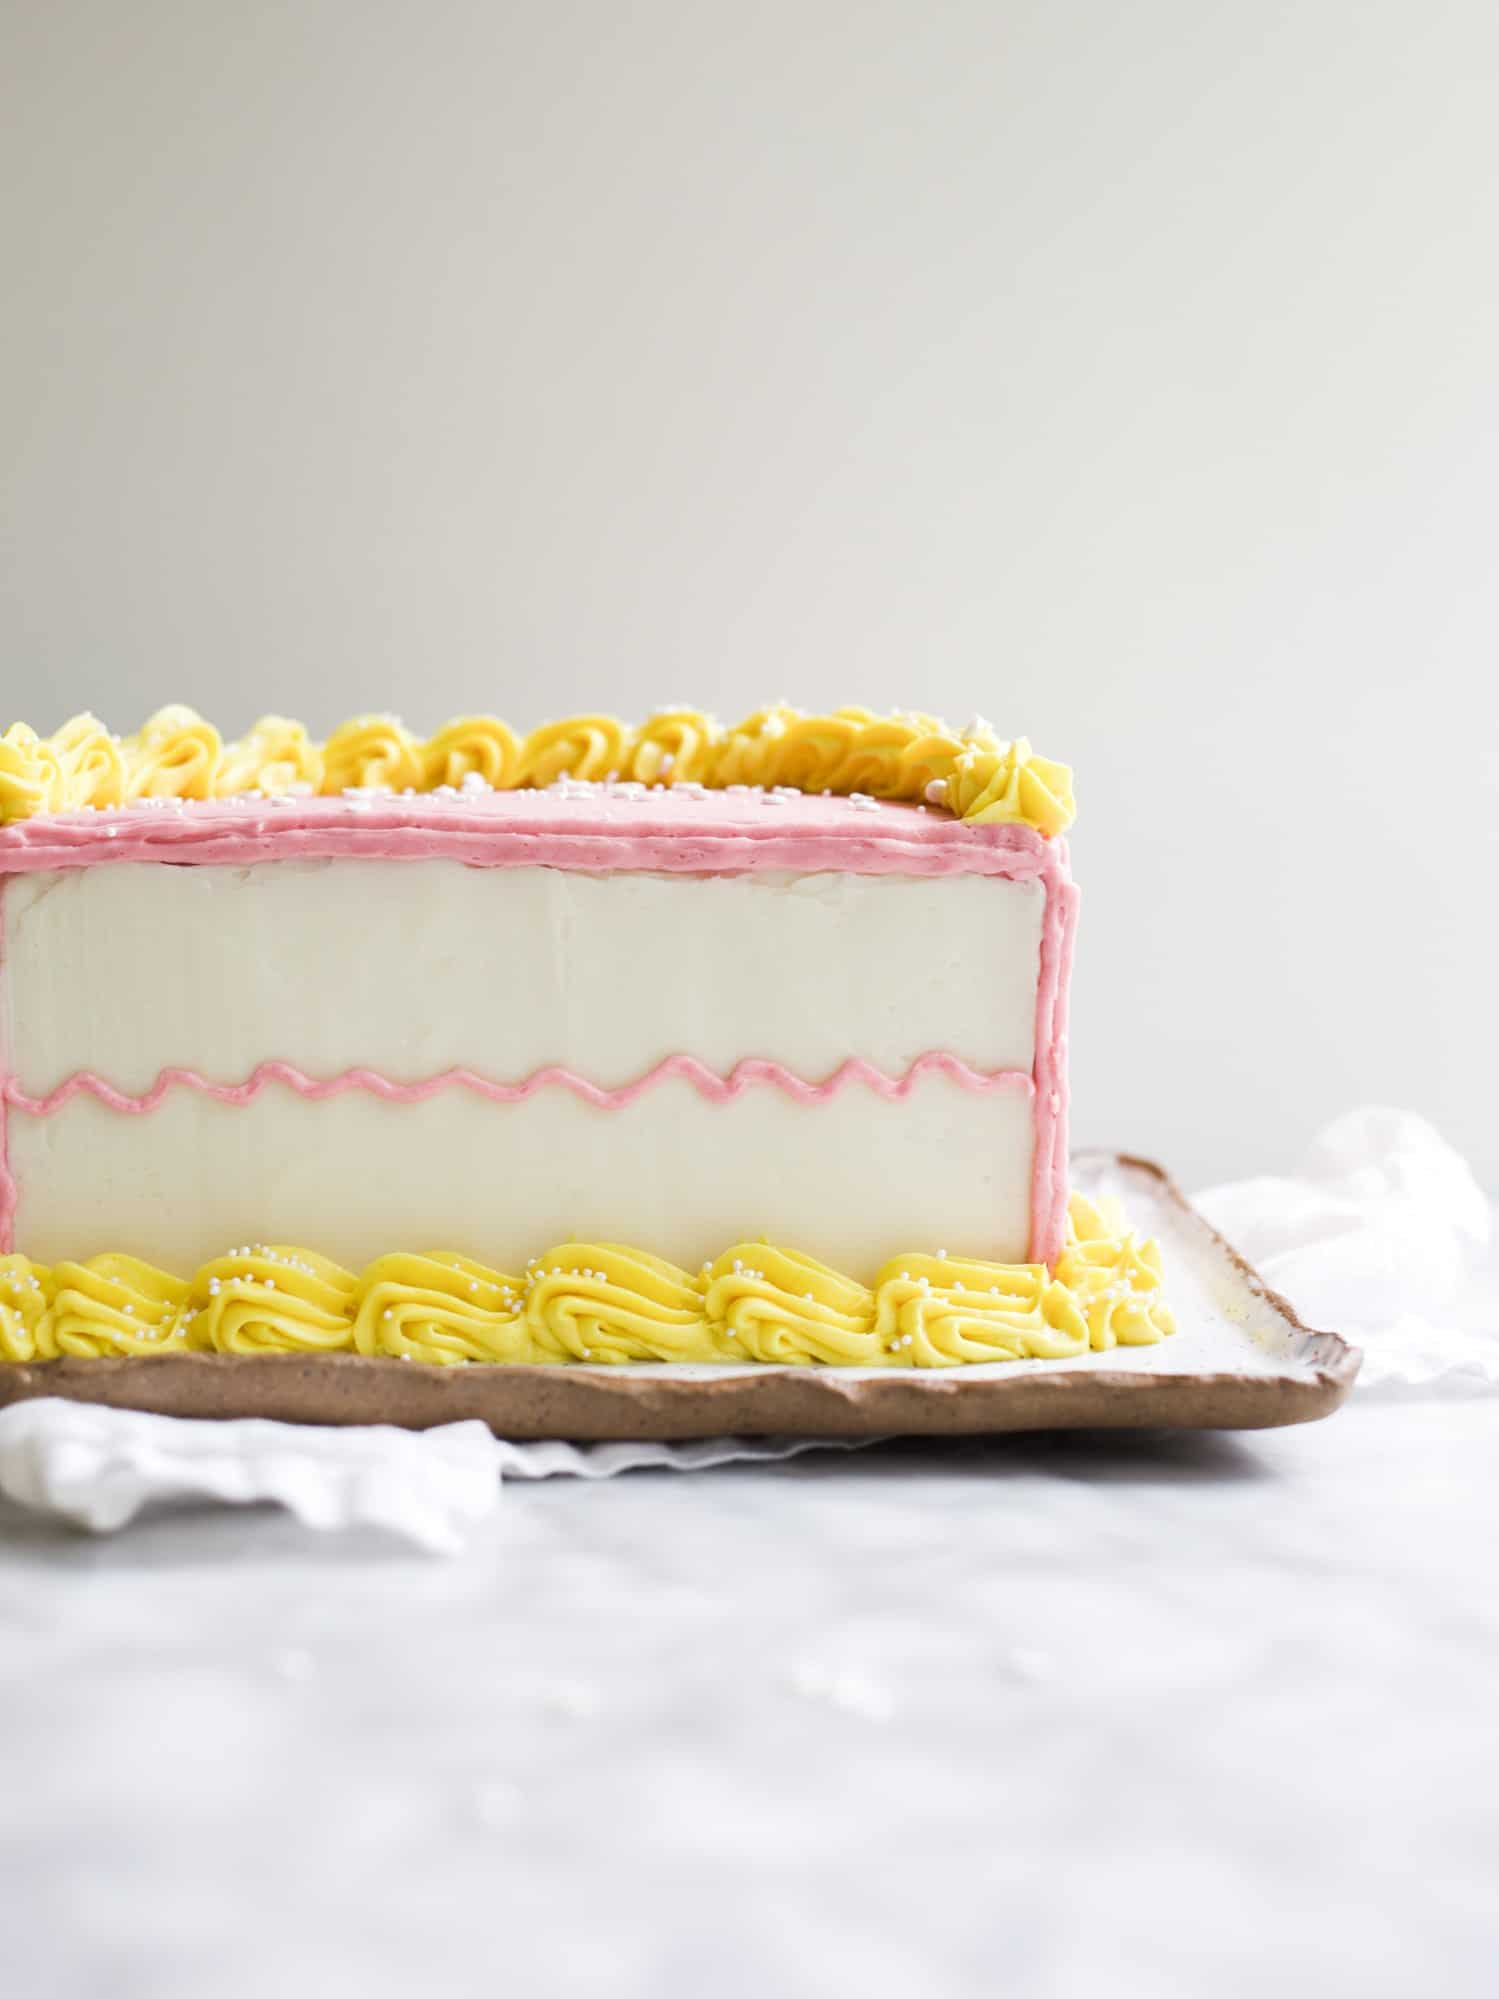
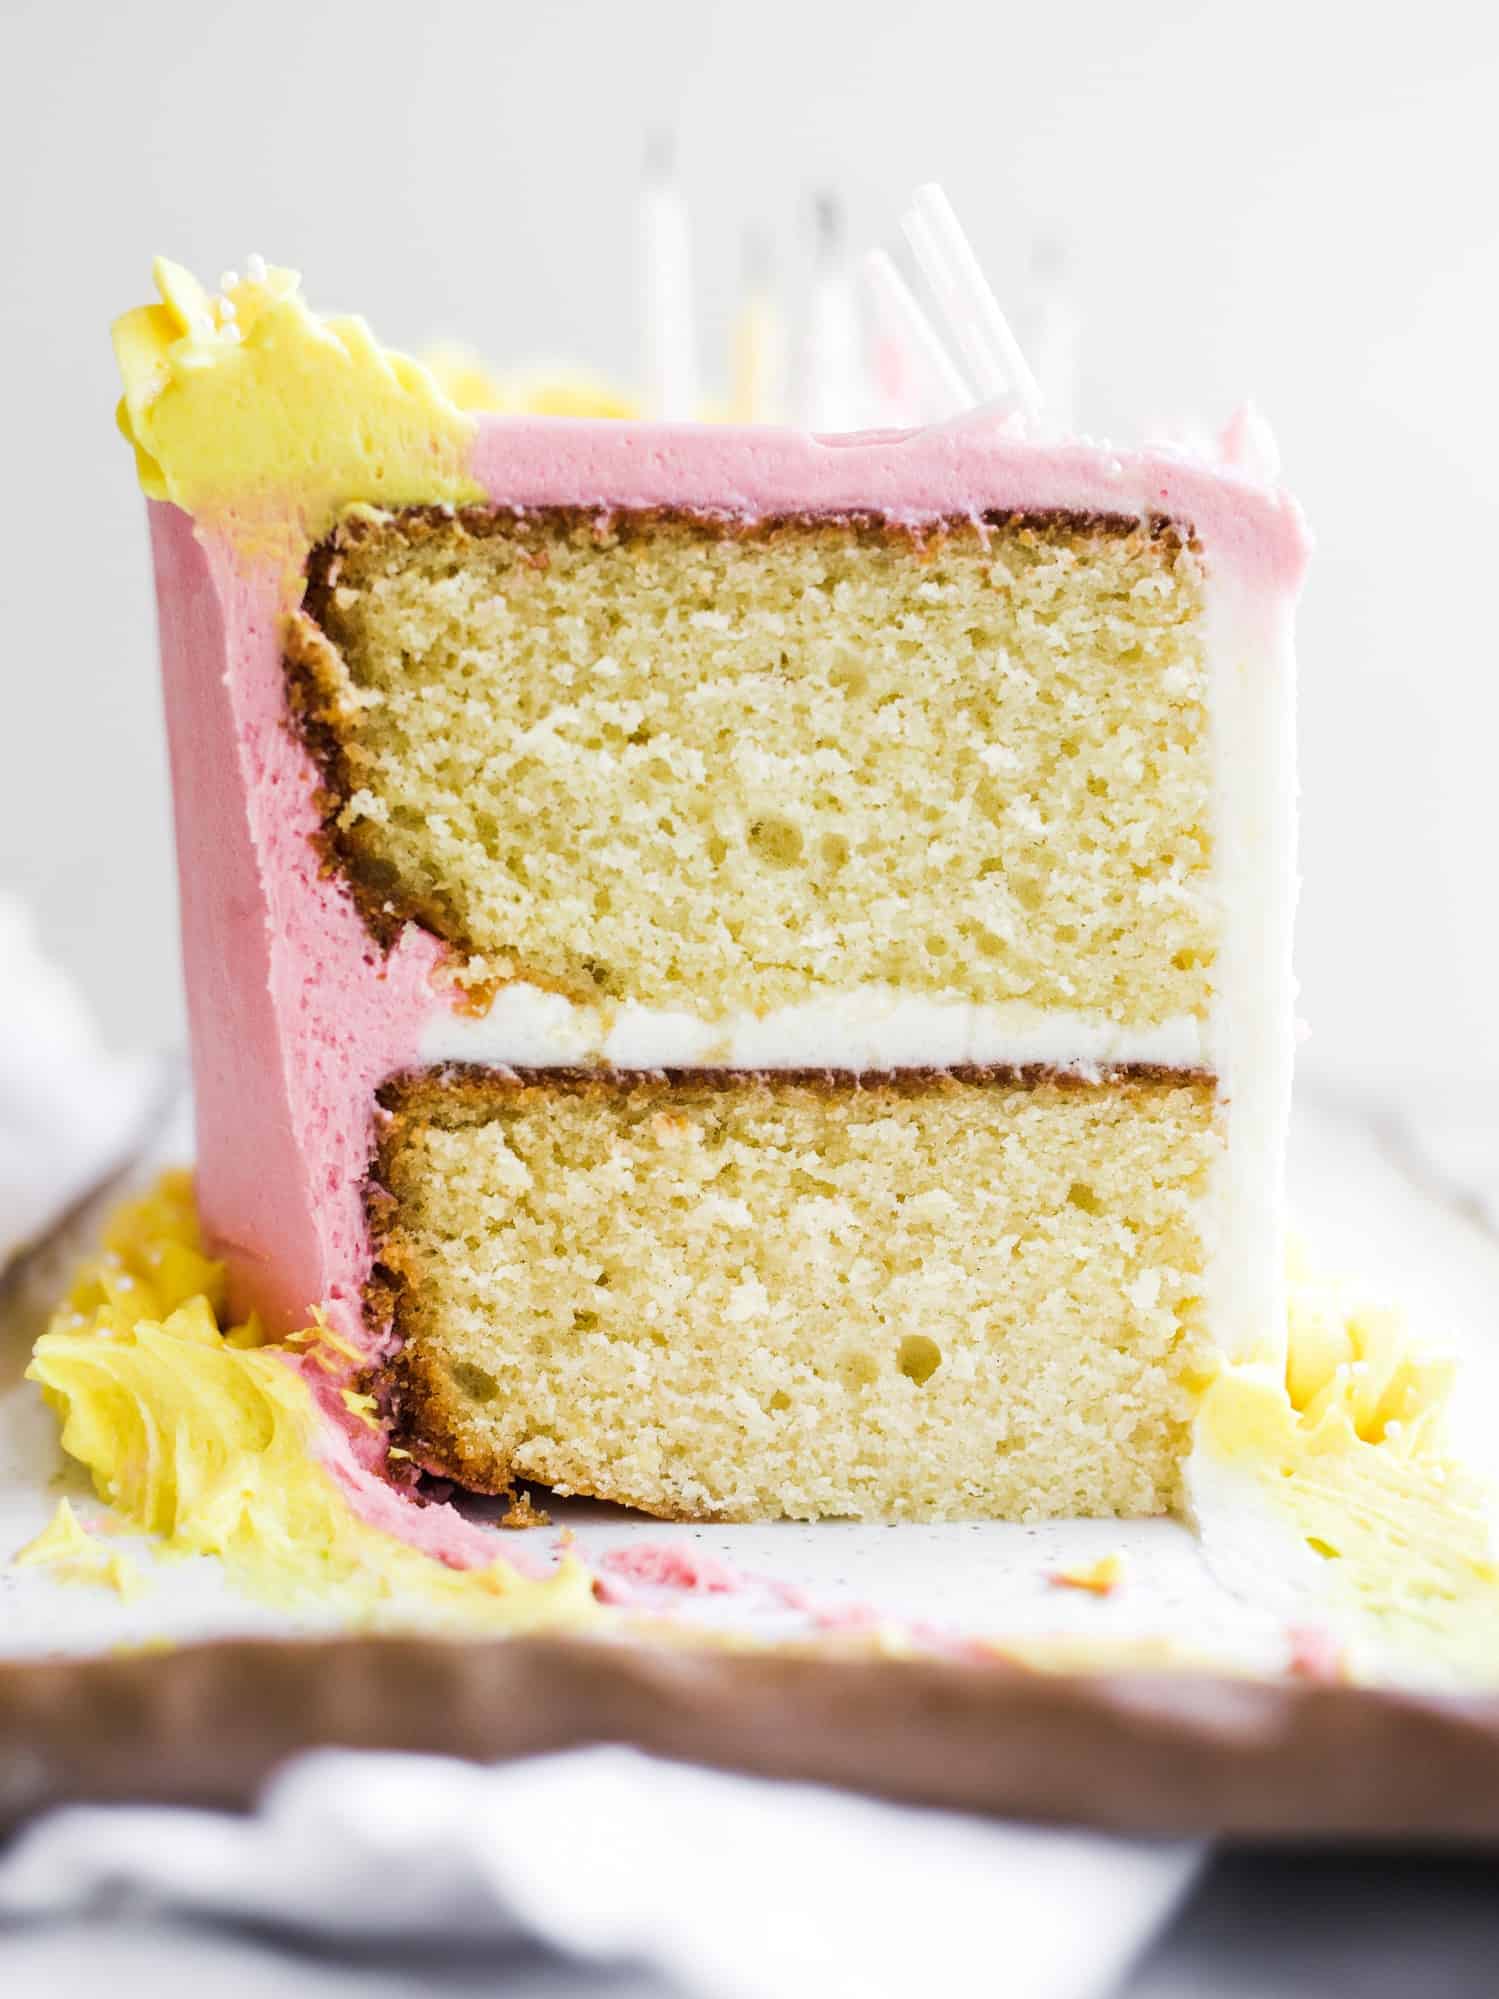
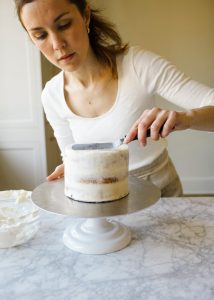
To make this cake at home, we start with one ultra-thick round cake. I used a homemade vanilla cake that came out sturdy and tender. Once cool, cut the cake in half to make two half moon-shaped pieces. Next, homemade American buttercream seals the two layers together before we begin to frost the tops and sides. Here’s where things get interesting.
You’ll want at least two different frosting colors here: one color to be the revealed faux cake layers, and another to be the frosting. I ended up with three different colors, because I wanted the edges piped and decorated in a different shade. Set aside a heaping cup of frosting for smearing on the flat edges of your cake and another 2 cups to serve as the frosting. You can use the remaining frosting to pipe and decorate in whatever color you prefer.
What You’ll Need to Make a Half Birthday Cake
I find an offset spatula helps to get the edges clean when frosting corners, but I’ll go ahead and warn you that frosting this shape of cake is not for the faint of heart. I spent a good bit of time to achieve the tidy edges and even frosting. Just be patient in the process. Once you have the flat edge frosted as the inside of you faux cake and the remainder of the sides frosted as well, use a piping bag fitted with a #3 tip to pipe a little wavy line for the center of the cake. I used a 1M tip to pipe the decorated edge around the perimeter of the cake in yellow, but you can decorate as you desire. This half birthday cake looks festive with or without the extra touches.
There’s no time like the present to celebrate wherever you find yourself, and if you find yourself somewhere in the middle, I hope you’ll consider making this half birthday cake. If you haven’t already, take a peek at my book or pick up a copy at Amazon or most major book retailers. Happy Saturday to you and happy baking!
This recipe and tutorial for a half birthday cake is a fun and playful way to celebrate everyday occasions!
Author:Kate Wood
Prep Time:60
Cook Time:40
Total Time:180
Yield:6 Servings
Category:Dessert
Ingredients
For the cake:
¾ cup unsalted butter, at room temperature
1 cup sugar
3 large eggs, at room temperature
¾ teaspoon vanilla extract
1–3/4 cup all-purpose flour
2 teaspoons baking powder
¼ teaspoon salt
6 ounces milk
For the frosting:
1–1/2 cups unsalted butter, at room temperature
3–3/4 cups powdered sugar
¾ teaspoon vanilla extract
¼ teaspoon salt
1–1/2 tablespoons milk, plus more as needed
Instructions
Preheat the oven to 350 degrees Fahrenheit. Lightly grease a 7 or 8” round pan and cut a sheet of parchment paper to sit inside the bottom of the pan. Set aside.
In a large bowl or the bowl of a stand mixer, cream the butter and sugar together on medium speed until light and fluffy, about 5 minutes. Scrape the sides of the bowl and add the eggs one at a time, stirring briefly after each addition. Stir in the vanilla and scrape the sides of the bowl. In a smaller separate bowl, stir together the flour, baking powder, and salt. Stir half of those combined dry ingredients into the bowl with the butter, just until combined. Add the milk, stirring briefly, followed by the remaining dry ingredients. Scrape the sides of the bowl and fold in any unincorporated bits until the mixture is uniform. Spread the batter into the prepared pan, and bake until a toothpick inserted comes out clean, about 40-45 minutes for 7” pans and 38-42 minutes for 8” pan. Allow to cool completely.
To prepare the frosting, cream the butter on medium speed until fluffy, about 3 minutes. Stir in about half of the powdered sugar and the salt, adding the remaining dry ingredients once combined. Scrape the sides of the bowl and stir in the milk. Increase the speed on the mixer to medium and beat until fluffy and combined, about 30 seconds.
Set aside 1 cup of frosting to remain white. This will cover the flat edge of the side of your cake, serving as the exposed faux cake layers. You can color the remaining icing however you’d like. I colored a remaining 2/3 in pink and a final 1/3 yellow to be piped as decoration.
To prepare the cake, cut the cake in half to make two half moon shapes. Spread a dollop of your frosting-colored frosting to a cake board or serving platter and place the first cake pieces on top. Spread a thick layer of that same frosting on the first piece of cake, smoothing with an offset spatula. Top it with a second piece of cake and continue frosting the top and rounded edges, being sure to keep the color frosting away from the flat edge. Next, use a clean offset spatula to cover the flat side with the white frosting. Clean up the edges as desired and then use a piping bag fitted with a small round (I used #3) tip to pipe a squiggly line on the flat edge. I used a 1M piping tip to pipe around the perimeter of the cake. Continue decorating the cake as desired, and enjoy!
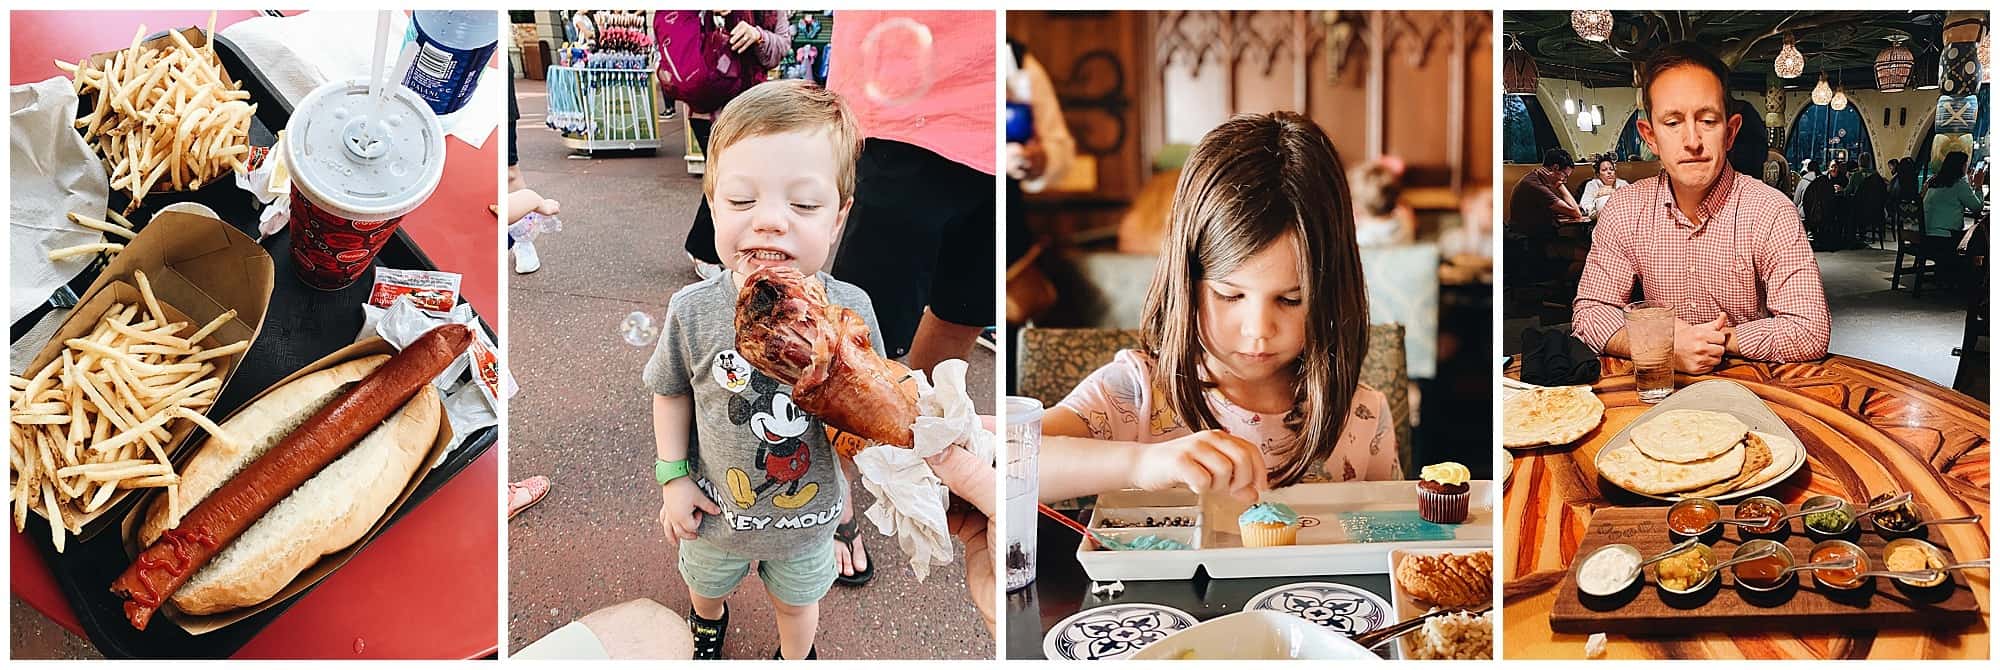
How’s that saying go? You can take the girl out of Orlando, FL, but you can’t take the Disney out of the girl? Well, for today’s intents and purposes, let’s pretend so. A few weeks ago, Brett and I took the kids back to my hometown of Orlando, FL for a trip to Disney World, and, it felt so good to be back at a place that once was home. Per usual, I got so many questions about Disney from friends on Instagram that I thought we might take today to map out a few of my personal faves. PLUS, I have a happy little Disney-inspired recipe to share- sugar cookie pops! Let’s get to it.
We should start with a disclosure: everyone does Disney different. There are some people who are one-and-done kind of visitors and others who go as often as possible. There are some that like the shut the parks down everyday, and there are other (raises hand) who are really just there long enough to eat as much Dole Whip as possible. Regardless of what camp you fall into, Disney has changed so much over the past couple of years that even those of us who have been nearly 100 times need a little help. With that being said, I highly recommend doing your own research prior to any trip to Disney, and if you are interested in a few of our faves, here they are!
My All-Time Favorite Disney World Hotels
Disney’s Riviera Resort. This is my current favorite Disney resort. Fresh paint, loads of suite options for those traveling with little ones, and an overall more quiet and polished vibe make this a comfortable place for kids and parents alike.
Disney’s Polynesian Village Resort. Have you seen the beautiful new over-water bungalows at the Polynesian? They’re to die for! Plus, proximal location to the Magic Kingdom makes this an easier option for those traveling with young kids.
Animal Kingdom Lodge. You know what never gets old? Waking up to seeing giraffes, antelope, and zebras outside of your balcony. My kids love this resort for the animals, and Mom loves it for the dining options.
Four Seasons Resort Orlando at Walt Disney World. I know most people will roll their eyes at this one, but I do really love a Four Seasons hotel, and this one, one Disney property and with shuttles on location, makes luxury accommodations possible even on a Disney trip.
Favorite Disney Meals
Sanaa at Animal Kingdom Lodge. This is probably my all-time favorite Disney restaurant- Middle Eastern cuisine in a comfortable, kid-friendly environment. Don’t miss the bread service with all the dipping sauce- SO GOOD.
Rose & Crown at Epcot. This was my parents’ fave as a kid, and old loves die hard. Now, as an adult, I come here for the fish & chips and a pint.
Topolino’s Terrace at Riviera Resort. Fine dining at Disney is rarely actually fine dining, but at Topolino’s, it really is. The pastas are housemade and the cocktails are a welcome addition after a long day at the parks.
Flame Tree Barbecue at Animal Kingdom. Why would someone who lives in Alabama go all the way to Disney for barbecue? Let me just say, the smoked meats are actually really good, and the intoxicating smells from the smoker literally draw you in. Don’t miss this quick dining spot.
Pecos Bill Tall Tale Inn at Magic Kingdom. My kids love a burrito bowl. LOVE one. With most of the dining at Magic Kingdom consisting of burgers and chicken fingers, a little guacamole is a welcome change of pace.
Tusker House Restaurant at Animal Kingdom. If you are set on doing a character meal, I love this one at Animal Kingdom. Moroccan flavors in an indoor/outdoor dining setting make this for a really enjoyable meal.
Best Themed Dining
Sci-Fi Dine-In Theatre Restaurant at Hollywood Studios. One word: TELEVSION. If you’re traveling to Disney with kids, let them zone out at this drive-in while you relax for a minute.
Restaurantasaurus at Animal Kingdom. Again, this one is here for the kids. My boys love checking out the dinosaur bones on the wall, and this mom appreciates any dining option that keeps them busy for a few minutes.
Biergarten at German Pavillion Epcot. It’s a meal AND a show! My husband loves this meat-heavy menu, and I love the beer flights.
Cinderella’s Royal Table at Magic Kingdom. If you’re traveling with a little princess (or want to feel like one yourself!?), could there be anything better than dining INSIDE of Cinderella’s castle? I think not.
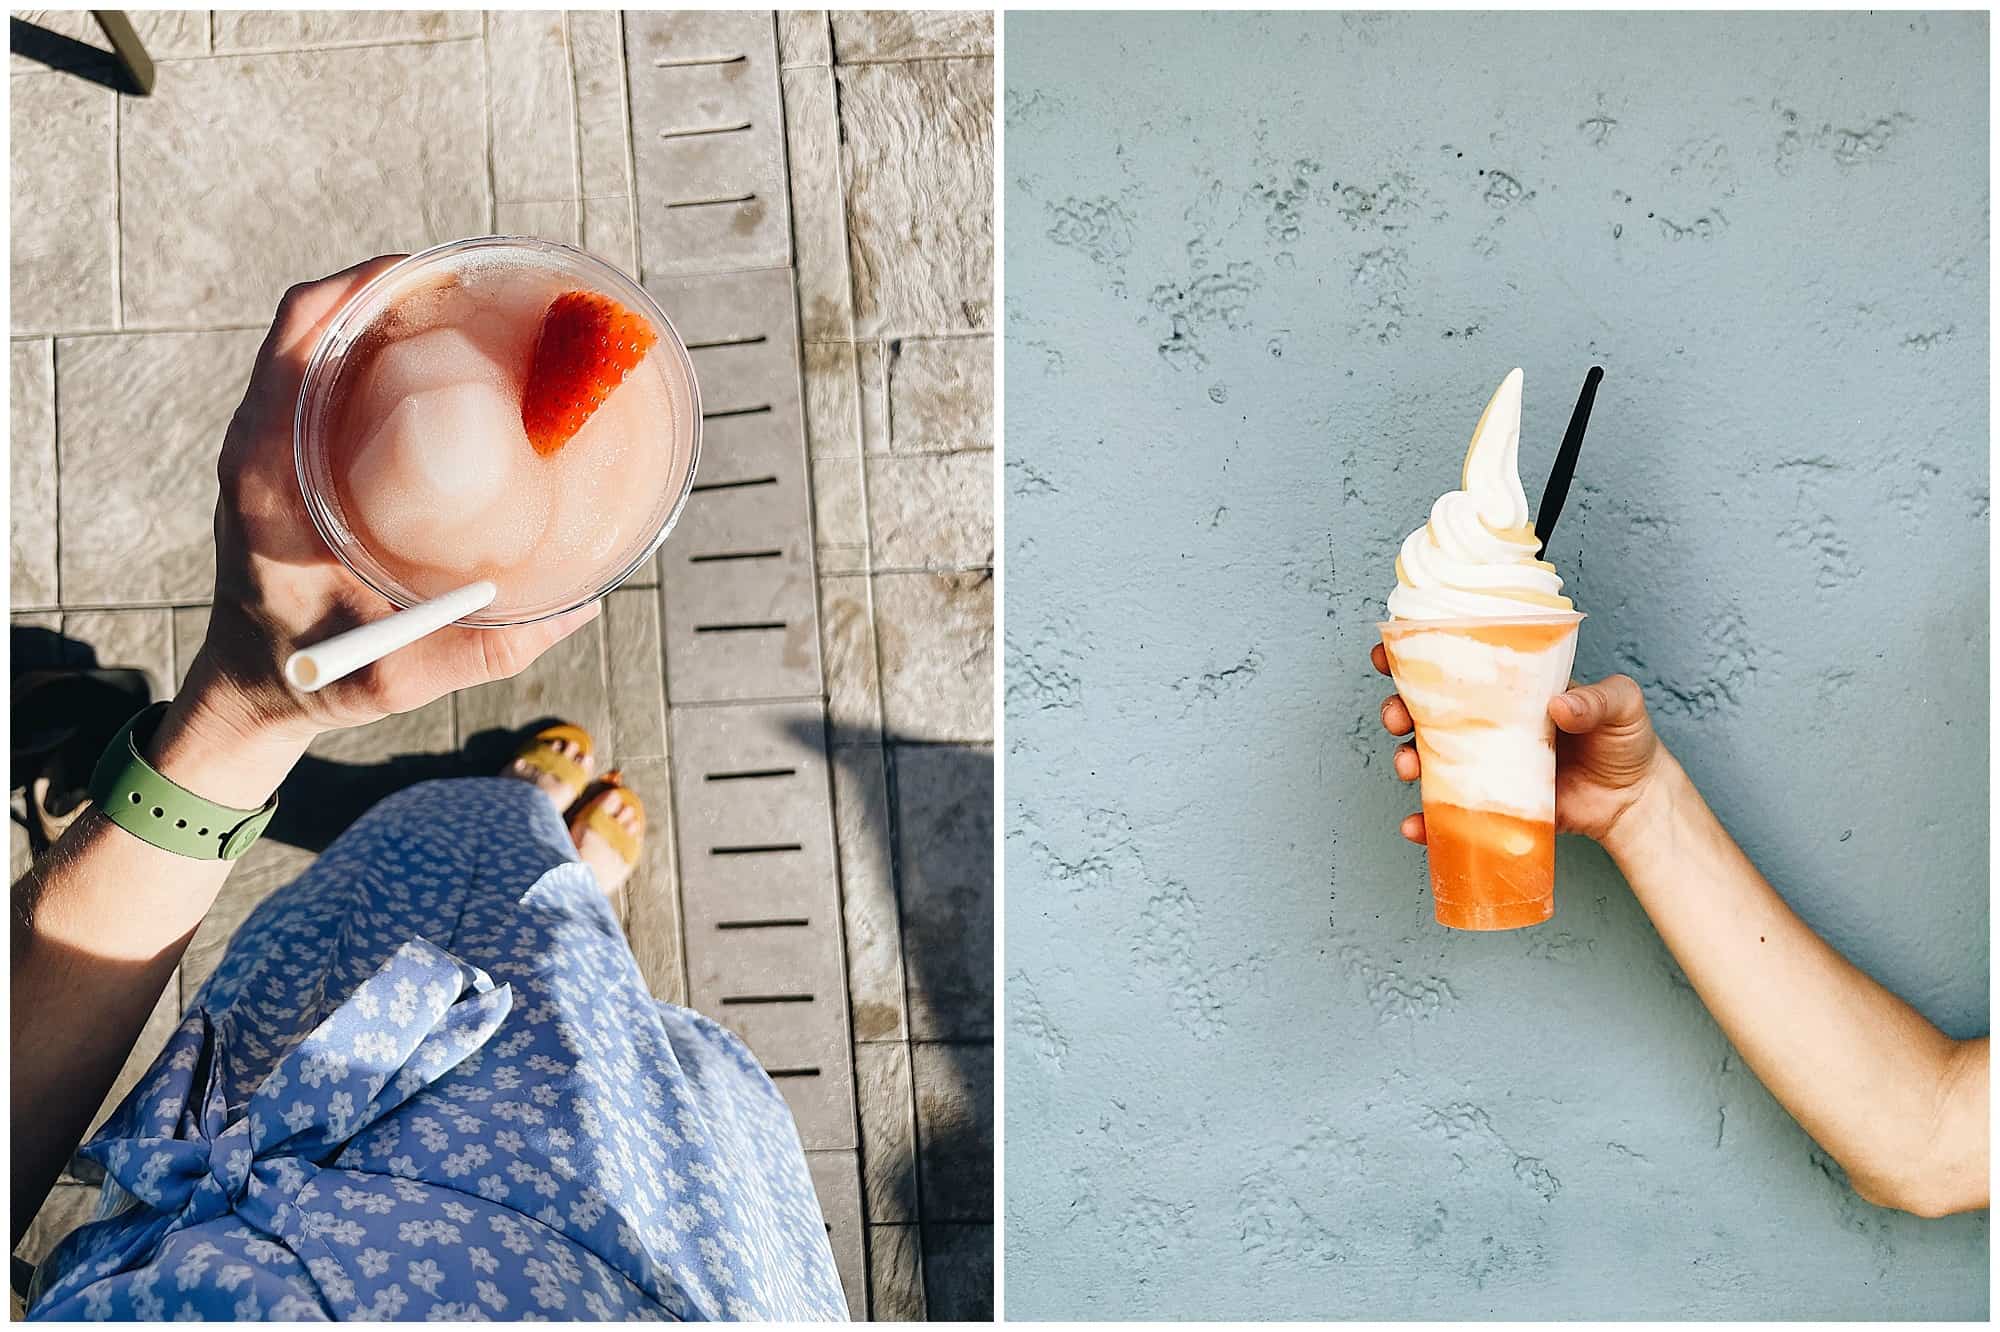
Best Disney Desserts
Dole Whip at Aloha Isle in Magic Kingdom or Tamu Tamu Refreshments at Animal Kingdom
The Kitchen Sink at Beaches and Cream Soda Shop
The Frosè at Bar Riva at Disney’s Riviera Resort
Funnel Cakes and Nutella Waffles at Sleepy Hollow Inn at Magic Kingdom
Ghirardelli Soda Fountain and Chocolate Shop at Disney Springs
Crepes from The France Pavillion at Epcot
Milkshakes from 50’s Prime Time Cafe at Hollywood Studios
My Best Tips for a Great Disney Experience with Toddlers
Make a Plan.
So much time, energy, and waiting can be saved by knowing what you want to experience in the parks. Even as a seasoned Disney veteran, I always take time prior to a trip to look at the park maps (I even print one offline!) and make note of what rides, shows, and experiences my kids will want to check out. You can even take this a step forward by cross-referencing wait times (available daily on the Disney app!) with your list to determine which rides will get busy.
Get Genie+.
This most recent trip was our first time using Genie+, Disney’s new system which has essentially replaced the old fast pass system. Now, for a daily per person fee, you can have access to shorter wait times. Be sure to buy the Genie+ pass in advance and log in at 7am EST sharp to get your first round of passes. I highly recommend research Genie+ and Lightening Passes to noting which rides you want access for PRIOR TO your morning at the park.
Rise and Shine!
I used to think that people who got to the park before it opened were crazy, but now, I am among those people. Nothing makes riding rides easier than getting there 30 minutes prior to park opening times and being prepared to HUSTLE. For example, if a park opens at 9 am, I typically try to get my family there by 8:30, and we move fast to ride as many rides as possible during the first two hours of operation. Again, make a plan and knock out as much as you can in those morning hours.
Get a Lunch Reservation.
I’m sure other people feel differently about this, but by about 11:30, my crew just needs a break. Nothing, and I mean nothing, is more unnerving to me than trying to figure out where to eat, where to sit, and how I can take a break for a few minutes after a morning of hustling. Lunch is a great opportunity for taking a seat, getting out of the elements, and zoning out for just a few minutes. Your body and brain need this.
Know When to Call it Quits.
Brett always jokes that one day he’s going to make a website called “Meltdowns at Disney,” because for as much joy and magic as the parks bring, it also just makes people lose their minds a bit. That’s why my policy is always to know when to throw in the towel. I don’t want to ruin a perfectly great day by pushing my toddlers (and my sanity!) beyond it’s limit. The kids will have just as much fun swimming in the pool or watching endless Disney cartoons back at the hotel. If you don’t squeeze it all in, that’s ok. At the same token, don’t be bummed if you can’t ride every single ride! The kids will have a blast watching parades, exploring the park, or even use jumping in muddy puddles.
Pack for Every Forecast.
Florida weather is unpredictable. Come prepared for everything.
Don’t Forget the Snacks.
A backpack full of lollipops, Goldfish, and trail mix has gotten my family through many a waiting line. Disney is not the opportunity to make sure your kids get in all their fruits and vegetables- pack some snacks for insurance, and know they’ll get back to a normal routine at home.
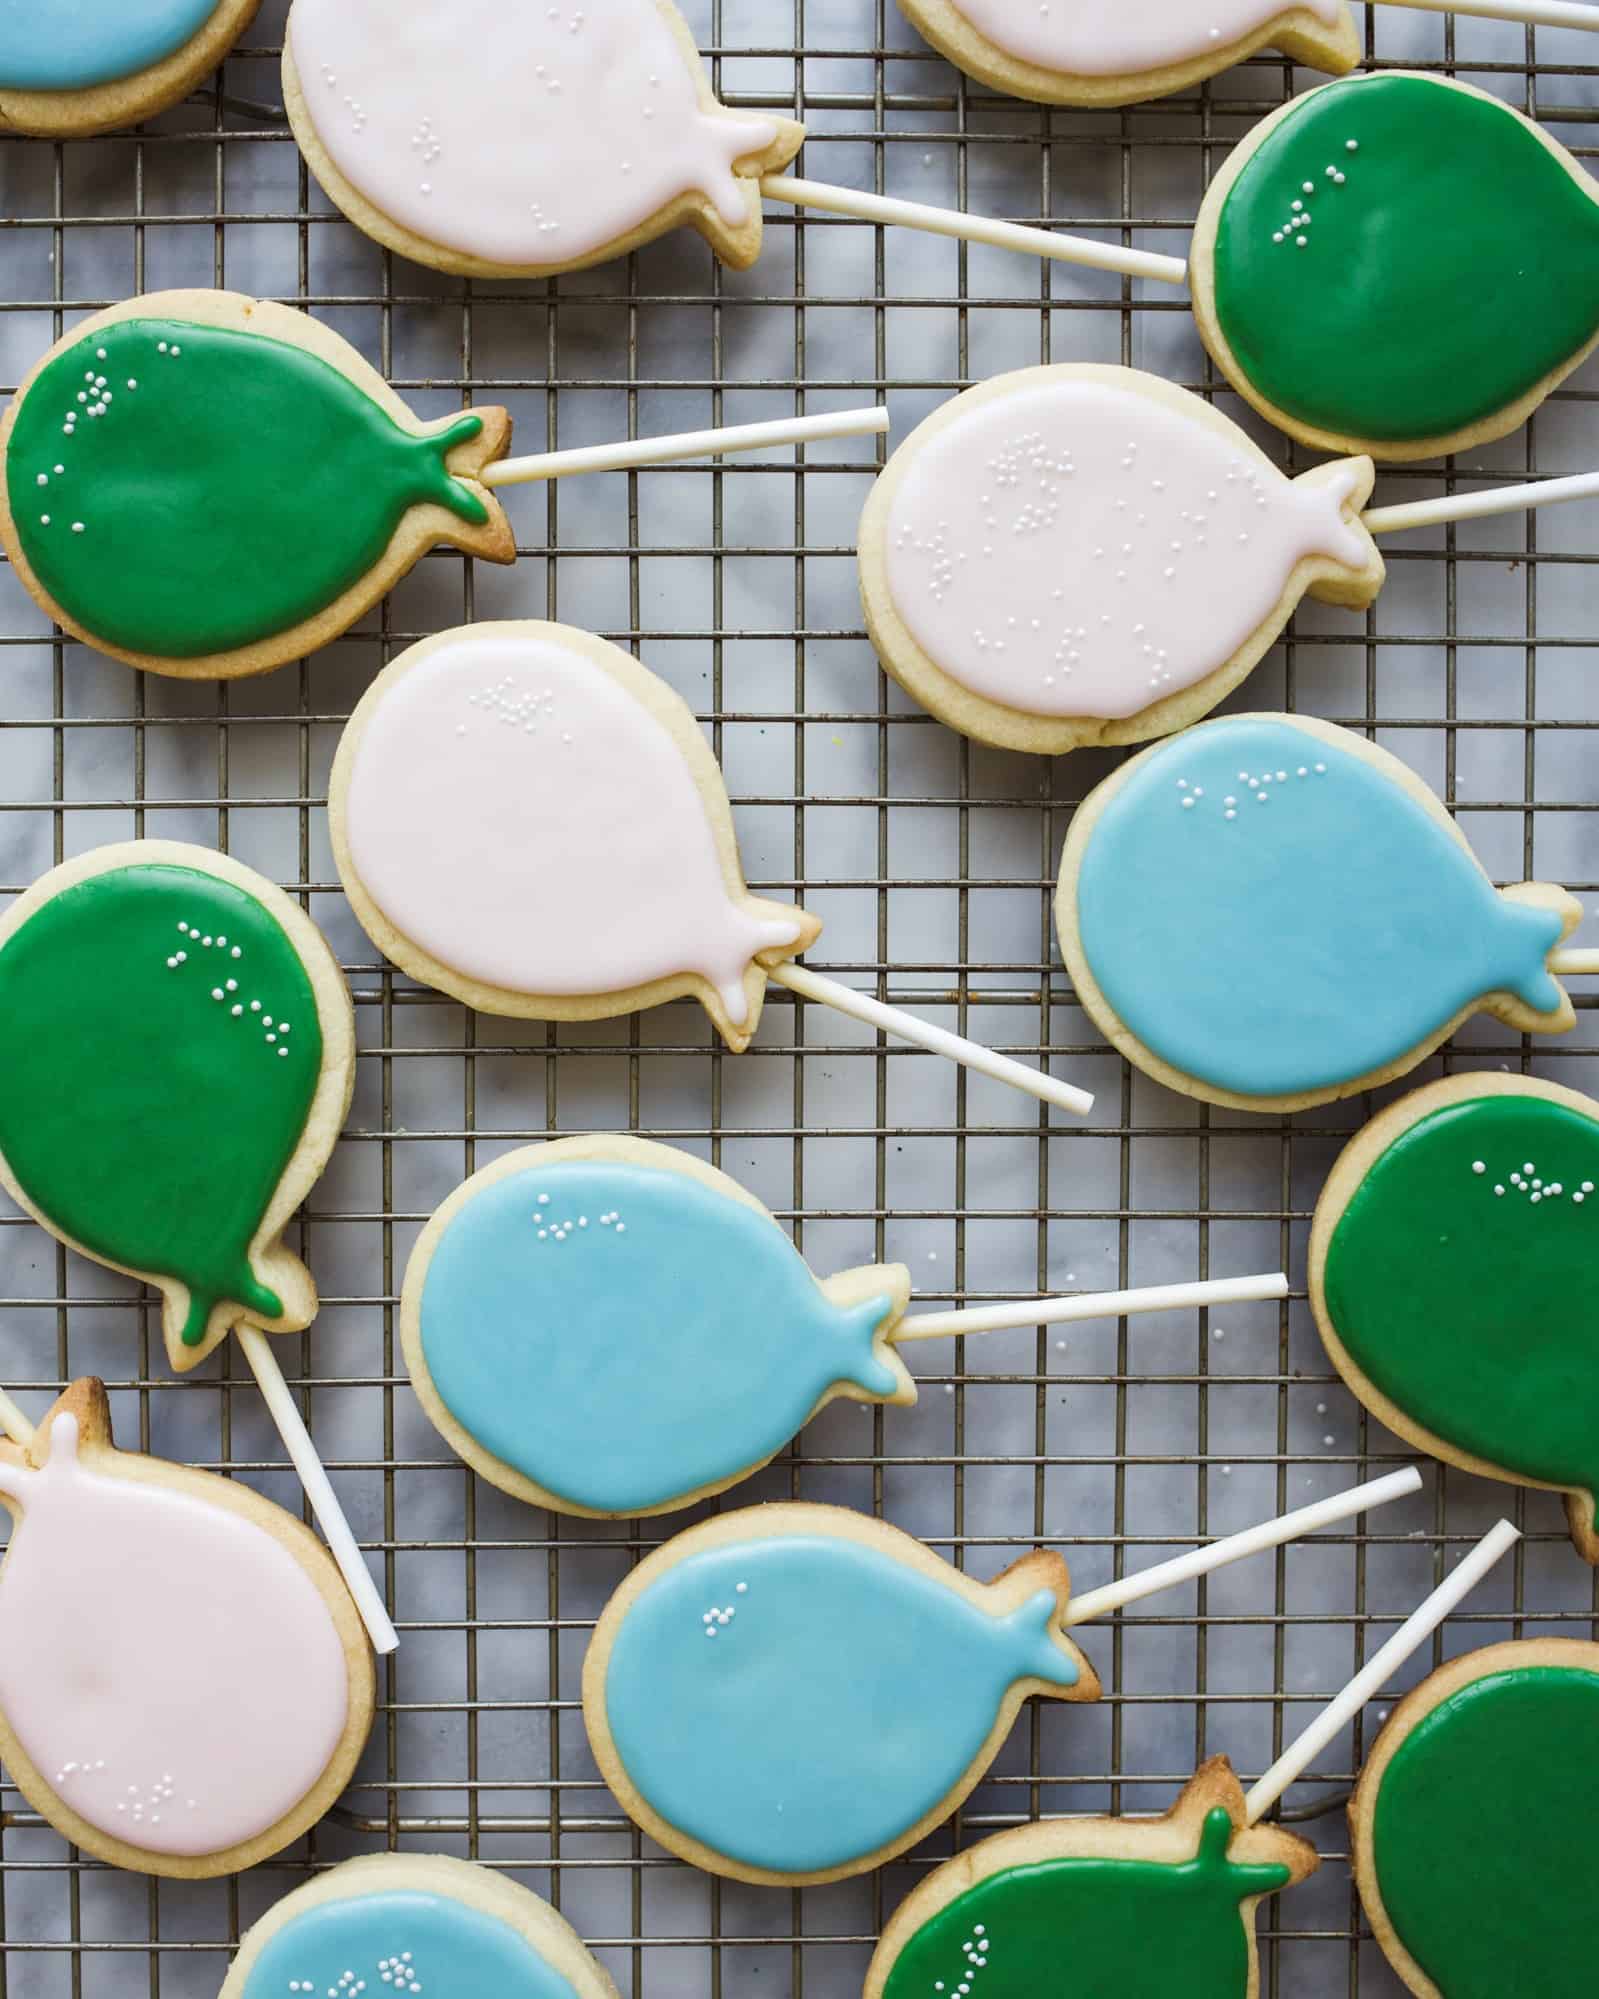
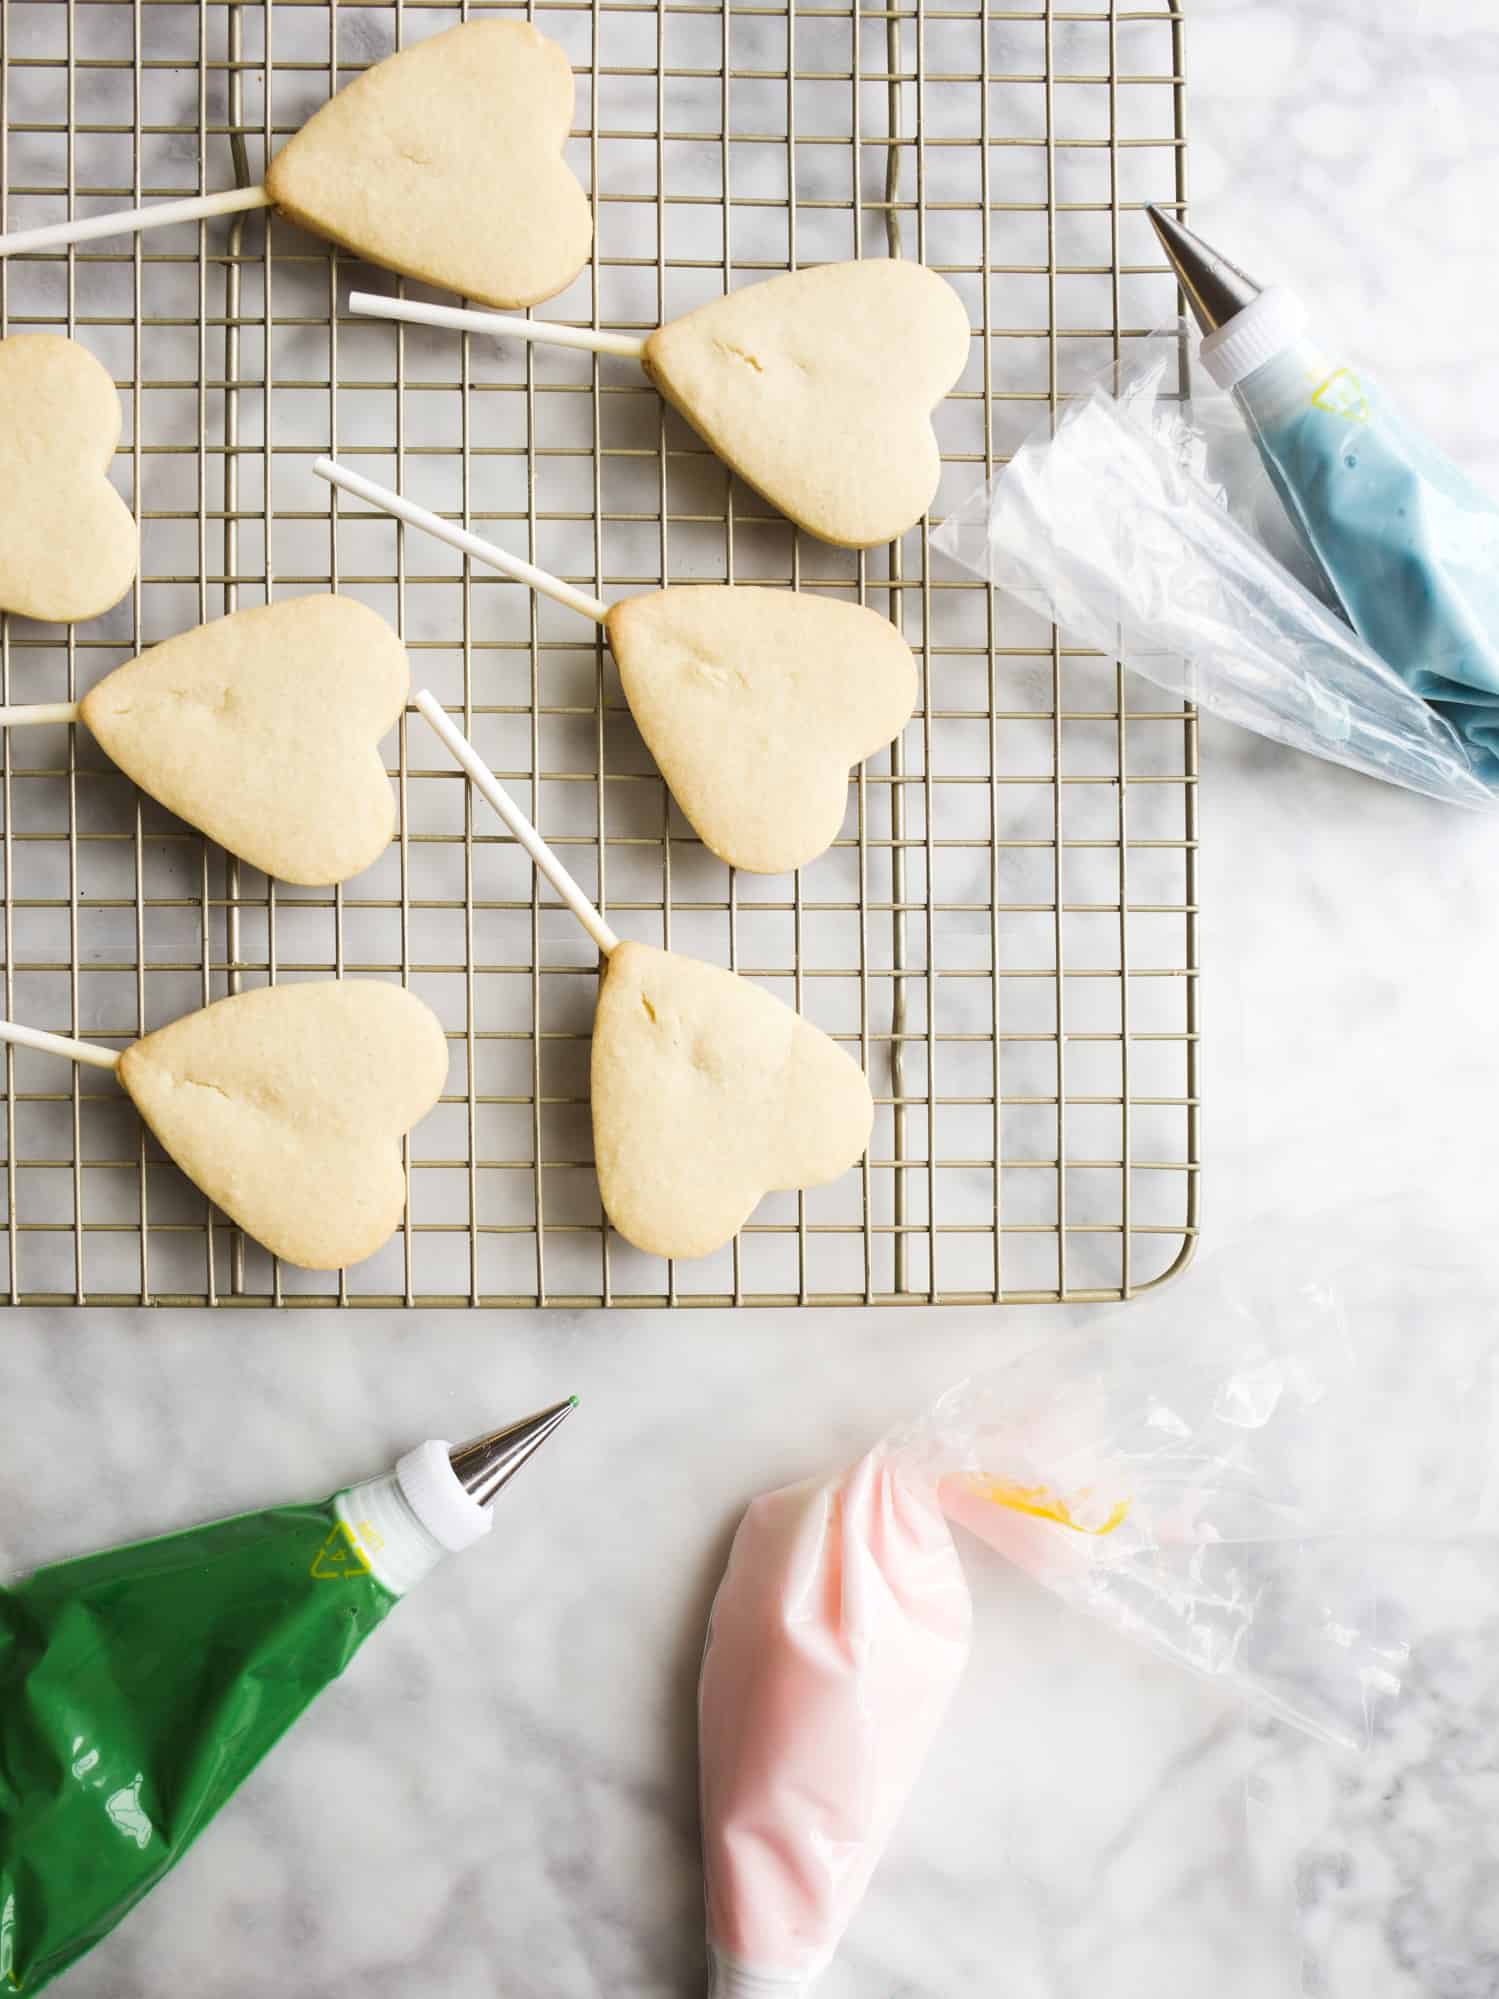
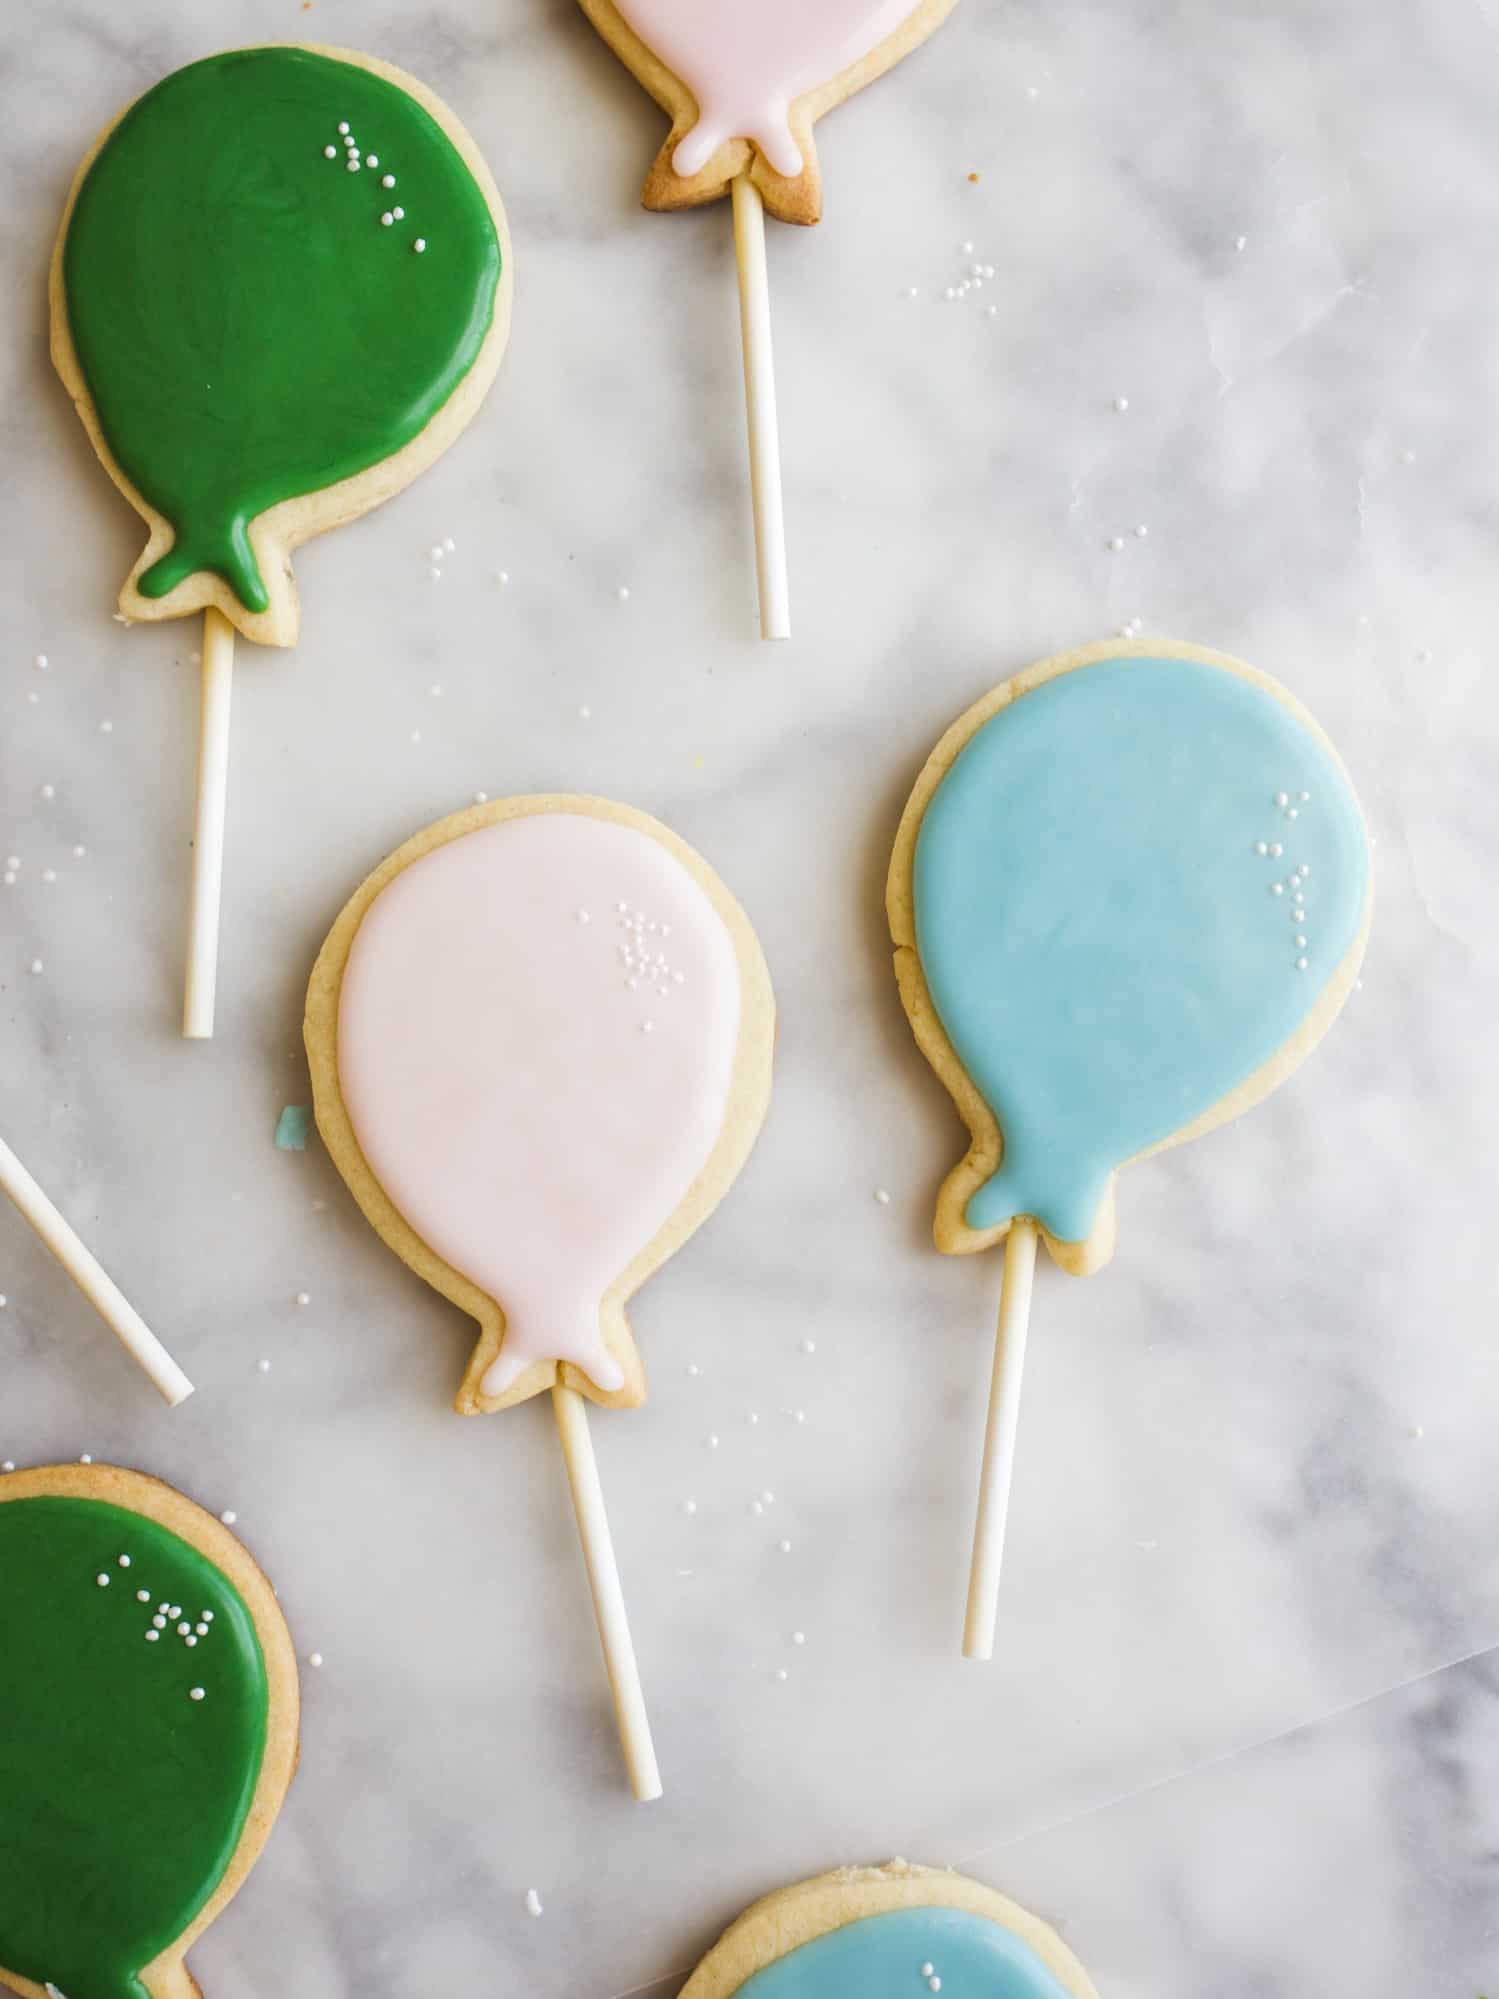
Sugar Cookie Pops
There are so many cute treats available all over the Disney parks, yet, for some reason, my kids always fixate on the desserts on a stick: Rice Krispie treats, ice cream bars, lollipops, and even sugar cookies. I decided to make these sugar cookie pops as an homage to all those kid-friendly desserts at Disney, and my kids were not disappointed. Tender sugar cookies decorated with a soft-set icing serve as a great pick-up treat option wherever a good theme is required. Just grab a theme-appropriate cookie cutter and a few lollipop sticks, and voila! Magic.
Making Sugar Cookie Pops
To make these sugar cookie pops, we start with a dough. I use this painted sugar cookie dough, because it holds up well even with a stick in it! The cookies are soft but stable. Once you’ve prepped and chilled your dough, roll out a thick 1/4″ slab of dough and use your cookie cutter to trim out shapes. I prefer to use a small or medium-sized cutter here, because large cookies are more likely to break off the stick. dough shapes have been chilled, gently twist to insert 4″ lollipop sticks into the base of the cookies. The first one or two might flop, but you’ll get the feel for it. If you happen to break through the cookie dough, you can use your fingers to gently pat extra dough around it to clean up. Make sure your dough is thick enough for future cookies too!
After baking, these cookies are iced with a simple powdered sugar glaze that sets overnight. You can follow my method as outlined in this post. Be sure to add sprinkles or sanding sugar before the sugar cookie pops have set up completely. I love to bag these cookies individually as party favors, school party treats, and more! Truly, even the adults in your life will love these happy little sugar cookie pops.
So that’s it My Disney faves and some yummy sugar cookie pops. Pop in my email to share any secret favorites of your own. Happy Wednesday and Happy baking!
These sugar cookie pops are cutout cookies a stick with a soft and simple glaze icing!
Author:Kate
Prep Time:60
Cook Time:13
Total Time:120
Yield:32 Cookies
Category:Dessert
Ingredients
For the cookies:
3 cups all-purpose flour
2 teaspoons baking powder
1/4 teaspoon salt
1 cup sugar
2 sticks unsalted butter, cold and cut into small pieces
1 egg
1 teaspoon vanilla extract
1/2 tsp almond extract
32 (4″) lollipop sticks
For the icing:
3 cups powdered sugar
3–6 tablespoons of whole milk or heavy cream
½ teaspoon almond extract
½ teaspoon vanilla extract
Instructions
To prepare the cookies:
Preheat the oven to 350 degrees and line two sheet pans with sheets of parchment paper. Combine the dry ingredients and set aside. In the bowl of a stand mixer, cream the butter and sugar until smooth and well combined, about 2-3 minutes. Add the egg and extract and cream until combined. Add the dry ingredients and stir on low just until combined. Dump the dough crumbles out on to a lightly floured surface and work together into one ball with your hands. Using a rolling pin, roll the dough to just over 1/4″ thicken and use a medium sized cookie cutter to cut shapes. If the dough ever gets too soft, refrigerate briefly. Place shapes on a baking sheet and freeze briefly to firm up slightly, about 5 minutes. Once chilled, gently insert the lollipop sticks into the cookie by turning the cookie stick back and forth gently as you insert it into the cookie. Make sure 1/3 of the stick is inserted into the cookie, and use your fingers to patch up any dough cracks or places where the stick has broken through. Spread the cookies about 2” apart on the prepared baking sheet and bake in the preheated oven for 10-12 minutes. Allow cookies to cool completely prior to icing.
For the icing:
Sift or whisk powdered sugar to remove lumps.
Add 3 tablespoons of the milk and the extract, whisking until combined. Continue to add milk until it is the right viscosity. You will want thicker frosting for piping. To test viscosity, run your whisk or a knife through the bowl of frosting- your frosting should slowly move back together until you can’t see any trace of the whisk any longer. This process should take about 10 seconds. If the frosting is too thick, it will not pool back together, and if it is too thin, it will pool back together too quickly. The ten second test doesn’t lie. Add more milk for a thinner icing and more powdered sugar if your icing becomes too thin. Cover tightly in a tupperware or with a wet paper towel if you are not using it immediately, as frosting will dry out and become clumpy. Whisk occasionally and add more milk if it becomes too thick. Spread or pipe the icing onto the cookie as desired. I like to pipe the border onto each cookie and then fill in with a food-safe brush or knife. Allow to rest and set up, and enjoy!
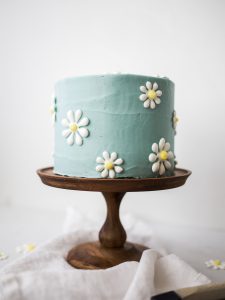
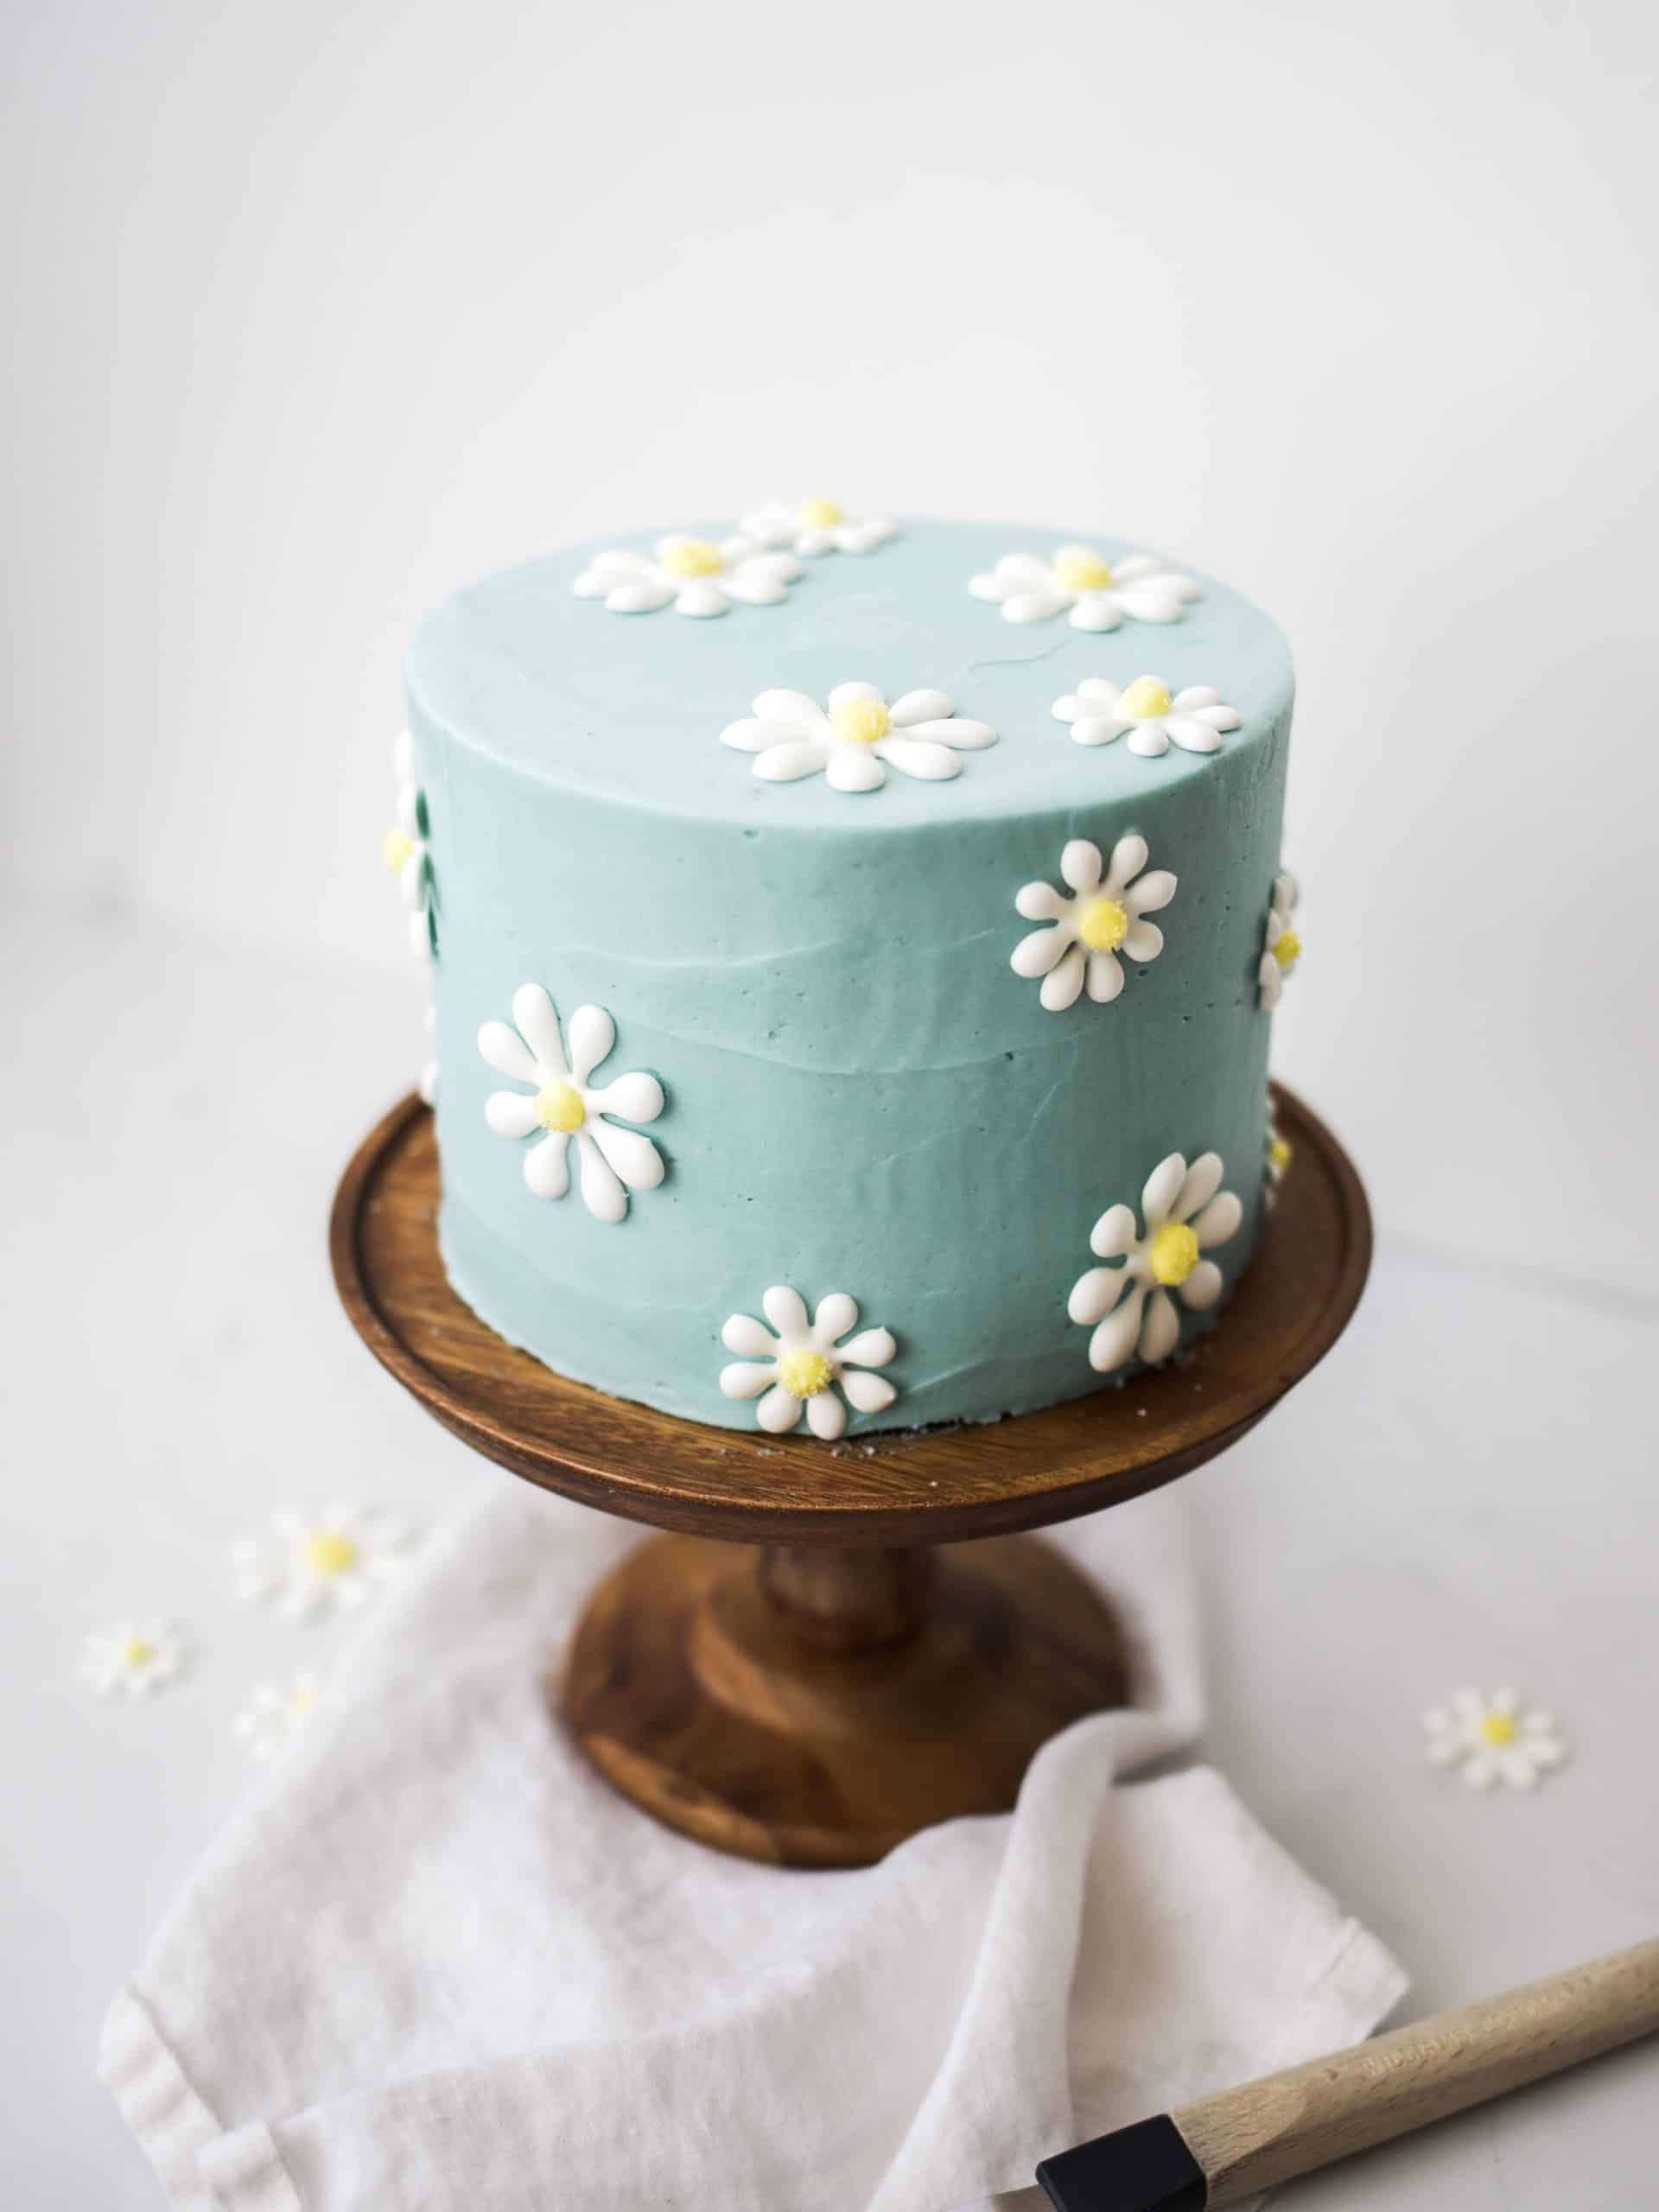
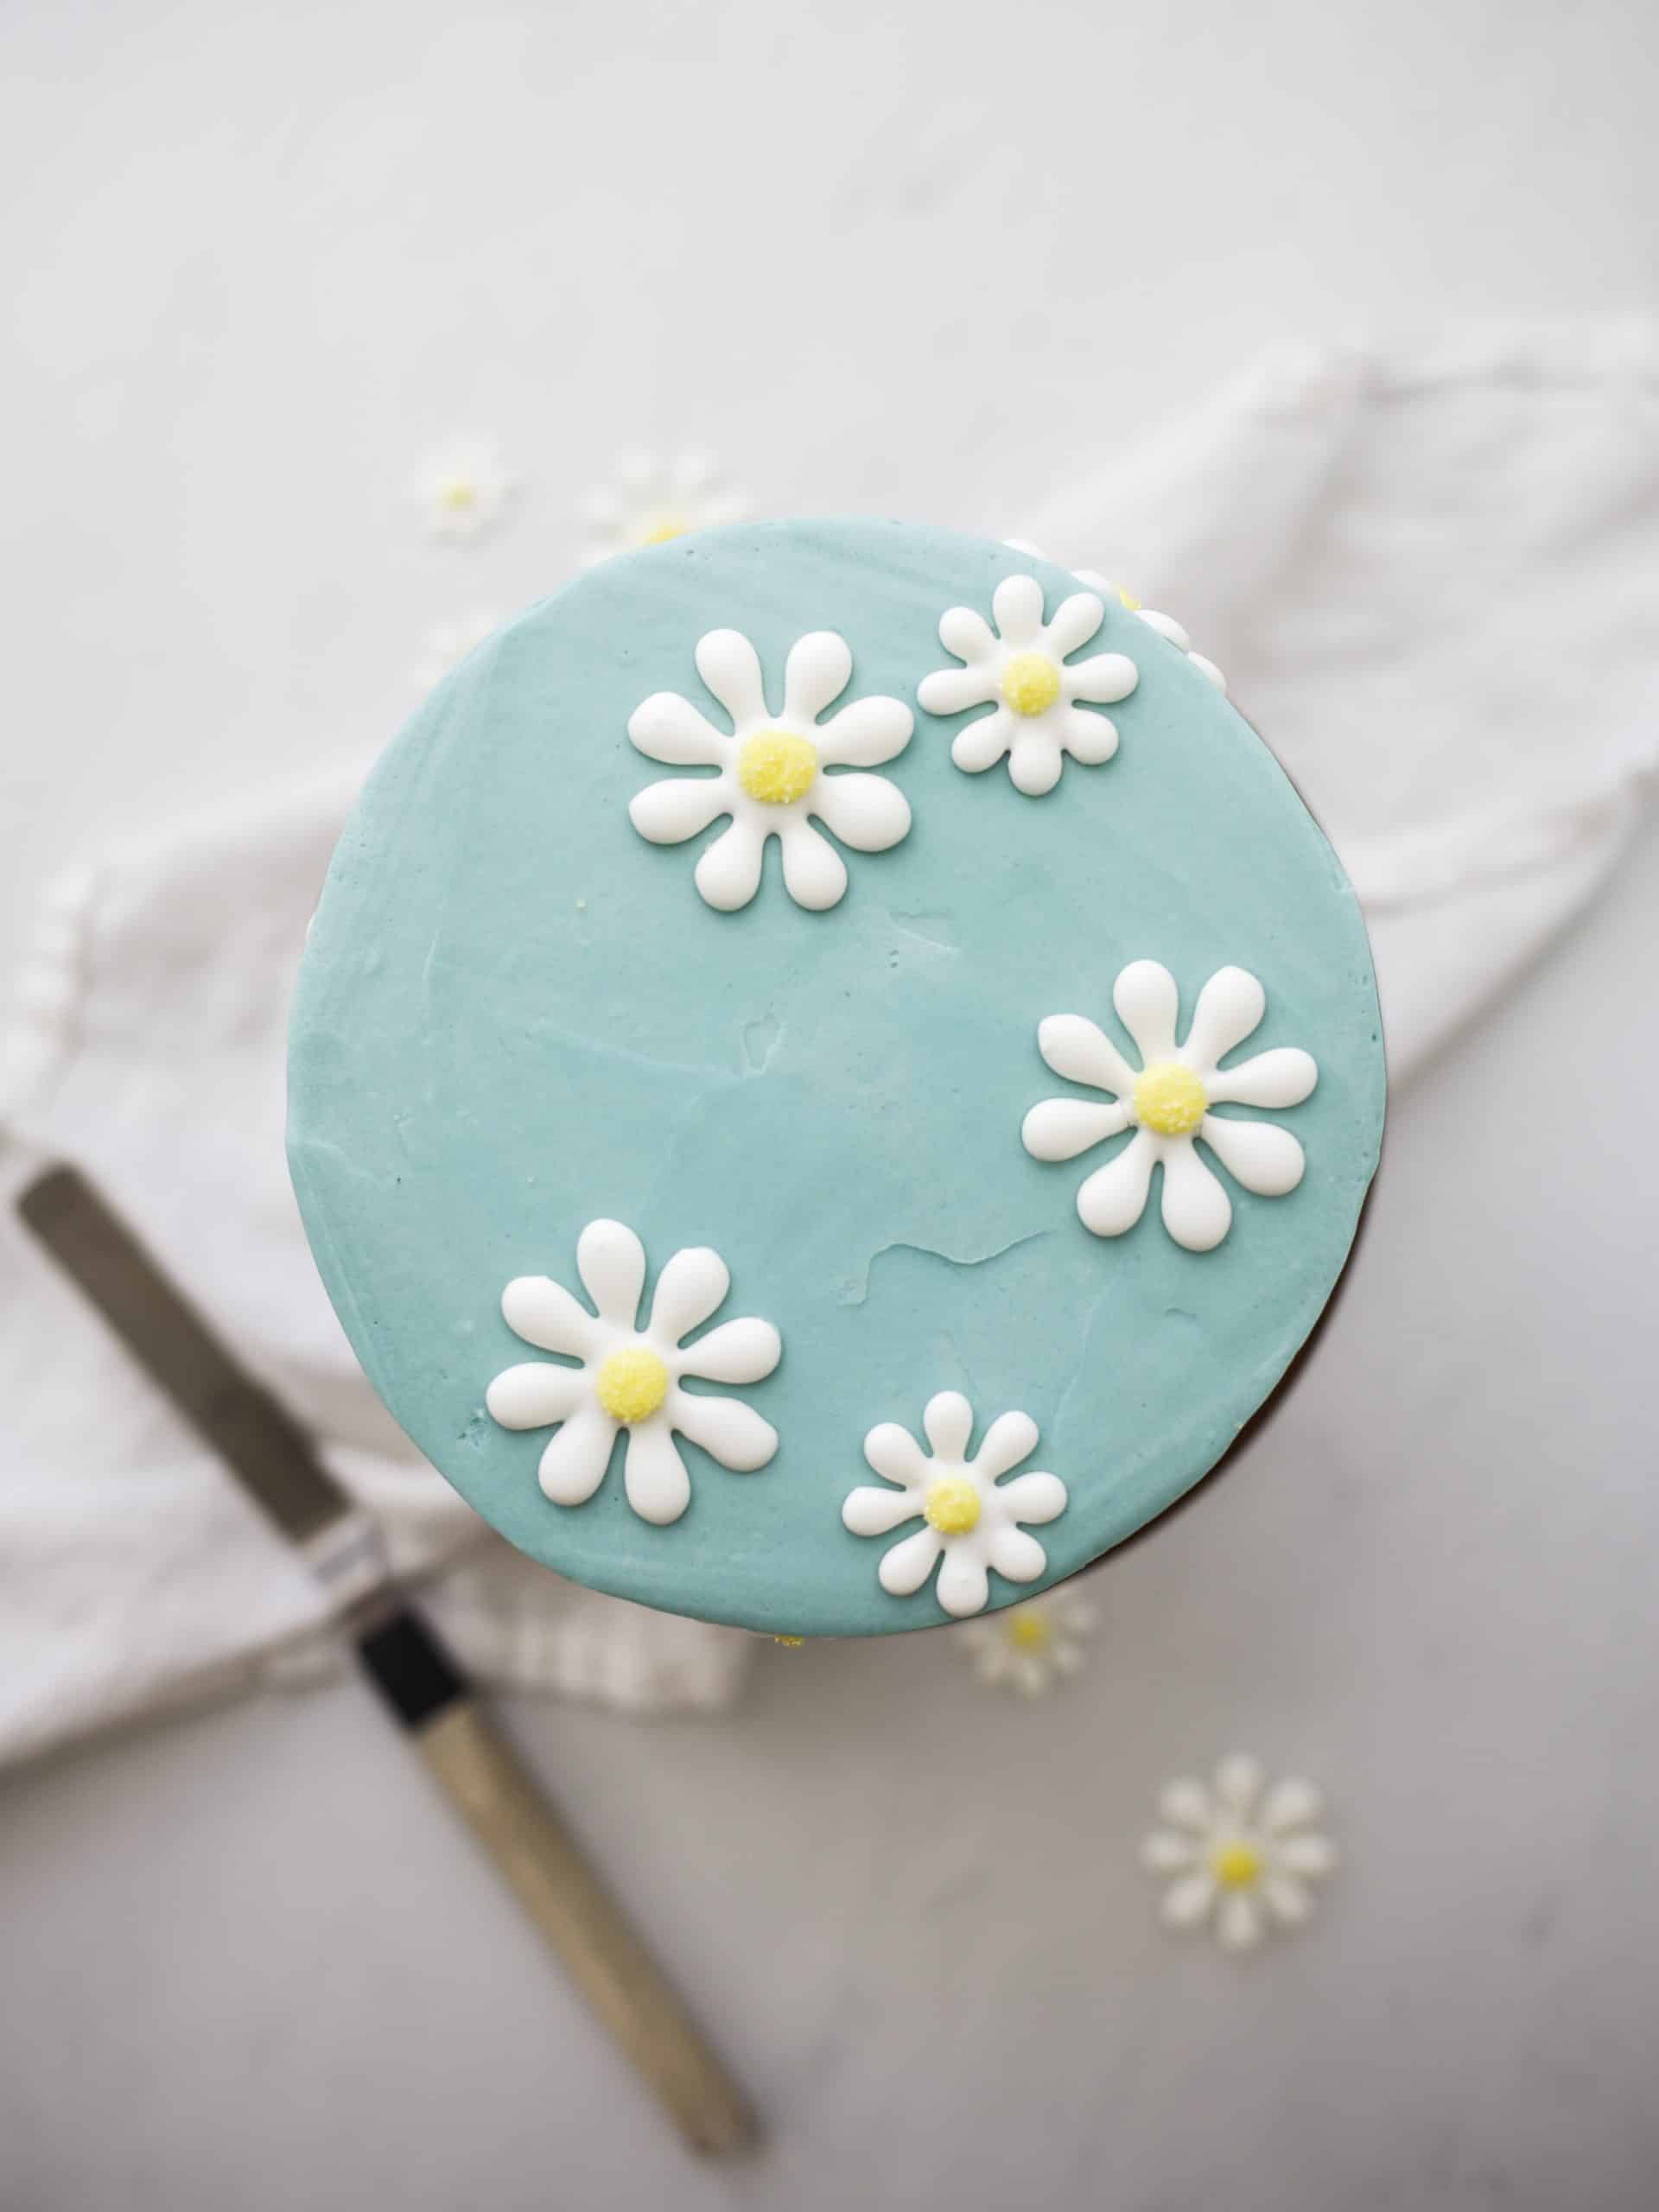
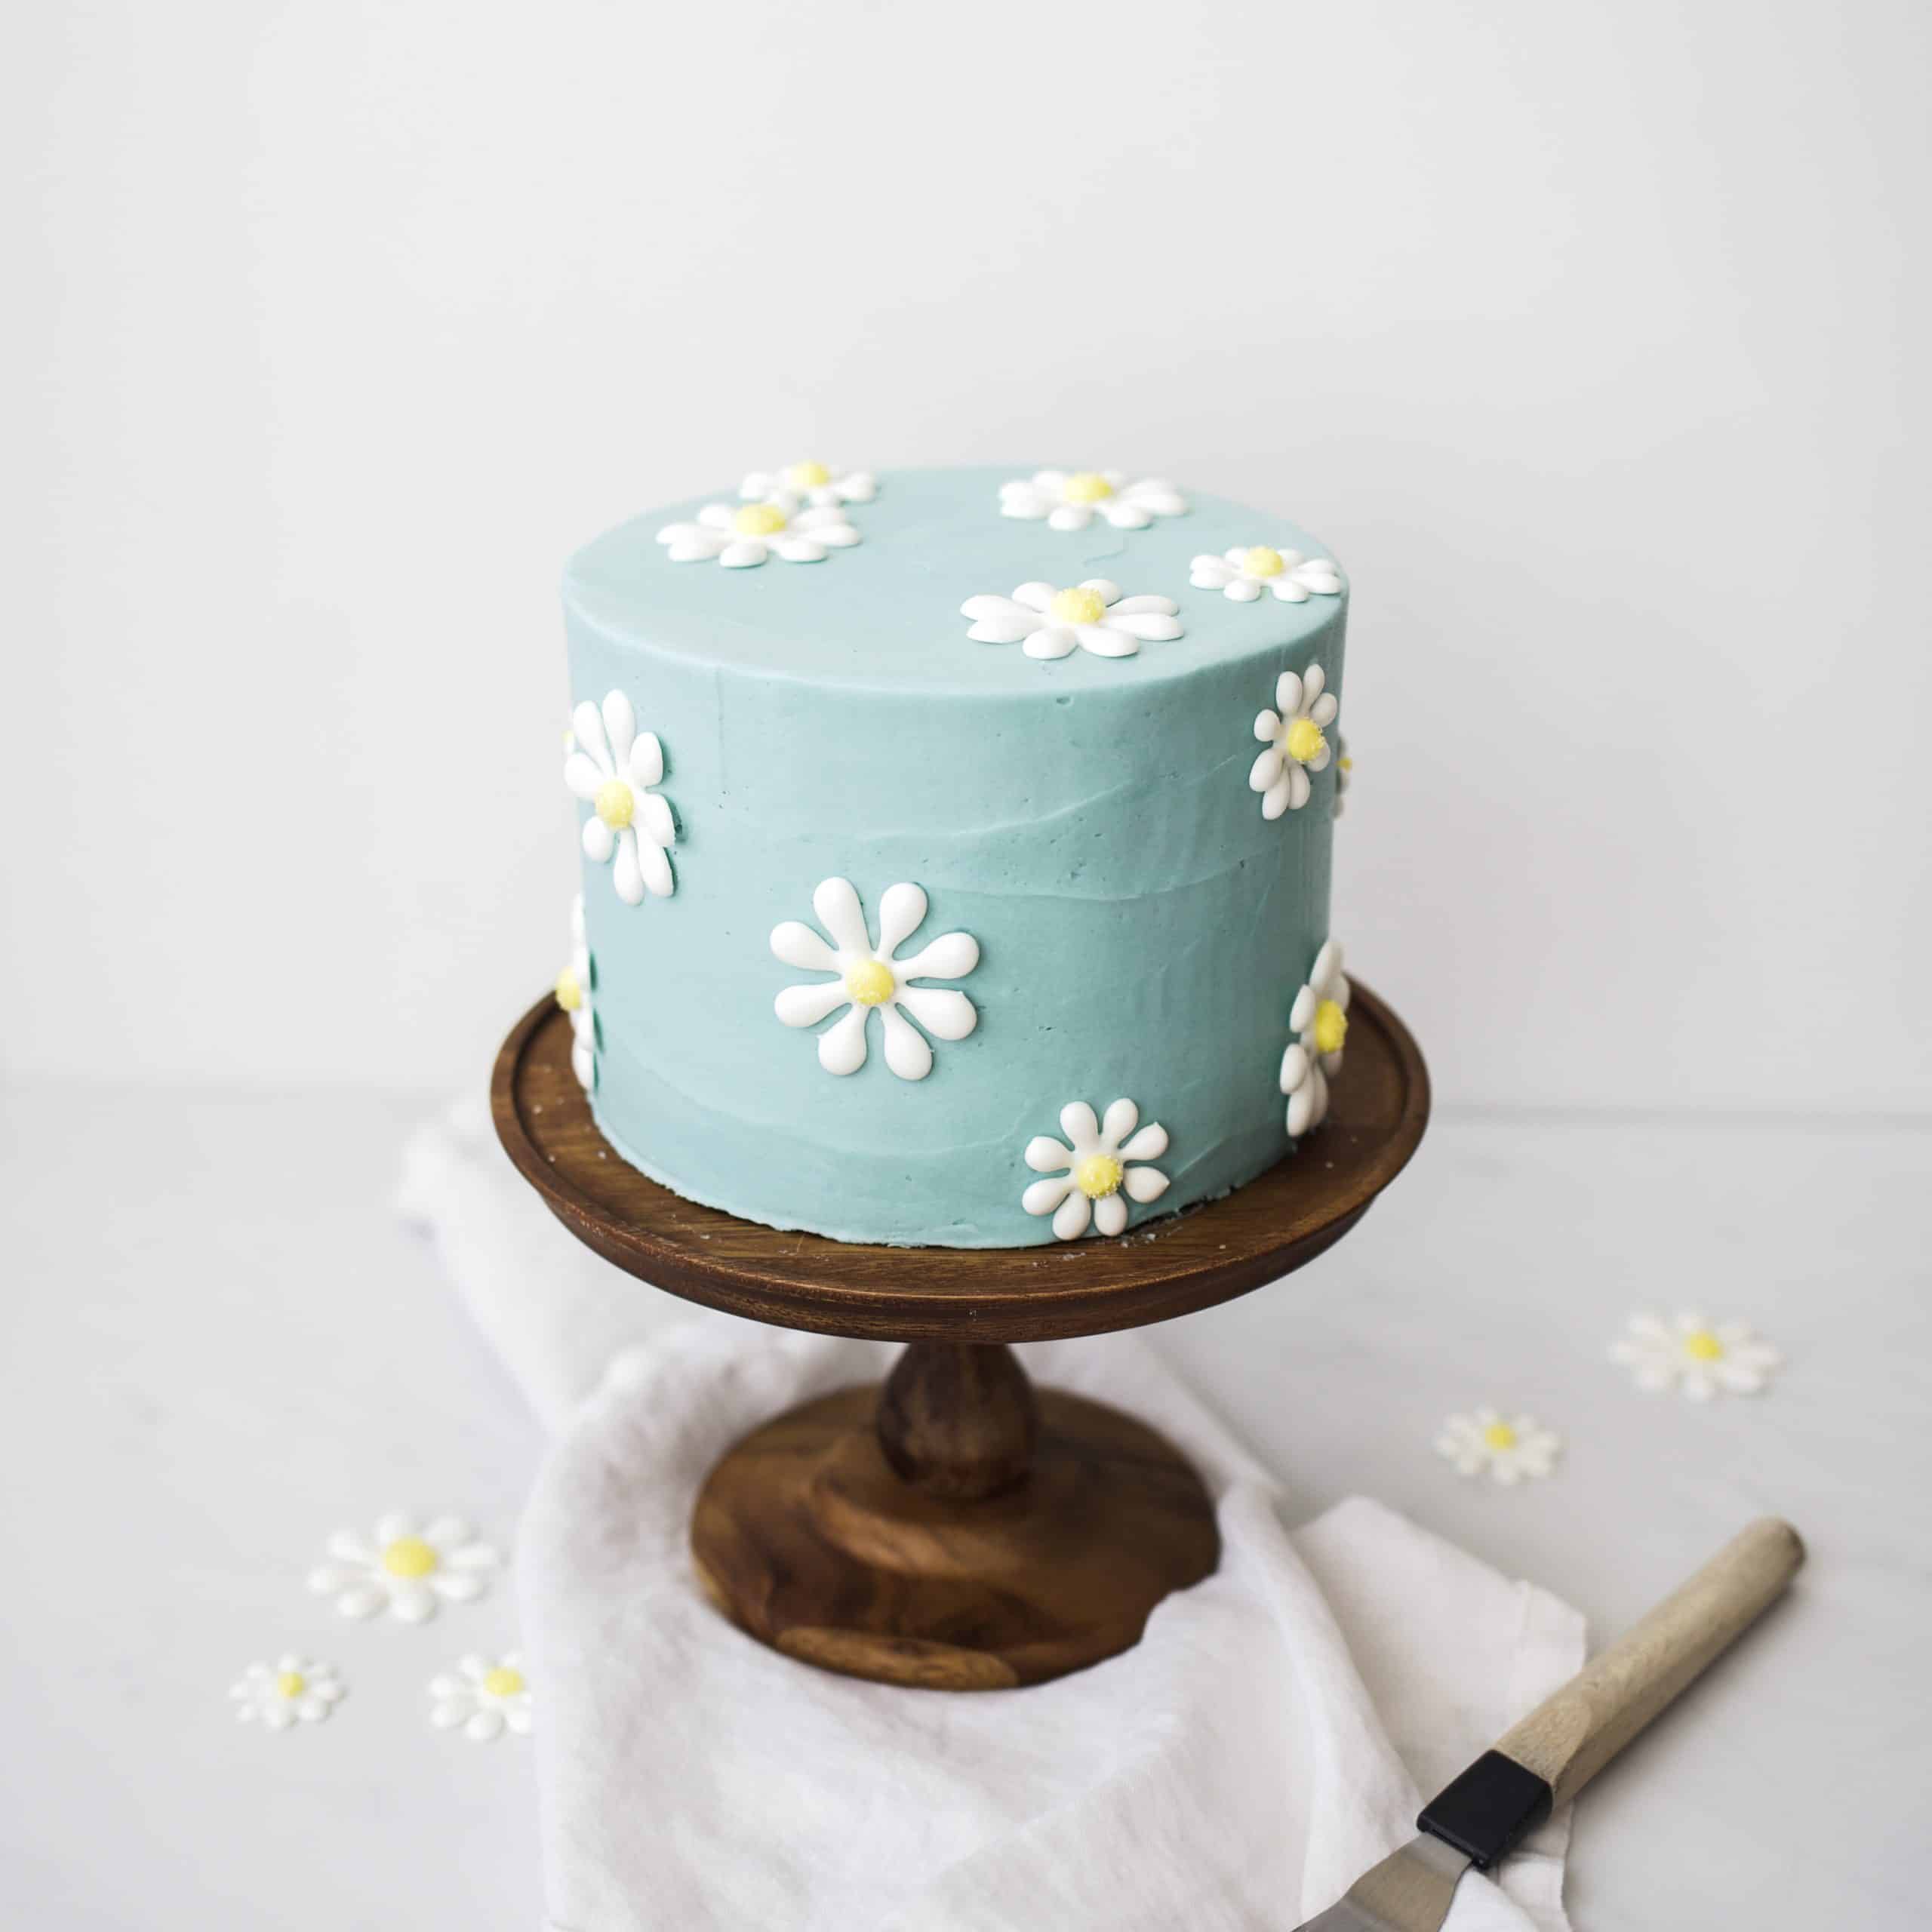
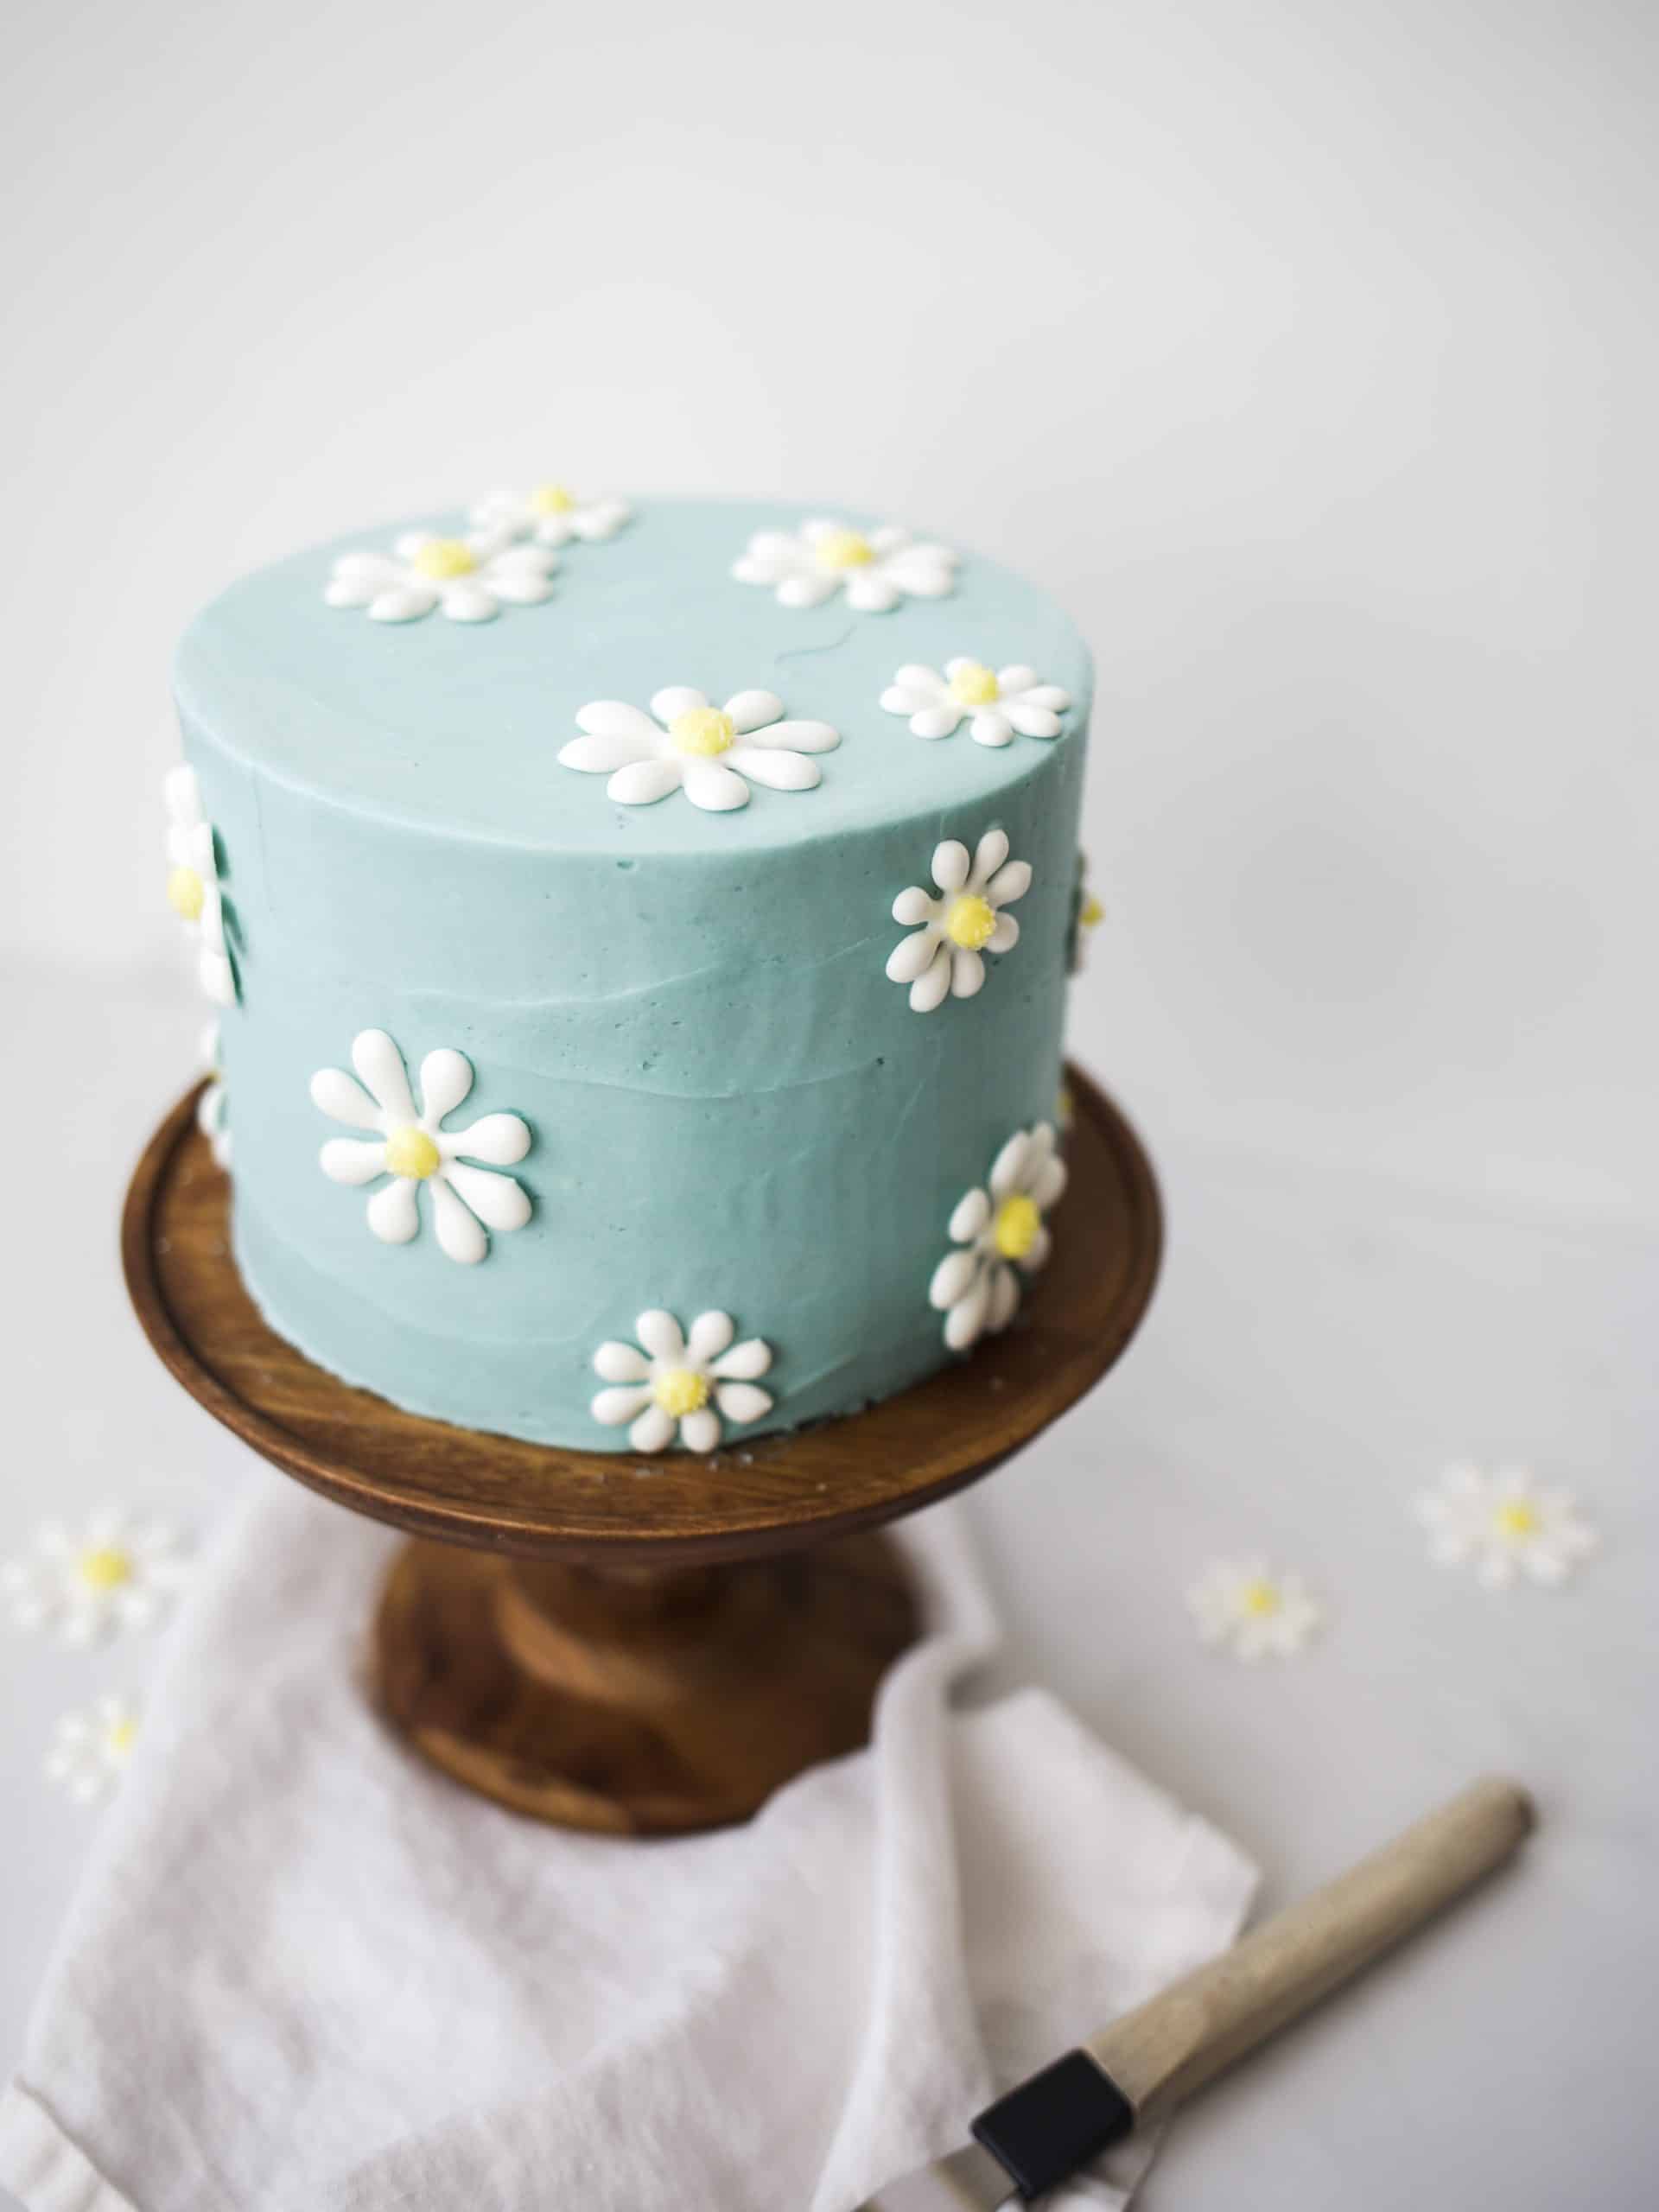
I’ll be honest: cake decorating is really not my thing. Although I love the creativity of putting together something that is equal parts tasty and beautiful, there are some people who are cut out for highly detailed desserts and pastries, and there are some who, well, are just not. I fall into that latter category. But since I’ve somehow made a career slinging recipes and photos of cookies, pies, and breads like I know what I’m doing, I thought that I would fill you in on one of my favorite dessert tricks: royal icing transfers. If you, like me, find most forms of cake decorating a bit daunting, keep reading while I show you how I made this daisy cake and how you can use royal icing to transform any little baked good you want.
What is a Royal Icing Transfer?
We’ve not spent much time discussing royal icing here, mostly because I typically opt for a thickly piped cookie glaze in lieu of royal icing, but there are actually a whole bunch of other jobs that royal icing performs well at. Gingerbread houses, homemade sprinkles, and sugar flowers would be nothing without royal icing, and today I’m going to show you how you can transfer piped icing designs from sheets of wax paper directly to a cake. A royal icing transfer is royal icing that has been applied to a sheet of wax paper, allowed to dry, and then carefully peeled off and transferred to a baked good. Because royal icing dries hard, perfectly piped designs can be picked up and placed onto any baked treat bearing a sticky surface: freshly frosted cakes, still-wet cookies, and swirled cupcakes.
Why Use a Royal Icing Transfer?
Although many people more proficient with a piping bag and tip might be able to decorate cakes, cookies, and confections freehand, some of us (raises hand) don’t have as much confidence in their own artistic designs. Instead, I like to print off shapes and letters onto sheets of printer paper, tracing the ink on top of a sheet of wax paper. This means I basically get to use a stencil and allow the icing to dry prior to transferring it to my cake or cookie. Using a royal icing transfer means I don’t worry about mess ups, shaky hands, or smudges, because I can create as many shapes as I want, only using the ones that turn out the way I wanted.
How to Create a Royal Icing Transfer:
Meringue Powder Royal Icing
Royal icing can be prepared in a number of ways, but my preferred method is made with meringue powder. Meringue powder can be found at craft stores or purchased online, and when combined with water and powdered sugar, it makes a glossy icing that can be thickened and piped.
Making It
To make royal icing, we simply combine powdered sugar, meringue powder, and water in a large bowl with a hand mixer. Stir until the mixture thickens slightly, leaving traces of the beater behind in the icing. For the purpose of piped designs, I like to test the viscosity of the icing by dragging a knife or spoon through the mixture; the icing will separate and slowly pool back together, all trace of the knife or spoon barely disappearing within 10-12 seconds. For more detailed designs, you may prefer a slightly thicker icing, so feel free to thicken it up by adding a few additional tablespoons of powdered sugar.
Spoon a small bit of the icing into a piping bag fitted with a piping tip and test out your design. Thicken (using powdered sugar) or thin (using just a few teaspoons of water) the icing as desired, and remember that thin icing will spread out and take longer to dry. Once your icing is the right consistency, you can modify its color using food coloring. I always recommend gel food coloring (I buy this kind!), and remember- a little goes a long way! Whisk in any gel coloring you prefer and allow the icing to rest for about 2 minutes to allow any bubbles to come to the surface the bowl. In the meantime, prepare your stencil.
Piping It
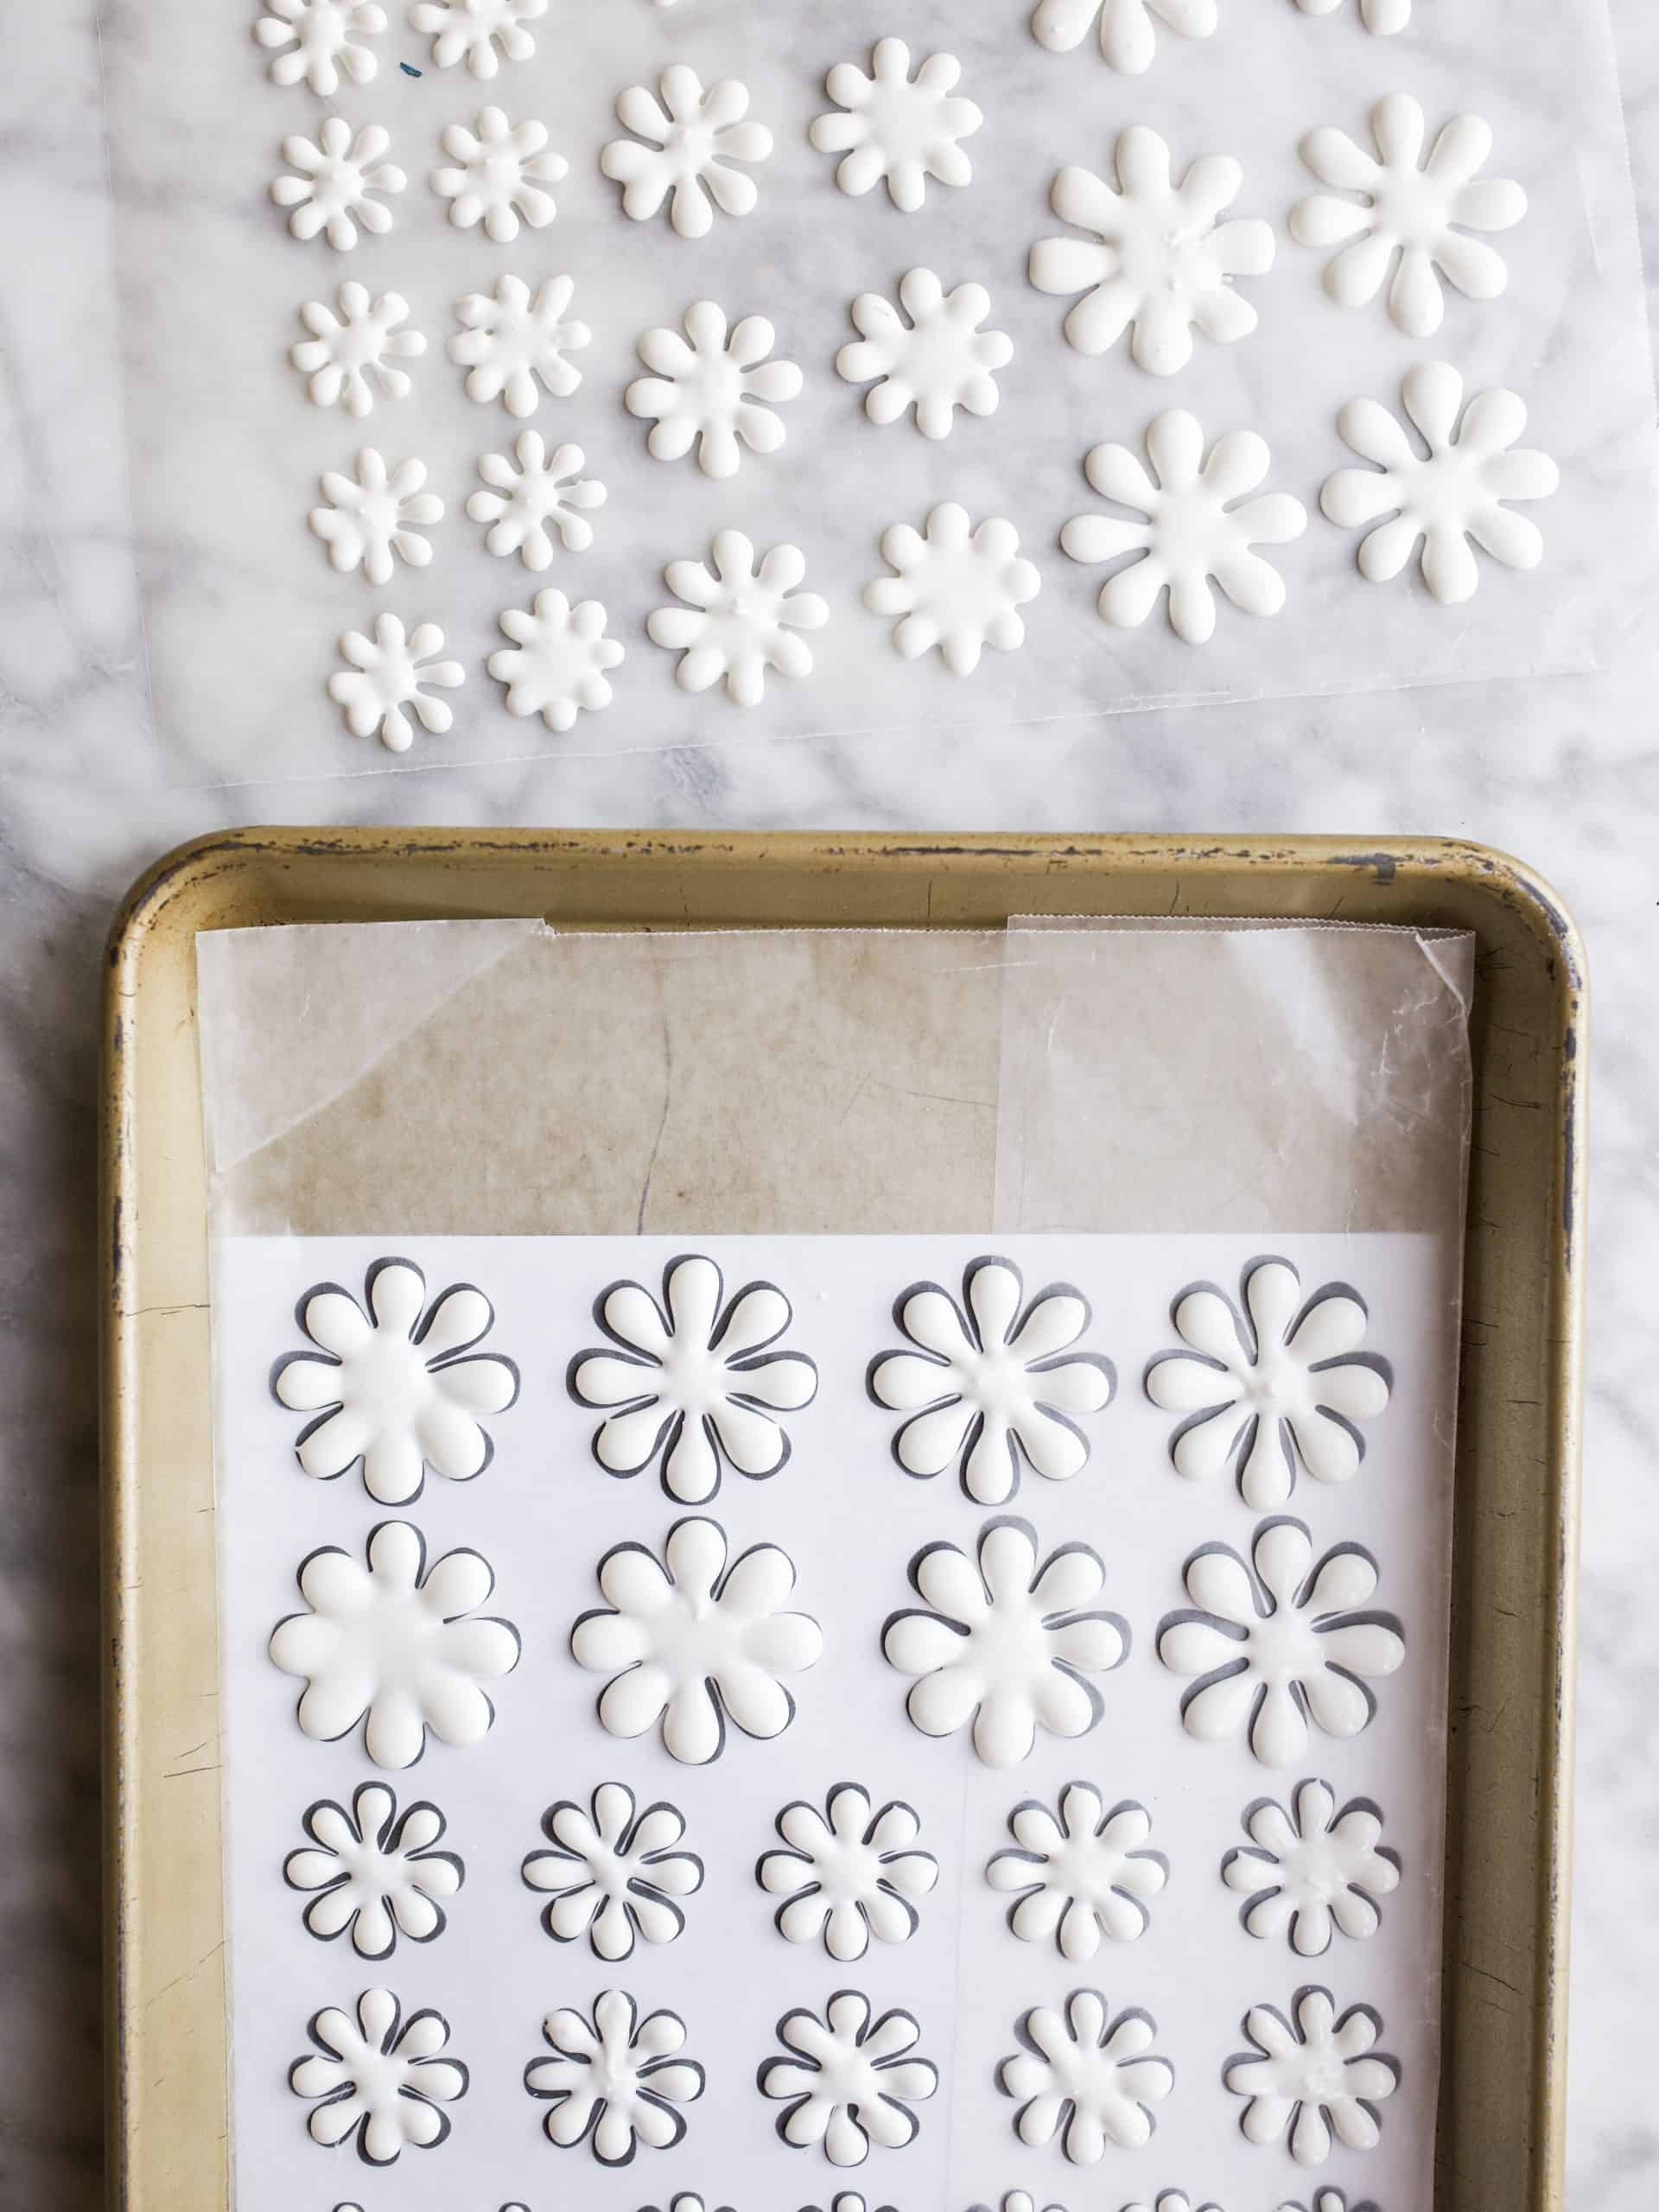
For royal icing transfers, I like to print my designs onto a piece of computer paper and then layer it onto a rimmed sheet pan with a piece of wax paper on top. Online programs like Canva make creating stencils a cinch. Keep in mind that many royal icing designs with two or more colors will need some dry time in between layers- don’t rush the process unless you’re fine with smeared designs.
When you’re ready to being, slowly apply pressure to the piping bags, tracing your stencil and filling in your design where needed. I like to use a food safe paint brush (that has never touched paint!) to move the icing around and fill in any borders, but you could also use a toothpick as well. Once finished, allow the designs to dry completely, usually 24 hours, before carefully peeling them off the wax paper and applying them to the surface of the baked good.
Troubleshooting Royal Icing Transfers
If your design is sticking to the wax paper, the underside may not be dry.
Designs that are too thin may break when peeling. Be sure to create plenty of extras just in case you experience breakage.
For easy peeling, consider piping designs directly onto their own little piece of wax paper. I typically avoid the extra work involved with this, but it does make the transfer easier.
Add any sprinkles, nonpareils, or colored sugar to the royal icing while wet, keeping in mind that thick royal icing will for a dried shell pretty quickly.
Use a toothpick or food-safe paintbrush to gently nudge any icing around on your design while wet.
Always use gel food coloring to dye royal icing.
Royal icing transfers will not stick to hardened surfaces! Be sure to apply designs while the surface of the cake, cookie, or confection is still sticky or wet.
If the surface you intend to apply your royal icing transfer to is no longer wet or sticky, you can often stick it using a few dots of royal icing on the back of your design.
If you, like me, are new to royal icing transfers, start with simple designs. The more detailed the design, the more frustrating the process will be.
Be sure to test the viscosity of your royal icing prior to piping; thin icing will spread out way too much.
Allow royal icing to dry at room temperature- not in the fridge. You can expedite this process by allowing a small fan to circulate air over them.
How to Make This Happy Daisy Cake
If you’ve read this whole post to see how to make this daisy cake, you’ve finally reached the right section! For this cake, I used a store-bought yellow cake mix baked in three (6″) cake pans. The cakes took about 23 minutes to bake, but just remove them from the oven when a toothpick comes out clean. While the cakes baked, I piped the first layer of the daisies (find my template here!).
First, prepare a single batch of royal icing and spoon about 2/3 of it into a prepared piping bag fitted with a #1 tip. Add a drop or two of yellow food color to the reserved 1/3 of icing, and place it in a small Tupperware or a bowl covered with a wet paper towel- this will prevent the icing from drying out. Pipe directly onto the wax paper, stenciling and filling in each flower as you go around. Remember that there is a learning curve here, and not every flower will turn out perfect. Be gentle with yourself. Allow the whites of the daisies to crust and dry, about an hour, before piping the yellow centers and sprinkling them with yellow sugar. Allow the designs to dry at room temperature overnight or 24-hours, preferably.
Once your cake layers have cooled and the daisies have dried completely, prepare the buttercream of your choice (you’ll need about 3 cups), and frost your cake. Peel off the daisies carefully and apply them directly to the sticky frosting. Leave the cake at room temperature and serve! I just think it’s super adorable and a welcome happy addition to these otherwise dreary months.
I hope you guys have learned a smidge in this tutorial and will give royal icing transfers a try! Let me know what you think and happy baking!
This simple royal icing is made with meringue powder and can be used to make royal icing transfers!
Author:Kate Wood
Prep Time:5
Total Time:5 minutes
Yield:1-1/2 cups
Category:Dessert
Ingredients
2 cups powdered sugar
1–1/2 tablespoons meringue powder
1/4 cup room temperature water
Instructions
Combine all three ingredients in a large bowl and use a hand mixer to blend together on medium speed until glossy and slightly thickened, about 1-2 minutes. Add additional water a teaspoon at a time to thin out or add additional powdered sugar a tablespoon at a time to thicken up. Stir until combined.
Notes
See directions in text above for achieving the appropriate viscosity royal icing for piping,
I’ll be honest: I’ve spent the last 10 minutes debating on whether to save this post until early-Novemberish when Thanksgiving dinners and holiday soirees have us all scrambling to make photo-worthy pies filled with canned pumpkin and toasty pecans. In the end, I considered my fridge full of summer berries, Chilton County peaches, and the first of this season’s cherries and decided now was as good of time as any to teach y’all how to make and bake a beautiful (and delicious!) pie dough. If you’re looking for tips on press-in crusts or store-bought varieties, this is not the post for you, but if it’s braided double crusts and flaky pastry you’re after, you’ve come to the right place. Let’s dive in on how to make pie dough.
What Is It?
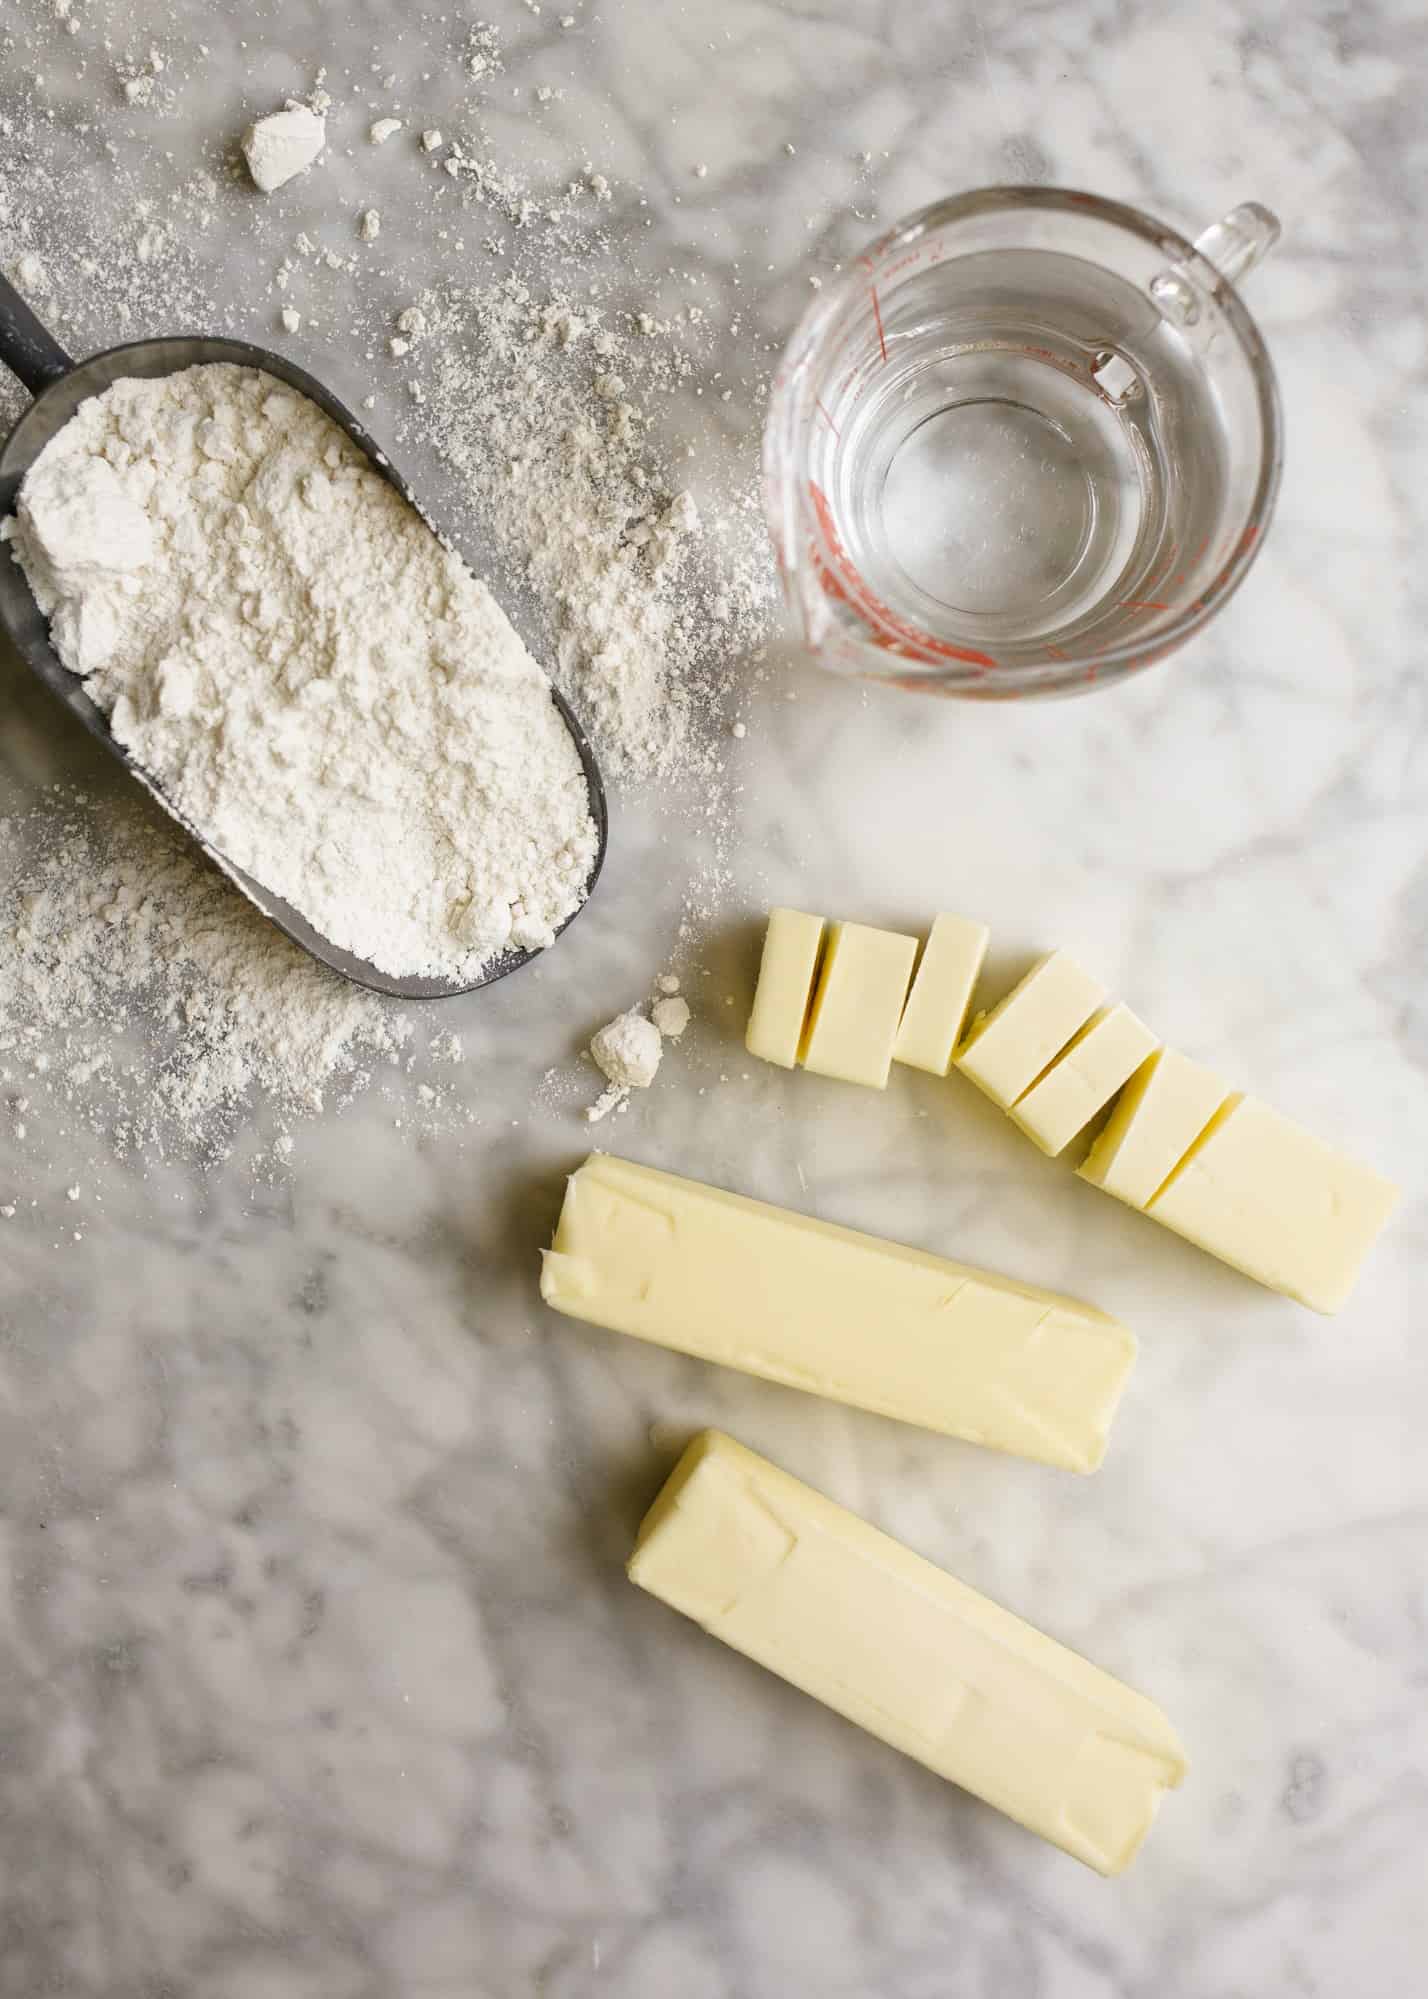
Any homemade pie crust starts with a plain pastry dough. Pie dough is typically made with three simple ingredients: flour, fat, and water. That’s it! Other ingredients can be added like eggs, sugar, and salt. These manipulate the flavor, color, and texture of your final pastry.
Flour
The right amount and type of flour can make all the difference in a homemade pie dough. Unbleached all-purpose flour is typically chosen for standard pie crusts. It must be handled appropriately to yield a crust that is both tender and flaky. Too much flour can create a tough or dry crust; not enough may flour may lead to a wet crust that shrinks upon baking. Proportions are everything to a great pie crust recipe. Even perfect pastry dough will ruin with over-manipulation. Because all-purpose flour is prone to increased gluten formation, overworked pie dough may wind up being tough and dense.
Fat
I would argue that fat is the single most important aspect of learning how to make pie dough. Fat contributes flakiness and flavor to pie dough, and different types of fat offer their own myriad of benefits. It’s widely known that shortening and lard produce the flakiest pastries thanks to its ability to coat the flour more easily than butter. Butter is often chosen for flavor, although margarine yields similar textures. Oil is a final alternative for pie makers (I made one once here!), although it’s used less frequently and often yields a grainy crust. The amount, temperature, and method of dispersing fat into the flour makes all the difference as we’ll see in a couple paragraphs.
Water
The addition of liquid to a pie dough enables leavening. As the dough heats in the oven, steam generated from the water leavens the pastry and enhances its flakiness. Water also hydrates the dough which is helpful for gluten production, although many people add vinegar, lemon juice, or even alcohol to prevent too much gluten formation. Without enough water or liquid, pie doughs are dry or too crumbly to work with, but if too much liquid is added, crusts make shrink or become too tough.
How to Make Pie Dough
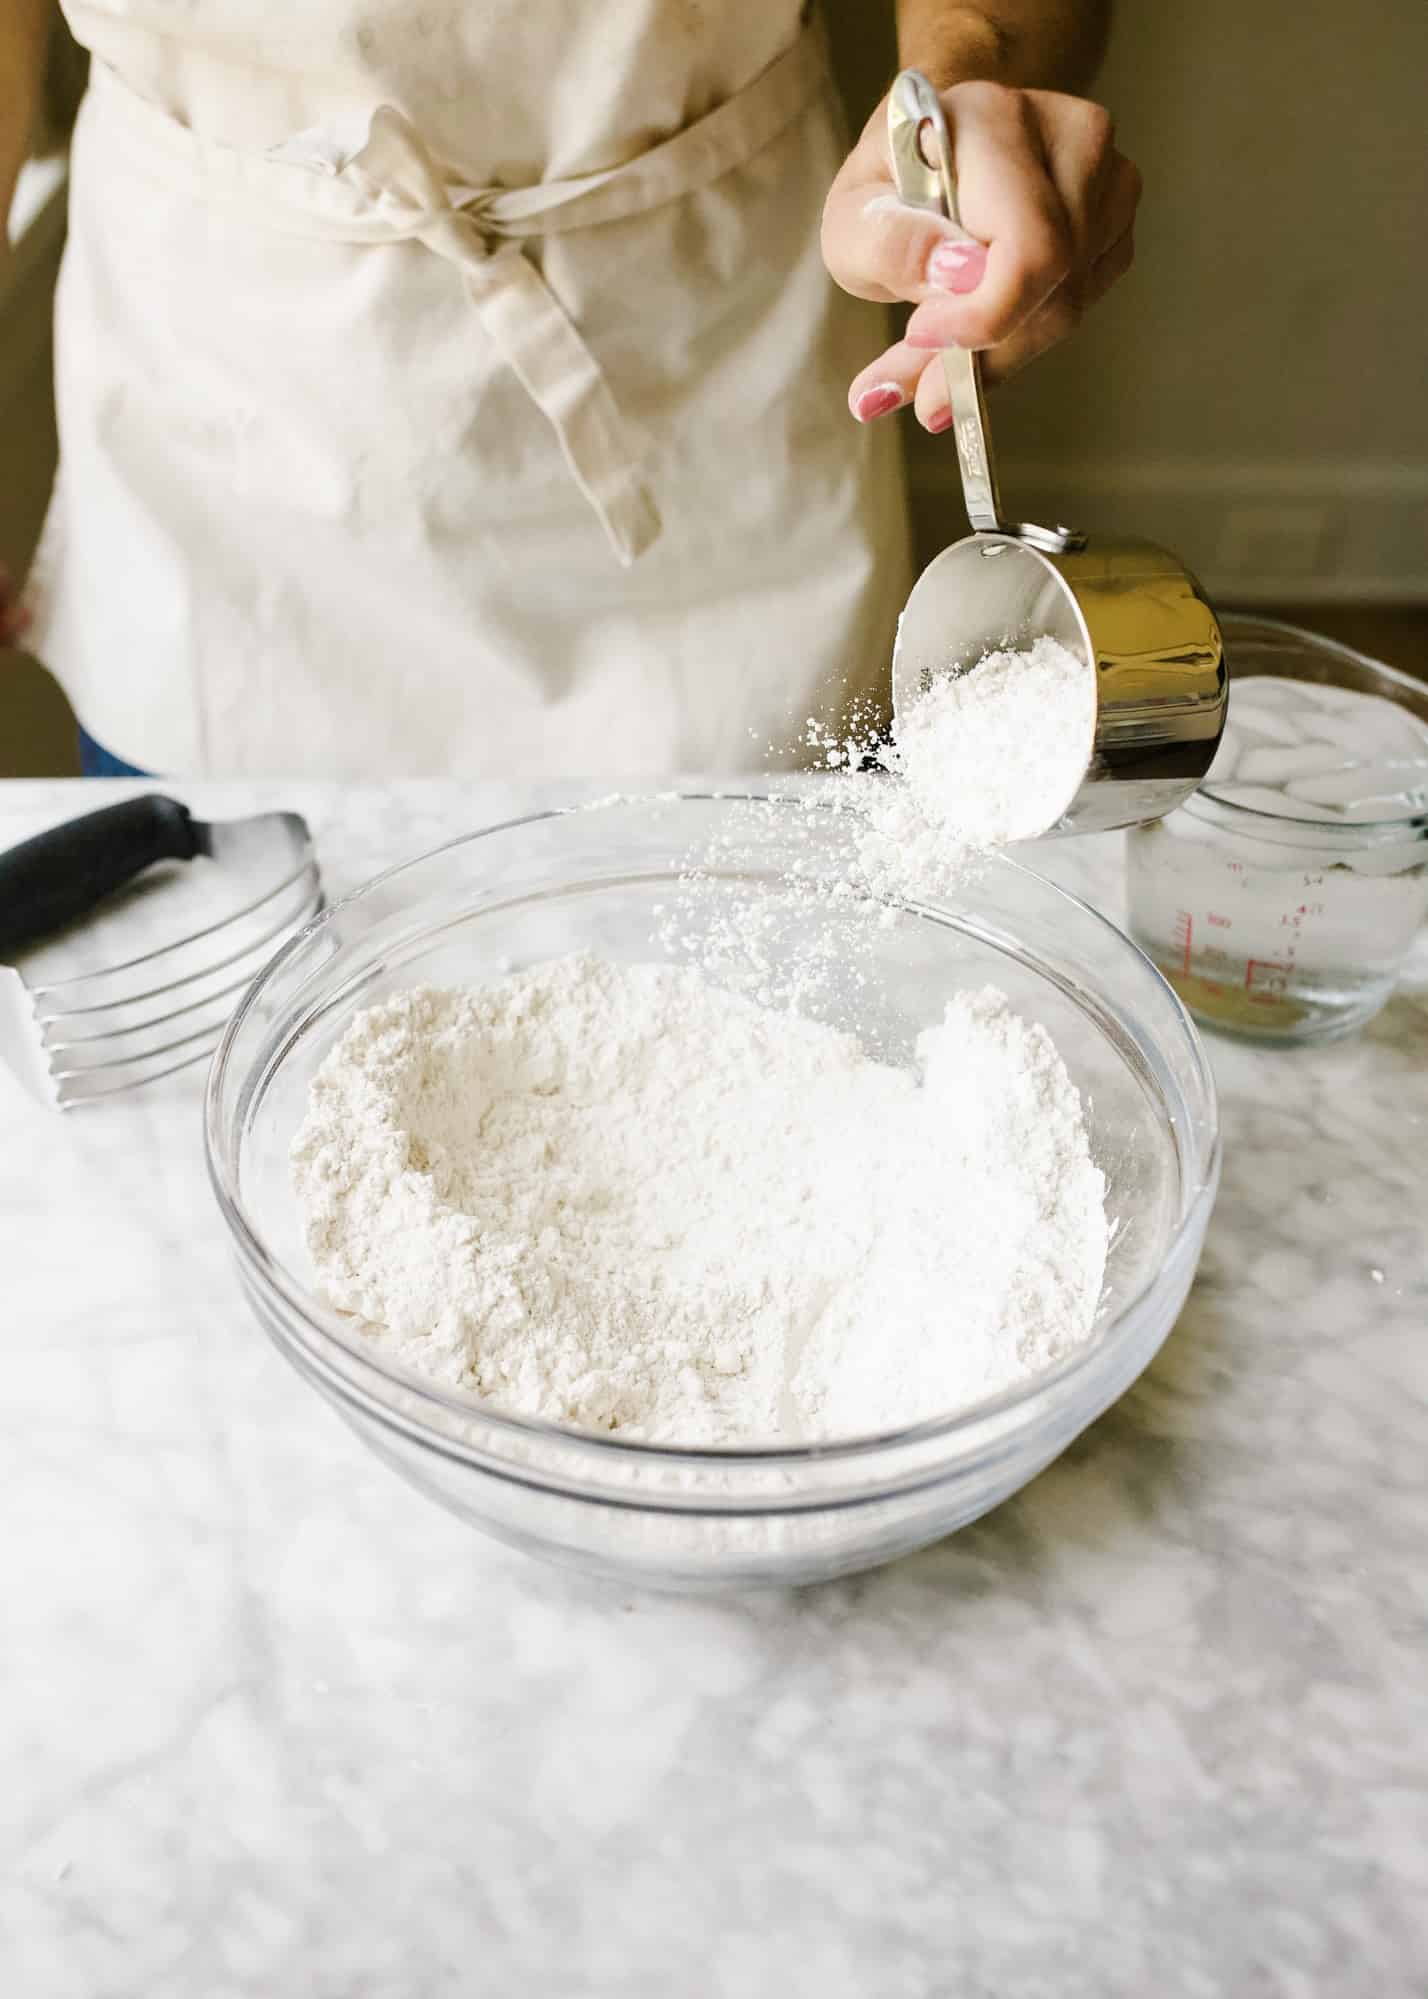
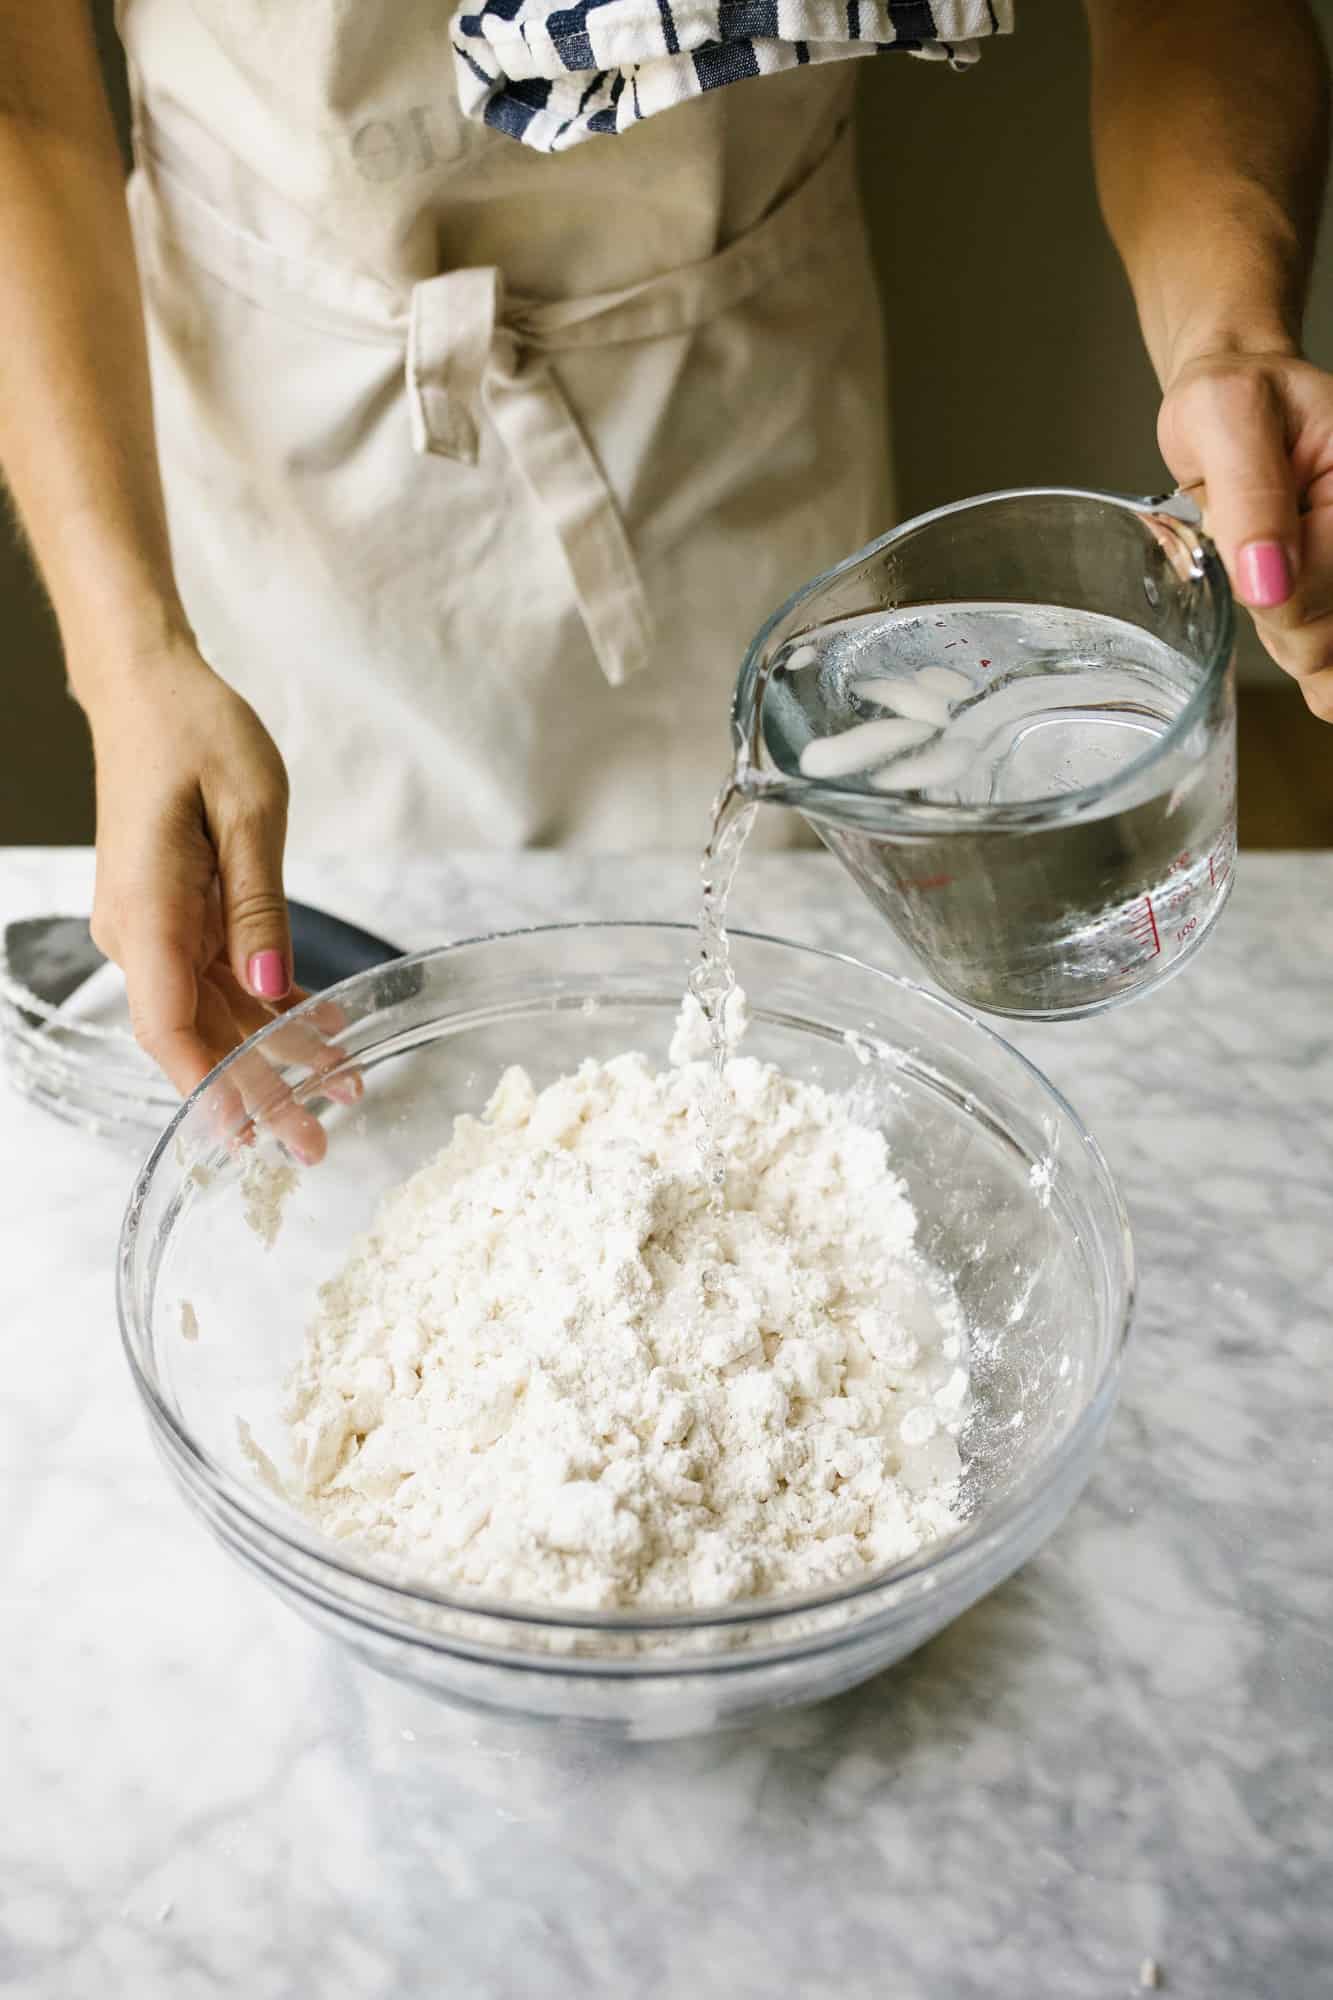
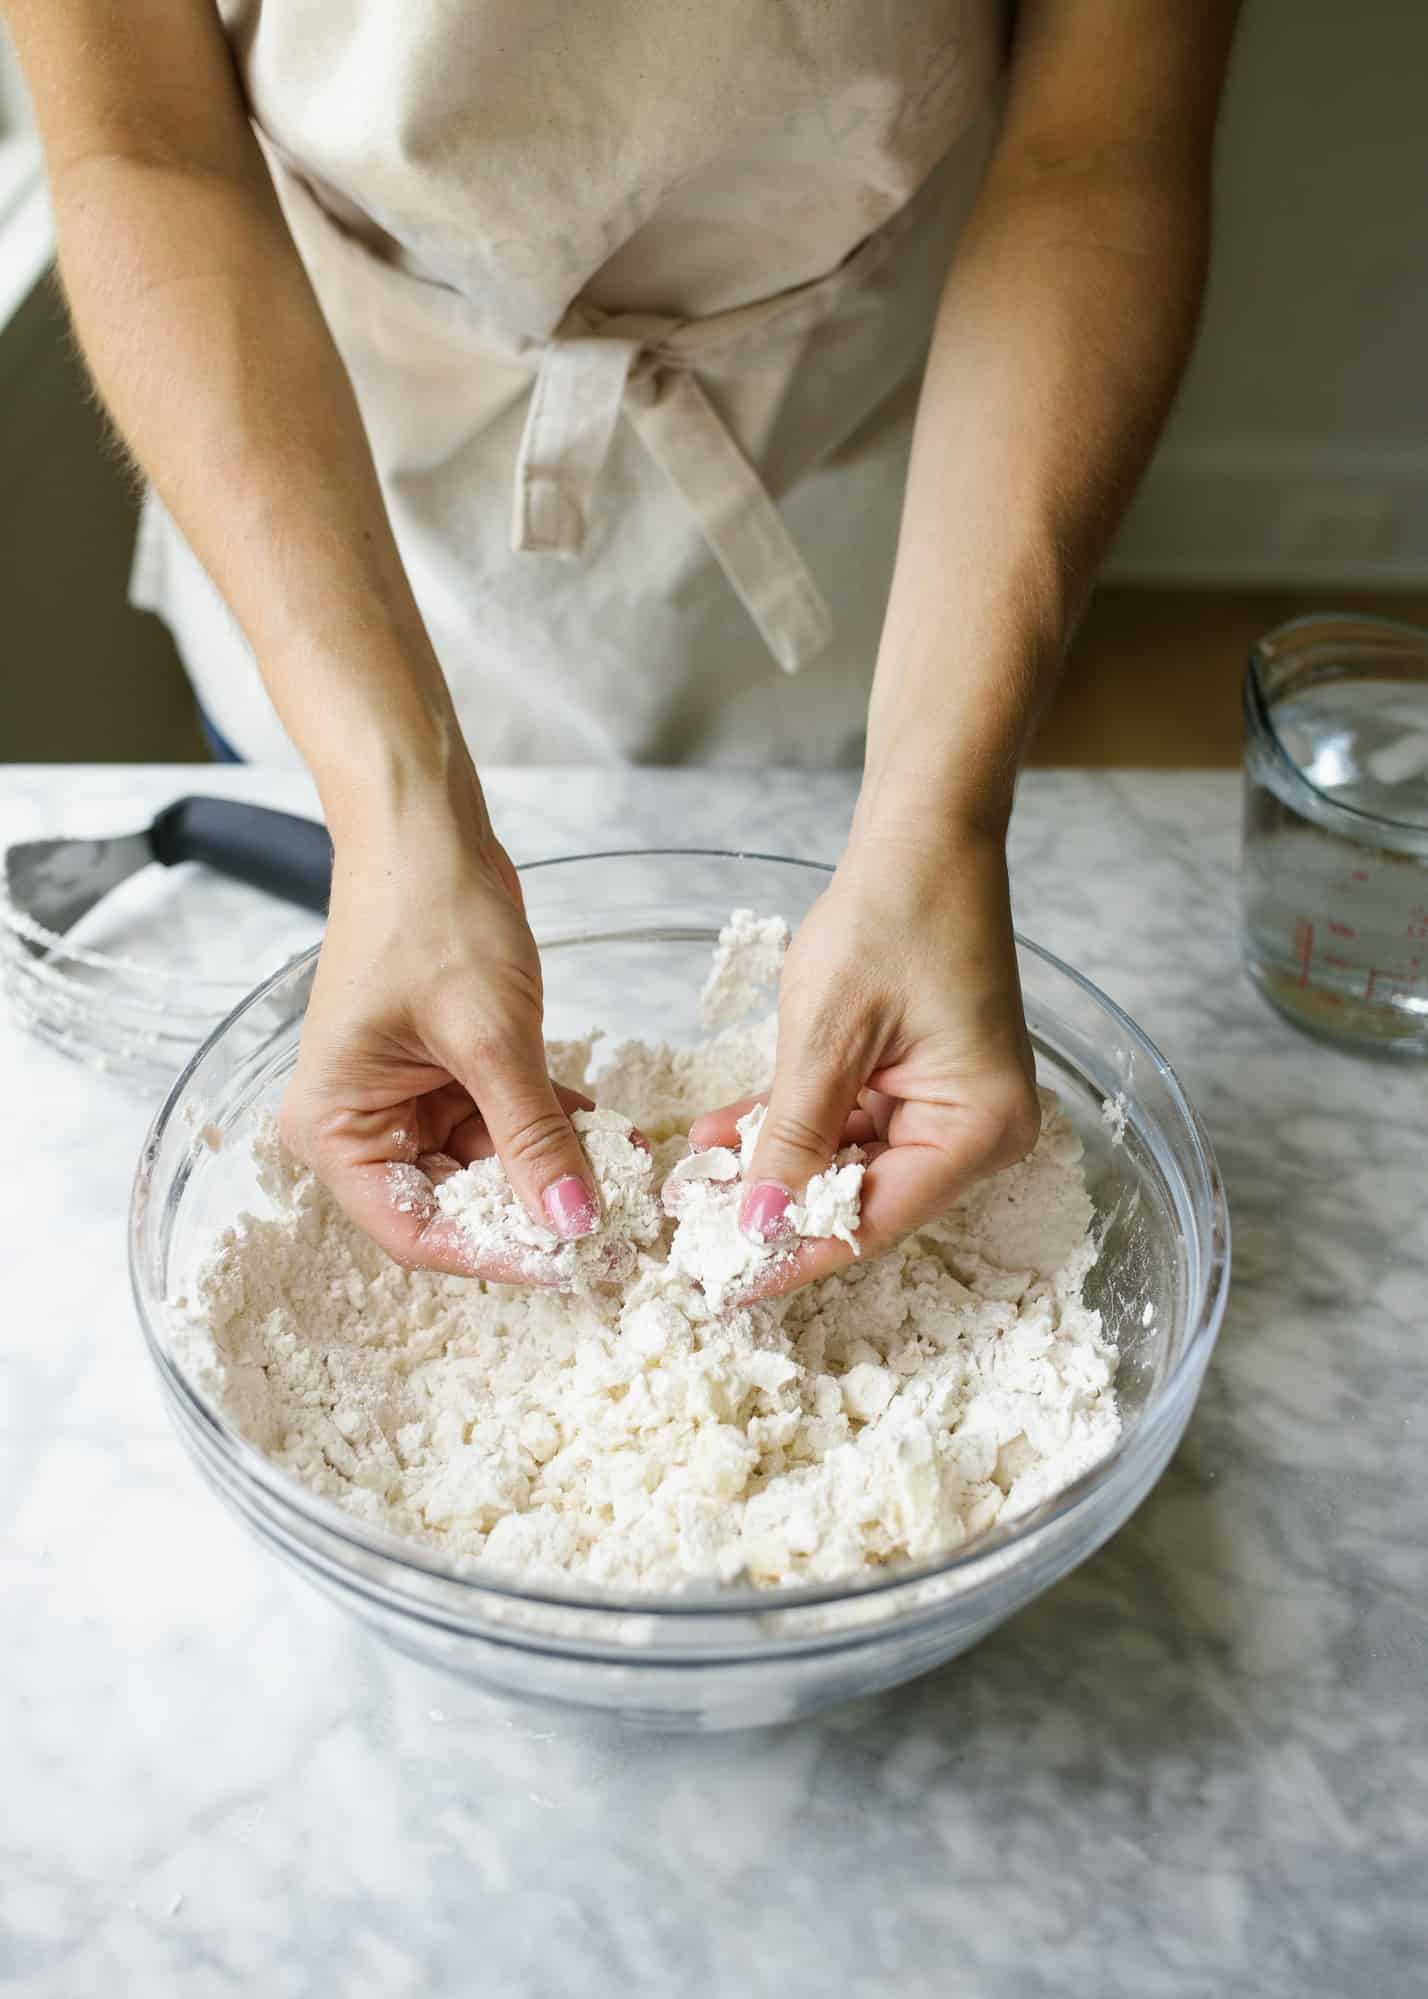
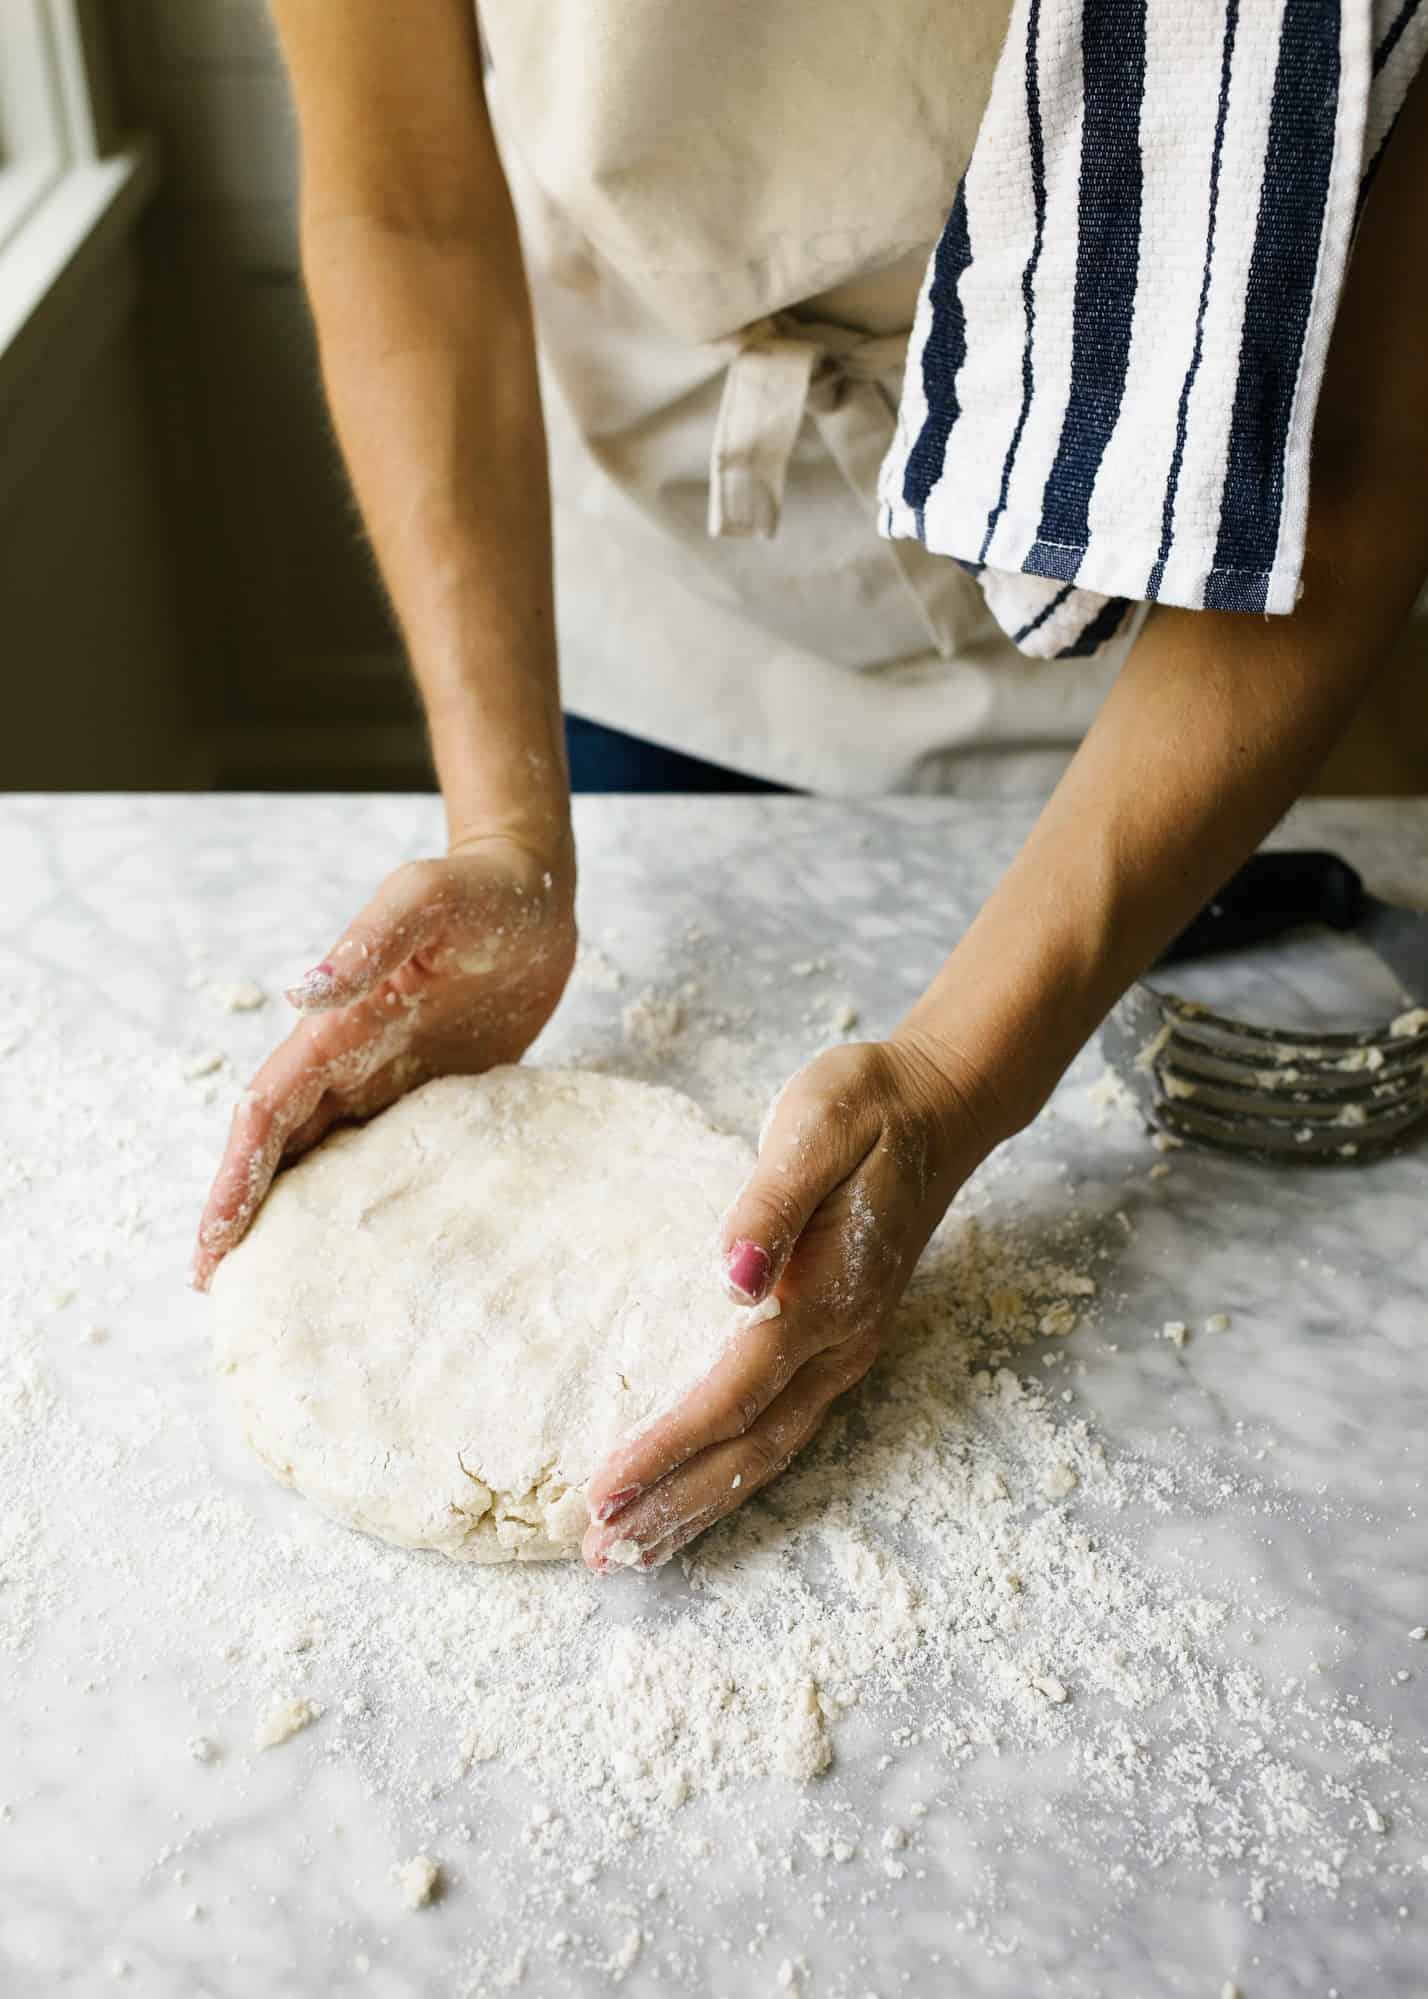
First, combine the flour with salt, sugar, and any other dry ingredients. Once combined, cut the fat into the dry ingredients using a pastry cutter, a food processor, or even just your hands. Continue cutting in the fat until it is evenly incorporated in pea or marble-sized pieces. Keeping the fat cold and working quickly helps to ensure that the pastry will remain flaky and prevent gluten formation. Once the fat is thoroughly integrated, stir in ice water or another cold liquid until the flour comes together into a shaggy dough.
Quite often, chilled dough is easier to handle and enhances the final baked product. Keep in mind it may need to sit at room temperature for 5-10 minutes to rolling to make the job easier.
Pastry Cutter vs. Food Processor, vs. Hands
99% of the time, I opt for my pastry cutter when it comes to preparing pie dough. The reason is simple: I don’t trust my fingers to do the job well but I also don’t love the clean-up involved with my food processor. A great pastry cutter can make the job quick and the clean-up simple, so, for me, it’s a win-win. Even so, don’t sleep on those other methods. If you’re new to pie dough, a food processor might help distribute the fat into the flour more evenly, but there are some benefits to working in the fat by hand too; as your fingers flatten the fat into the flour, those chunky pieces will create holes in your crust that enhance its overall flakiness. The bottom line is, this is a choose-your-own adventure kind of deal. Do what works best for you.
How Is It Used?
Once prepared and chilled, homemade pie dough makes any number of treats. Although it’s typically used for dessert pies, you’ll find it’s delicious for quiche, hand pies, and more! For today’s post, I’m going to spend time talking about the areas I get the most questions about: storing pie dough, rolling, crimping, and braiding pie dough, and baking pie dough.
Storing Pie Dough
Once prepared, most pie dough need some chill time. This isn’t a Netflix and chill kind of situation: this is a temperature situation. I like to ready my pie dough for the fridge by patting it into a flat round disk and wrapping it in plastic wrap. The wrap will protect it from drying out in the fridge. If you plan to make a slab pie or any kind of squared-off pastry, you may find it easier to chill it in a flat rectangle shape that will be easier to roll out after chilling.
If you don’t plan to use your pie dough right away, you can typically store it in the fridge up to a week in advance. Any longer, and you’re better off leaving it in the freezer. Simply wrap your plastic-wrapped dough in a sheet of heavy duty aluminum foil and freeze on a flat surface. Once frozen, pie doughs keep in the freezer up to 6 months. When you’re ready to use it, just thaw out overnight in the fridge and allow it to rest at room temperature about 10 minutes or until it’s pliable for rolling.
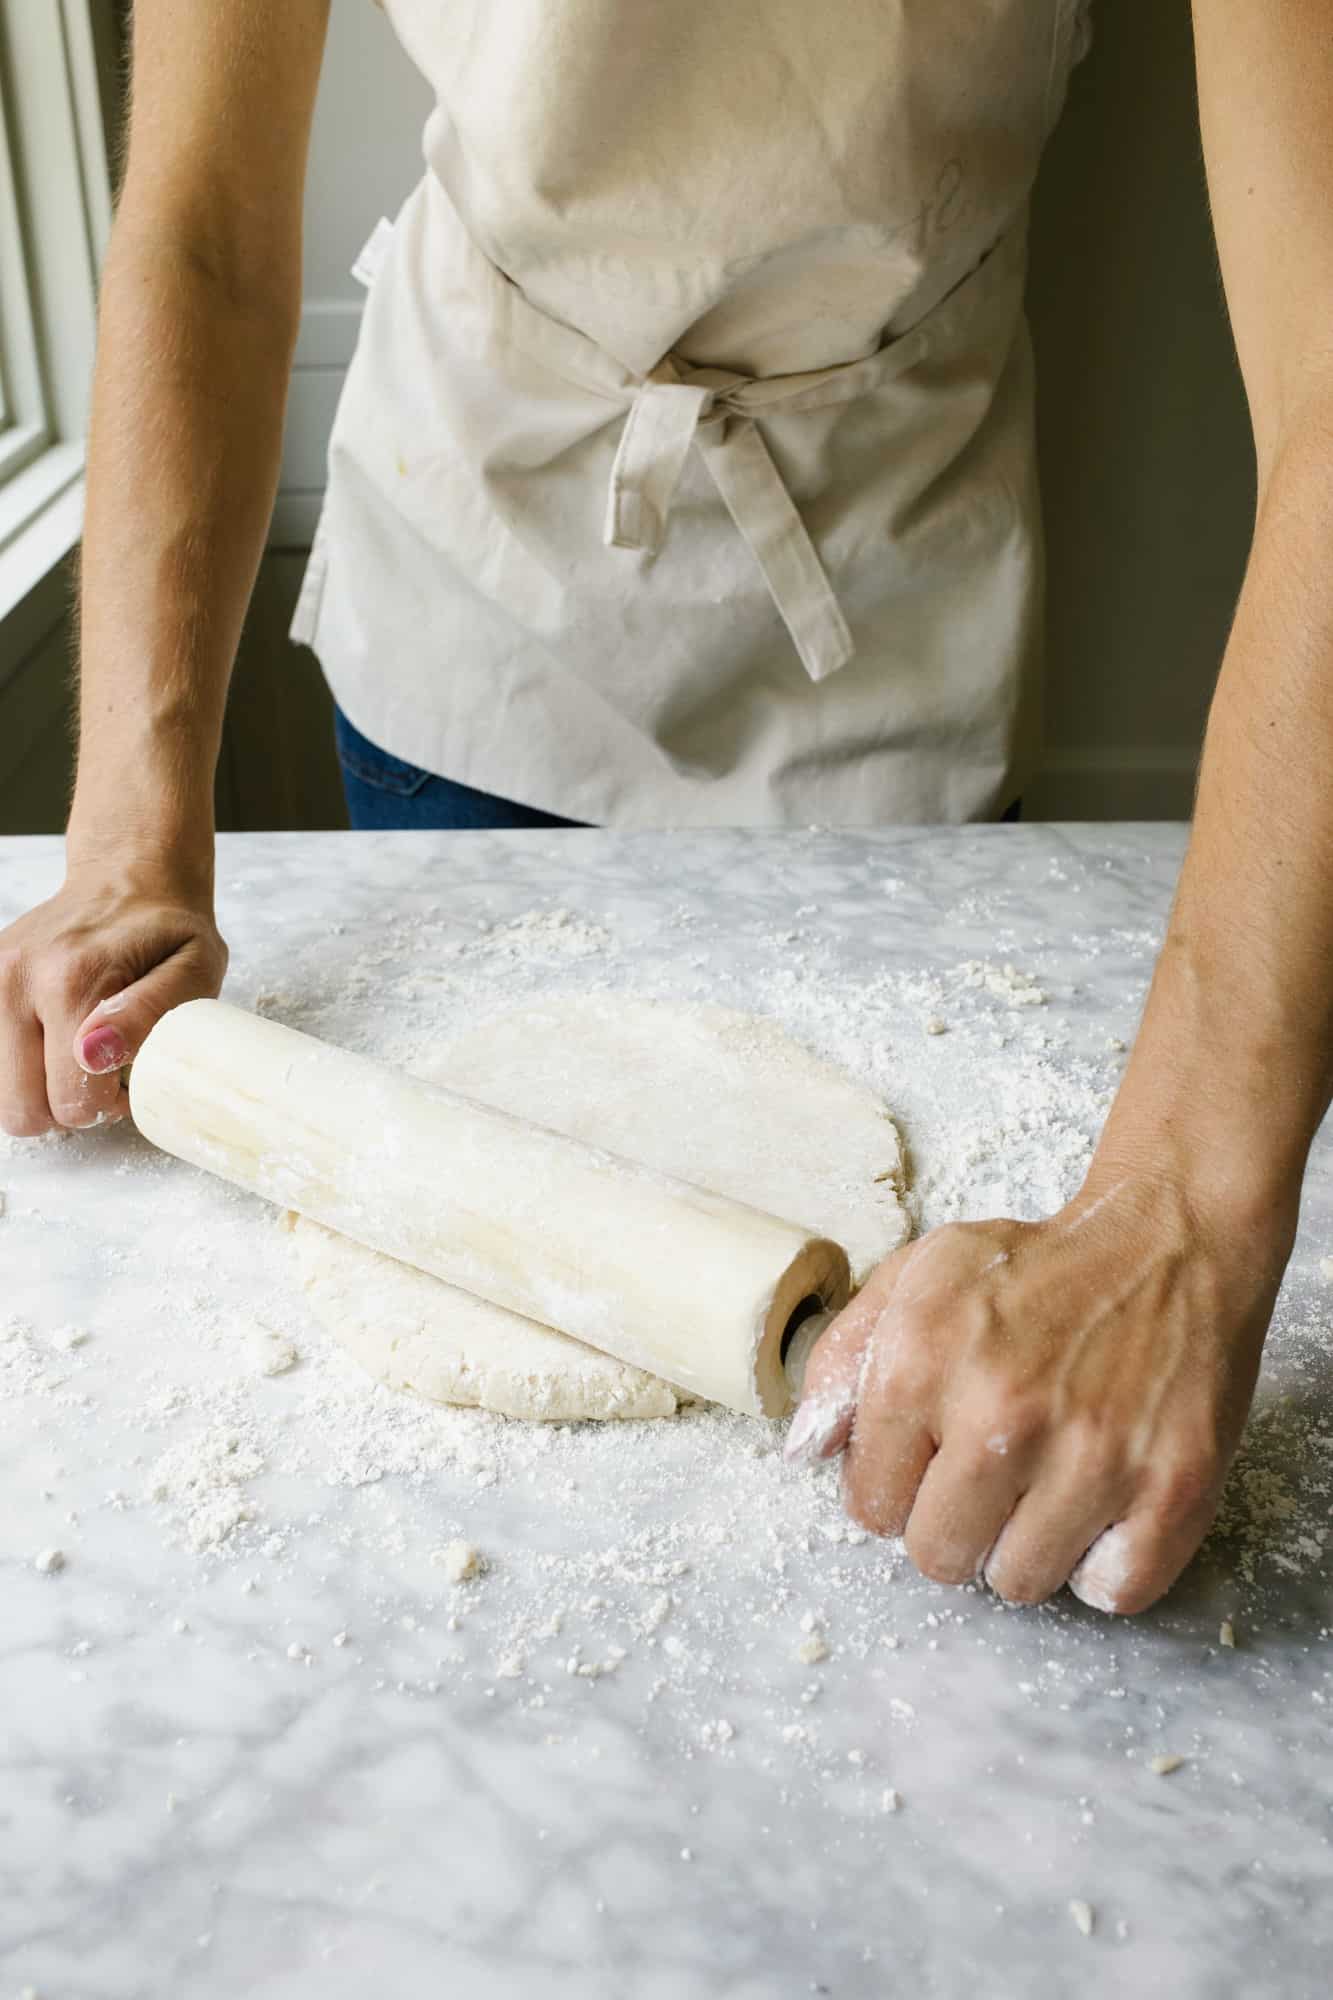
Rolling Pie Dough
As with most pastry dough, rolling pie dough works best on a cool, lightly-floured surface. My marble counters make an excellent place for rolling, but pastry mats and other flat surfaces will work brilliantly as well. Using a lightly floured rolling pin, begin rolling from the center of the dough to the outer edges, using short, firm strokes. Every few rolls or so, gently slide your hand under the dough to ensure the work surface is thoroughly floured. If more flour is needed, roll the dough onto the floured pin and sprinkle additional flour. Most recipes call for pie doughs rolled out to 1/8″-1/4″ thickness. Check to make sure your dough is large enough by holding your pie plate over the rolled-out round of dough; the dough should be an inch wider on all sides, larger if you’re working with a deep-dish pie plate.
To transfer your pie dough to a pie plate, gently roll the pie dough onto your rolling pin and unroll into the pie plate! If this method doesn’t suit you, you can try folding the dough into quarters, picking it up, and unfolding it into the pie plate. Once in the pan, tuck the dough into the edges of the pan and begin crimping or braiding your dough as desired. If you are making a double-crust pie, you can transfer your pie dough top the same way you did the bottom crust: simply roll the dough onto your rolling pin, unroll it centered on the pie, and begin crimping your edges together as desired.
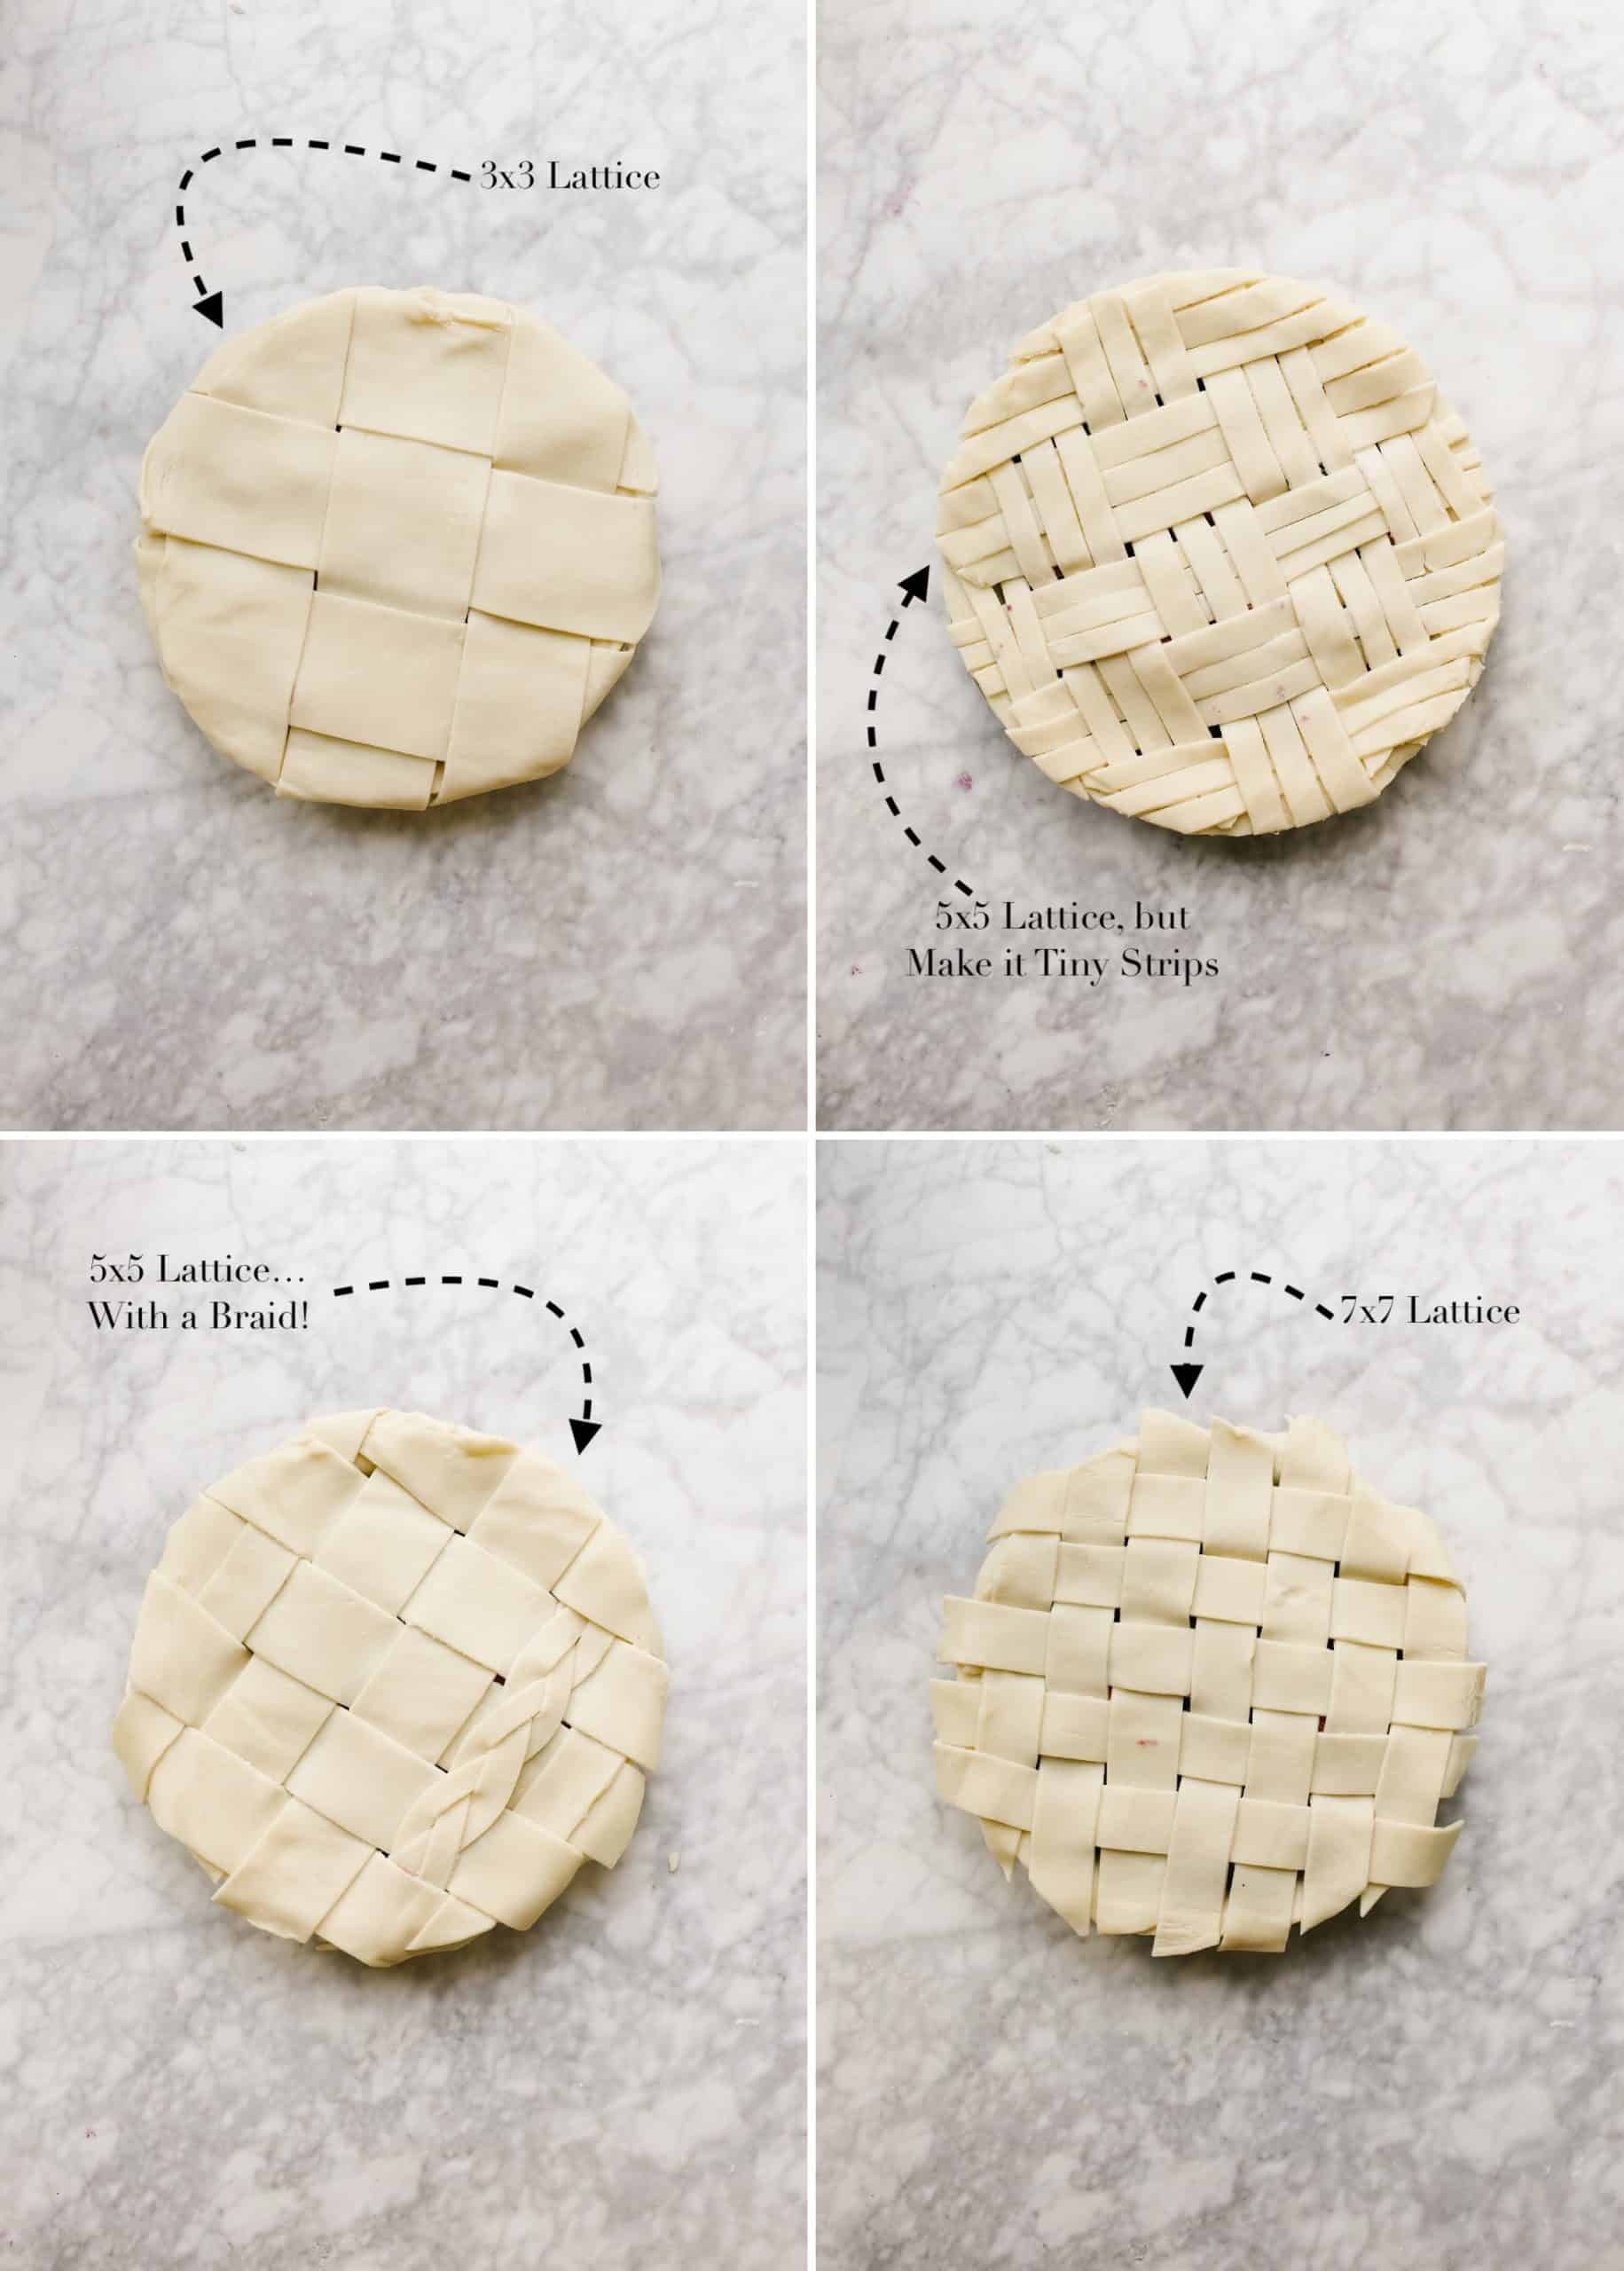
Latticed Pie
A latticed pie is one of those things many people aspire to. In fact, there are tons of Instagram accounts, Pinterest boards, and more dedicated to intricately woven pie tops. Below, you’ll see a few of my favorite simple lattices. In my own kitchen, I love to use a pizza cutter and a clear sewing ruler to keep my trimmed strips the exact size I want them to be. I don’t have the patience for much beyond this, but if you do, know the principles are the same: keep your dough cold and work quickly!
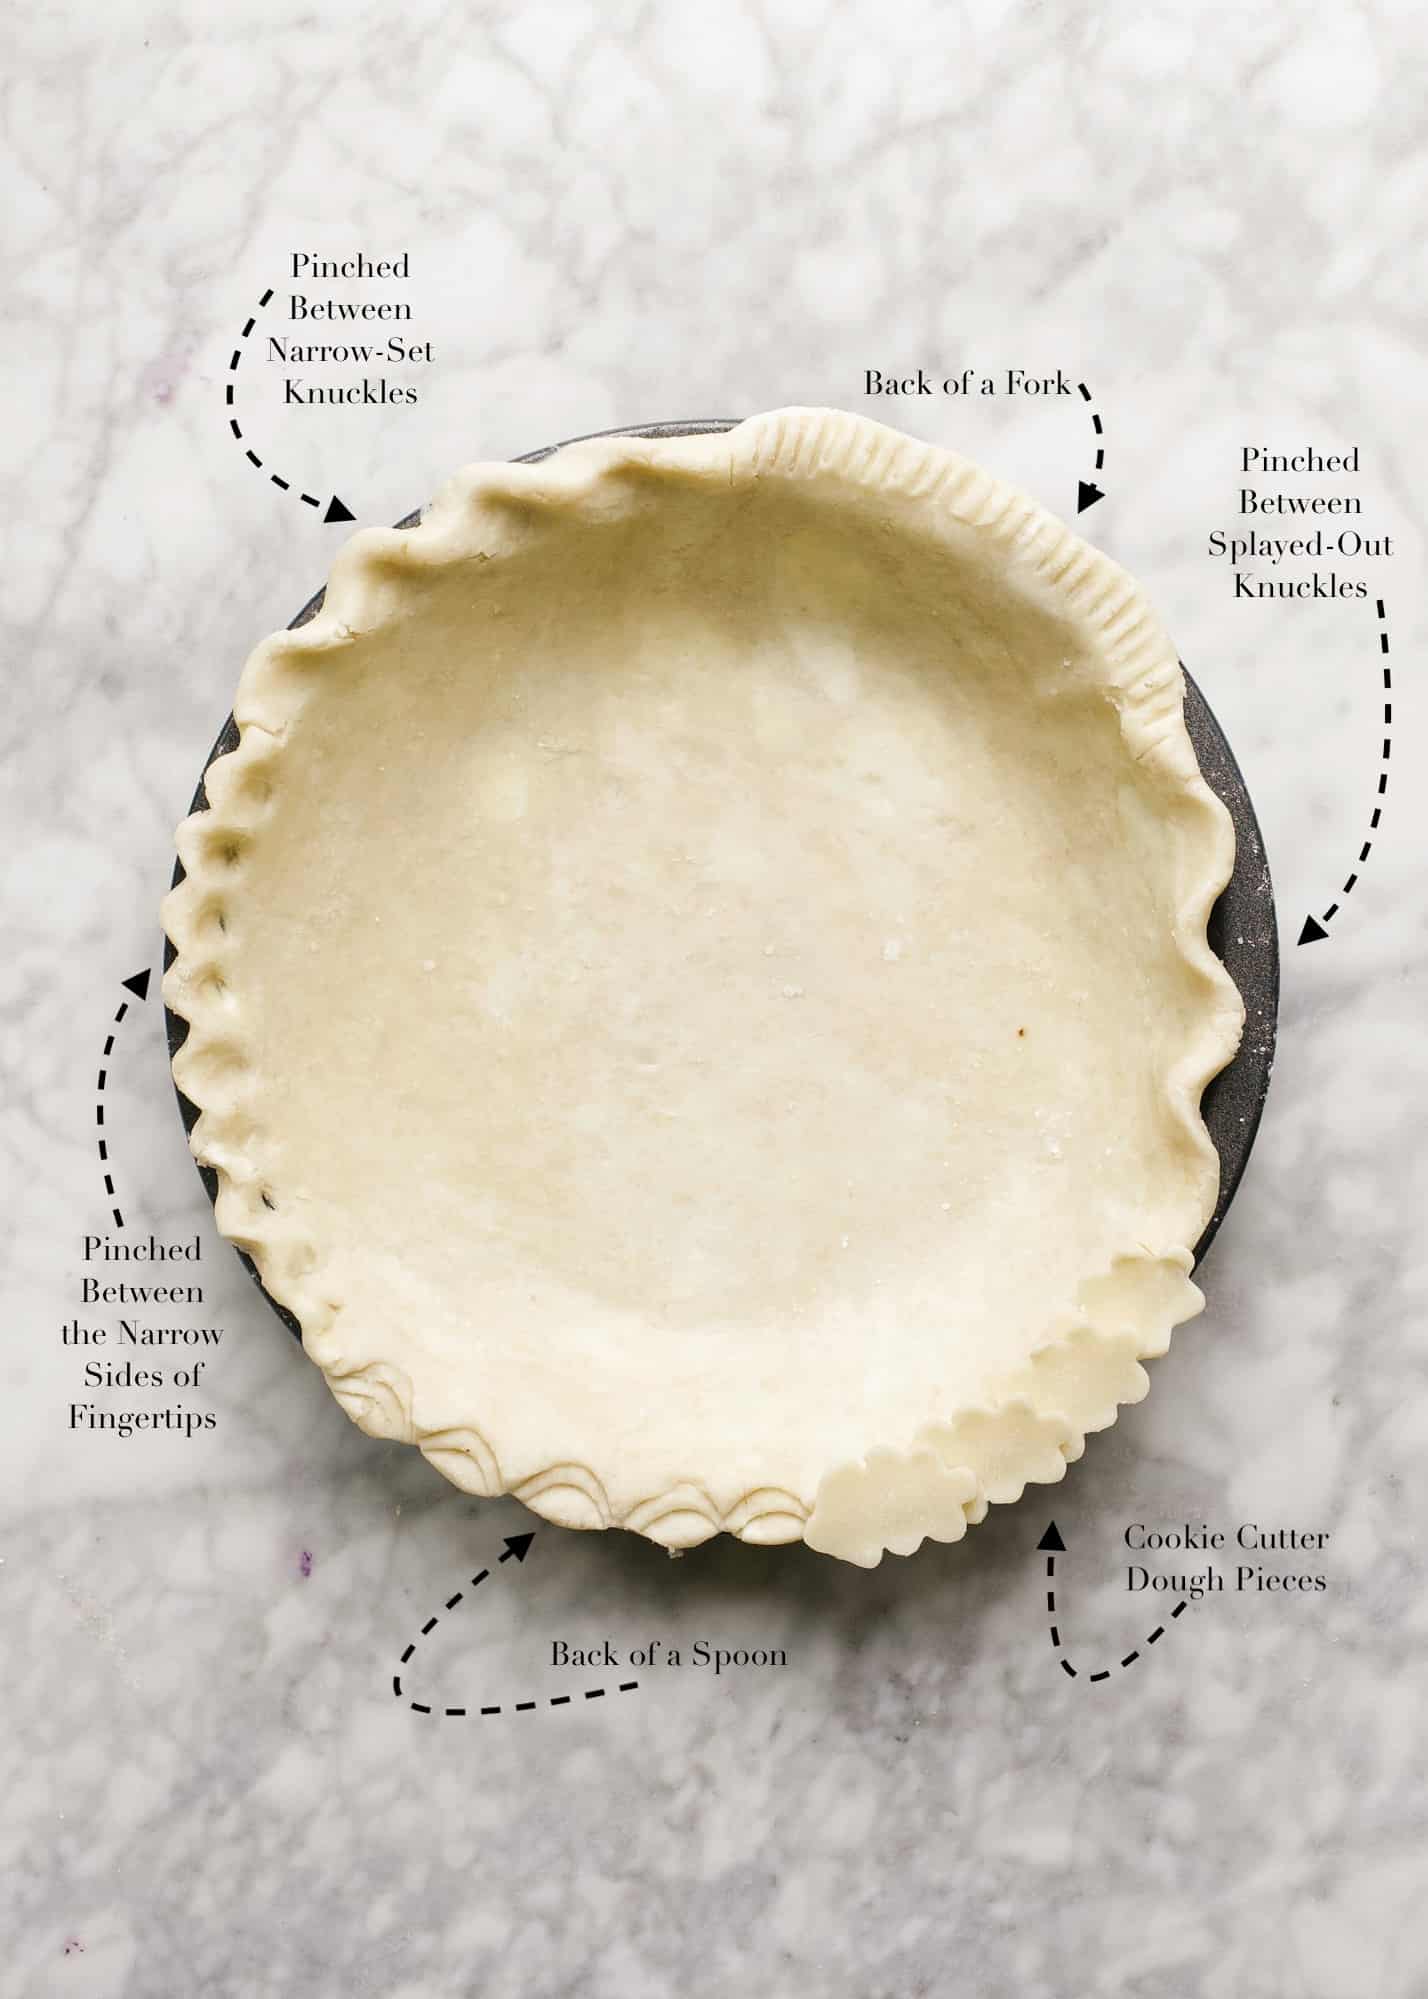
Crimping Pie Dough
Again, nothing fancy here, just a few of my favorite crimps! When in doubt, the back of a fork is your friend. Just pinch your edges together and crimp away!
Preparing Pie Dough for Baking
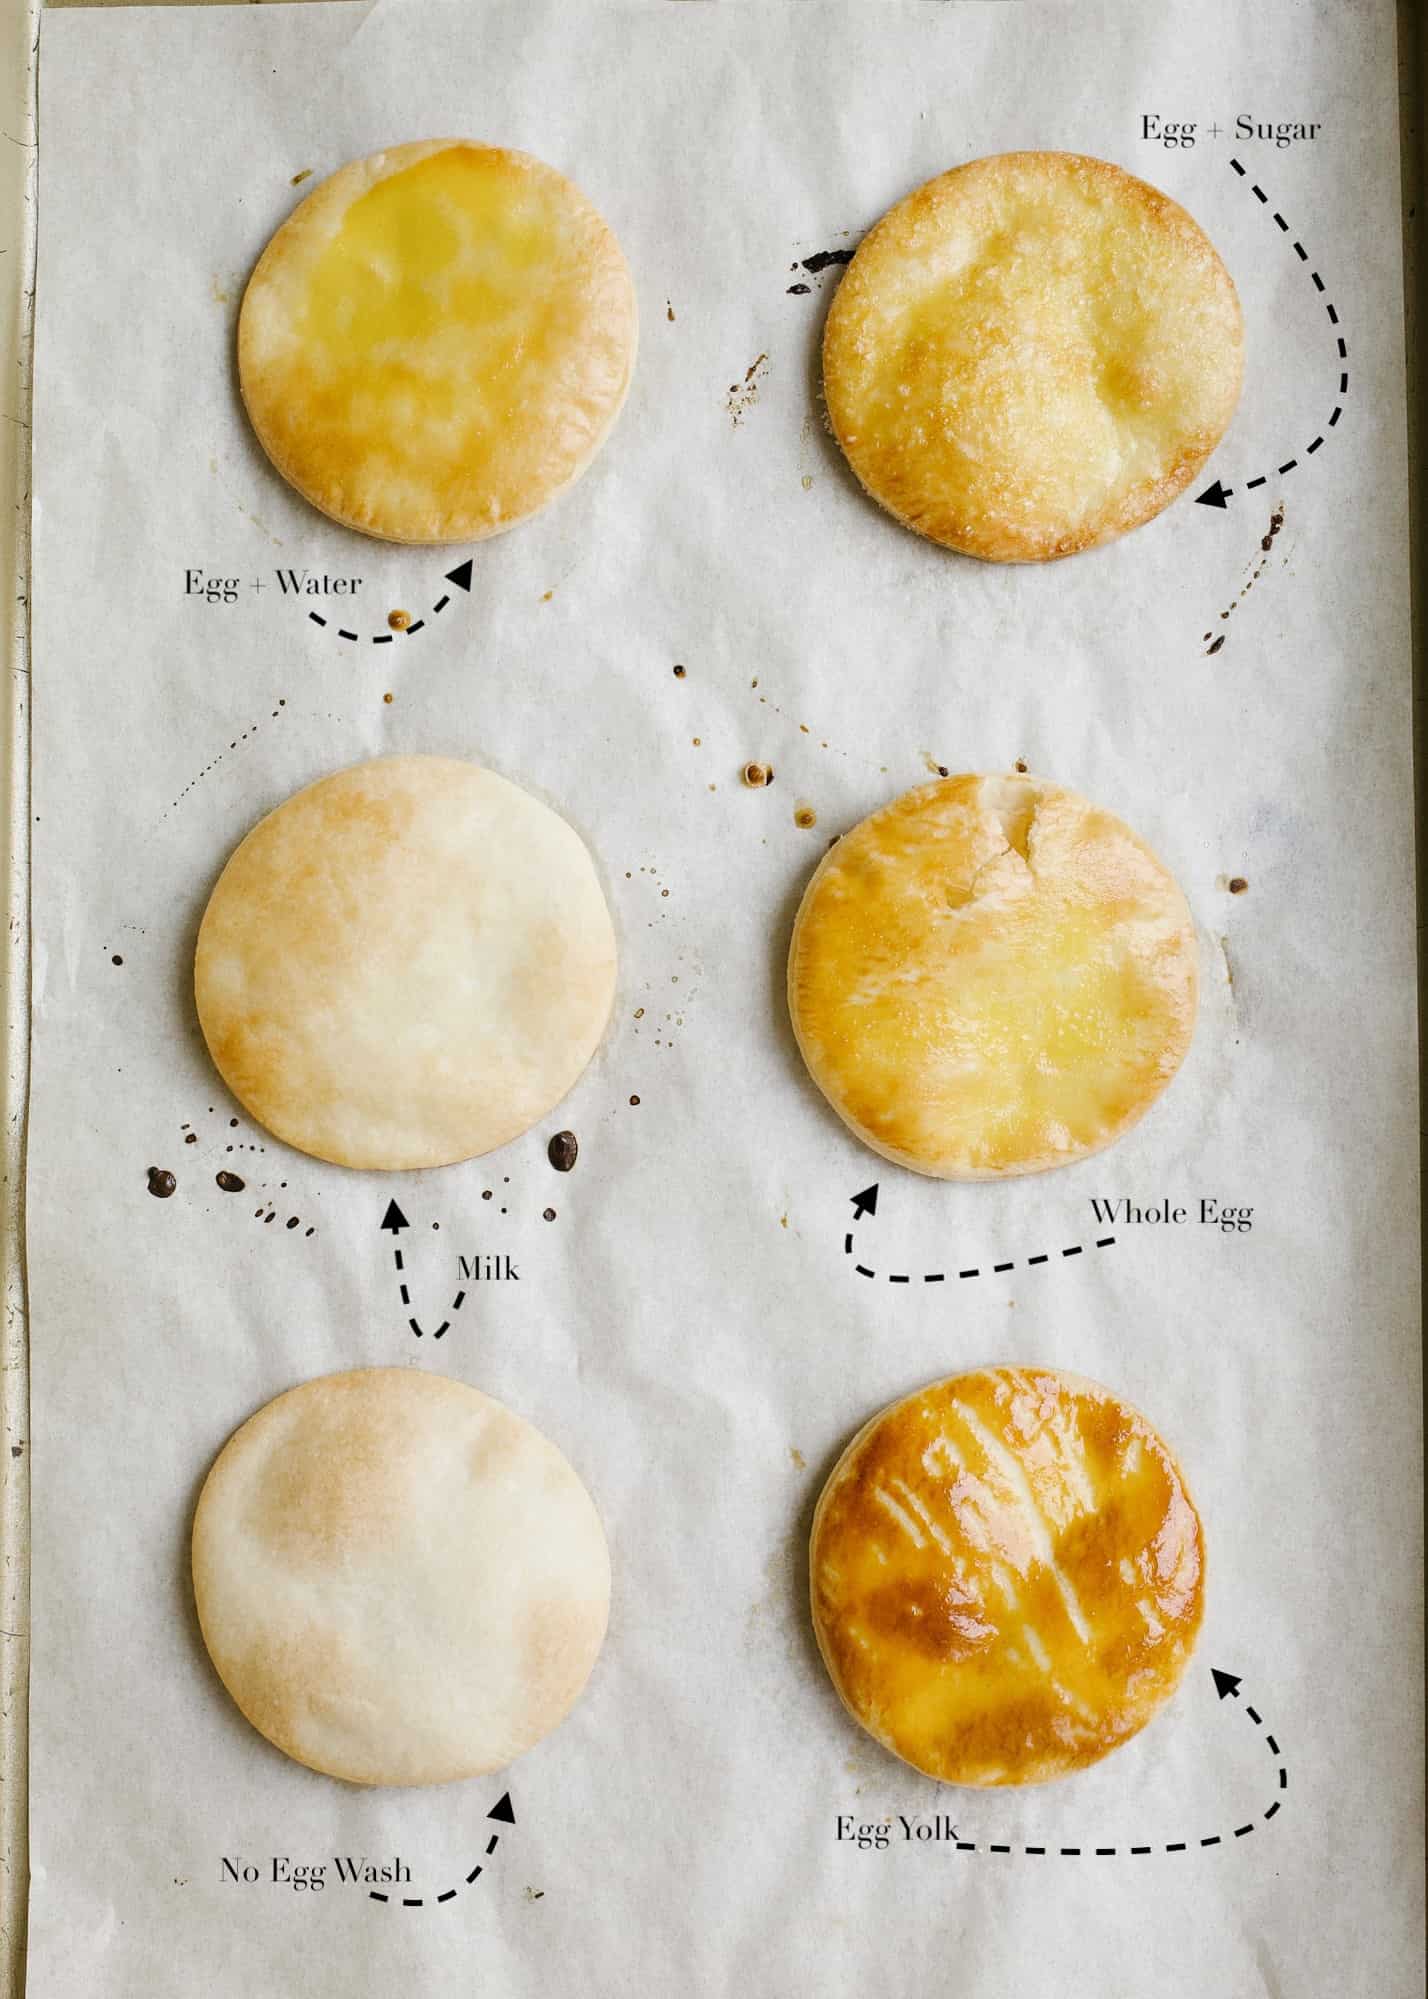
At some point in your baking career, you’ll stumble upon a recipe that calls for an egg wash. More often than not, this is solely for aesthetic purposes. An egg wash combines all or part of an egg with some kind of liquid (water, milk, or cream) which you then brush in a thin layer on a prepared pie dough crust prior to baking. The protein, fat, and water in the wash adds color or gloss to the finished pie crust. Below, you’ll see a sampling of a few different wash varieties. Choose whichever works best for you or go for my favorite: whole egg whisked together.
Blind/ Par-Baking
A blind baked (or par-baked) crust is one that has been partially or fully baked prior to adding the filling. Usually done only on single crust pies, blind baking can help prevent soggy bottoms and ensure that crusts are cooked thoroughly and evenly. To blind bake, start by docking (or poking holes with a fork) the bottom and sides of your chilled pie dough that has been rolled into a pan. Fit a crumpled sheet of parchment paper into the bottom and sides of the dough and fill it with pie weight, dried rice, or dried beans. The weight will prevent steam from bubbling underneath the dough and ensure that the crust remains flat in the pan.
More Help on How to Make Pie Dough
We’re nearing the end of this lengthy (but hopefully helpful?) tutorial, so I wanted to wrap things up with a few frequently asked questions. Most of these are internal questions that blaze across my brain when a failed pie attempt has me searching Google for answers or help, but some of these are questions that have been posed me to by readers like you! We’ll end on this note, but be sure to see below for my favorite double crust pie recipe. It’s been tried and true for me for years, the combination of shortening and butter yielding a flaky yet flavorful crust. Give it a try and let me know what you think! Without further ado, here’s some FAQ!
Why is my pie dough sticky?
Two possible situations: either it’s not cold enough or you added too much water. Pop it in the fridge for 30 minutes or so to see if that helps!
Why did my pie crust shrink in my pan?
Again, it’s probably a hydration issue. Next time, add a little less water and chill the pie crust prior to baking it. I even like to pop crusts in the freezer sometimes!
What kind of rolling pin is best?
This is a personal preference thing. I prefer a wooden rolling pin with traditional handles, but you may opt for a French pin or one that is made with marble or plastic! The important thing is keeping that pin floured the whole time you roll out your dough!
Can I use different flours in my pie crust?
Sure. The internet is loaded with recipes for people looking to use alternative flours. I don’t have a recipe here that I’d recommend, but I’m sure you’ll find something on the interwebs.
Is a deep-dish pie the same as a standard one?
Not typically. On this site, I always specify where a deep-dish pie pan is needed, because they always hold more volume. If you attempt to make a deep-dish pie recipe in a standard pie plate, you’ll wind up with too many ingredients and not enough room. Tread lightly.
So what kind of pie plate is best?
Again, this is a preference thing. I live and die by my William-Sonoma Goldtouch Pan, but many other people swear by glass or even ceramic. I will say that glass is helpful when you’re wanting the ensure a crisp, golden bottom- after all, you can look under the pie and see how the cooking is coming!
Do I have to flour or grease my pie plate?
Nope, not unless the recipe you’re following specifies to do so.
How can I get a crisp-bottomed pie?
Par-baking is a great option for single pie crusts, but I also love to bake my pies closer to the bottom third of the oven. Other recipes may specify to add an egg wash to the bottom of the pie.
How do I know my fruit pie is done?
I always look for bubbling fruit in the middle of the pie.
What do I do if my pie crust is too brown before the filling is bubbling?
Use a sheet of aluminum foil to gently cover the top. If it’s just the edges getting too dark, make a foil collar to rest around the edge of the pie like a crown.
Where can I learn more about your favorite pie crust?
A pie crust equal parts buttery and flaky, lightly golden, and perfectly baked- this is the only recipe for a double pie crust that you’ll ever need.
Author:Kate Wood
Prep Time:10
Total Time:10 minutes
Yield:1 Double Crust
Category:Pastry
Ingredients
3 ½ cups (420 gm) all purpose flour
3 teaspoons (12 gm) sugar
3/4 teaspoon (4 gm) salt
2/3 cup (135 gm) chilled solid vegetable shortening, cut into pieces
3/4 cup (1–1/2 sticks, 170 gm) chilled unsalted butter, cut into pieces
10 tablespoons (approximately) ice water
Instructions
Give the dry ingredients a whiz in the food processor to combine.
Pulse in the shortening and butter, just until barely evenly dispersed.
Begin adding ice water, 2 tablespoons at a time until moist clumps begin to form.
Remove dough from food processor and separate in two round disks. Wrap in Saran wrap and chill for at least two hours prior to use.
When ready to use, roll out to 1/4″ thickness and line the bottom of a 9″ pie pan. This is enough dough to fill a deep dish pan as well. Prior to baking, brush with an egg wash, if desired. This is done by whisking 1 egg with 1 tablespoon of water and lightly brushing crust prior to use.
Notes
This recipe makes a double crust. If you want extra dough for decorating the top, I recommend doubling the recipe and saving leftover crust for a future pie! The dough freezes nicely when wrapped well.
Chilling the dough is essential. If your dough gets too warm while you are rolling it out or decorating the top, you may not get as flakey of a crust as you might desire. So work swiftly!
Patch up holes or tears in the crust with leftover dough. Even small holes on the bottom of the pie plate can make a burned and sticky mess of your pie and you’re not going to want to waste a drop of this deliciousness!
You can easily substitute the shortening for butter and visa versa, however I cannot vouch for any other substitutions. Unless you’re super anti-shortening or anti-butter, I strongly recommend this combination for a buttery, flaky crust.
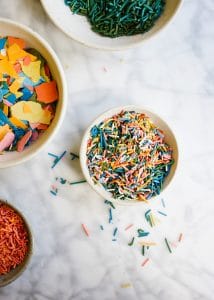
Sprinkles are rarely an option. Those colorful little bits of sugar and crunch can make just about any dessert as vibrant and fun as it should be. Today, I’m going to teach you how to make homemade sprinkles. True, there’s tons of varieties at the stores, but sometimes you need an extra-special color. You may be looking for a specific size or color combination, and making them from scratch is shockingly simple. If you’re up for the challenge, let’s dive in!
What Do I Need to Make Homemade Sprinkles?
Today we’ll be making three different varieties of sprinkles: jimmies, nonpareils/ sanding sugar, and flaked sugar confetti. Jimmies and confetti require the same simple list of ingredients: confectioner’s sugar, water, extract/flavoring, and meringue powder. Those few items get whipped together in a stand mixer until a thick royal icing comes together. While there’s a number of ways to make royal icing, I always find that using meringue powder is easiest. If you’re unfamiliar with this ingredient, look for it in the cake decorating section at craft and superstores. It keeps forever and makes royal icing in a cinch! Once your royal icing is prepared, we’ll use gel food coloring to make it your favorite hue and a piping bag or offset spatula to form your sugary bits!
Homemade nonpareils are a different story. Put simply, I don’t have a clue how to make a nonpareil from scratch, but I can teach you how to custom color like a boss. All you’ll need is plain white nonpareils, sanding sugar, or pearls and a bit of gel food coloring. More on that in a bit.
How Do I Make Homemade Sprinkles?
Let’s start with a large bowl or (preferably!) the bowl of a stand mixer. Combine the powdered sugar, meringue powder, and water and begin to whip on medium speed until the mixture has thickened to stiff peaks. You’ll notice the icing standing at attention, straight in the air, when the beater is removed from the bowl. Gently stir in extract and small amounts of gel food coloring until the mixture has reached your desired color. This recipe makes quite a few sprinkles, so don’t be afraid to make multiple colors. You’ll see I blended several bowls of icing so that I’d end with a bowl of richly-colored rainbow jimmies.
If you’re planning to make the basic jimmies, you’ll want to outfit a piping bag with a number two tip. You can go bigger or small here, but the number 2 size yields a diameter most similar to store-bought sprinkles. Line a few baking sheets or a clear work surface with parchment or wax paper and begin piping straight lines all over the place! Don’t worry about keeping them perfectly straight or an even flow. Just pipe away until your wax paper is full of lines. Allow the lines to dry completely- at least 6 hours but preferably overnight. Once dry, use a chef’s knife to cut uniform pieces, or roll the parchment/wax paper into a tube and gently crunch with your hands to break them up. I’ve found that the rolling method is easiest unless you are looking for a special size of sprinkles. Store in a sealed container.
For the flaky confetti, skip the piping bag and use an offset spatula to spread a thin layer of icing all over your parchment and wax paper. You’ll want it to be super thin- not translucent but just barely thick enough to coat the sheet. Allow it to dry completely, at least 6 hours but preferably overnight. Once dry, gently roll the parchment/wax paper to crunch the sugar shards. Crunch more for smaller pieces and less for larger ones! Store in a sealed container.
How Do I Custom Color Nonpareils, Sanding Sugar, and Candy Pearls?
This is shockingly simple. Grab a bag of white nonpareils, pearls, or clear sanding sugar. Put your desired amount in a small plastic bag and gradually add small dots of gel food color. Remember, you can add more food coloring but you can’t take it out! Go little by little and feel free to reference this coloring chart from Wilton! Seal and shake the bags liberally until the color is uniform throughout. Dump the contents of the bag onto a baking sheet prepared with wax or parchment paper and spread out. Allow them to dry for at least 6 hours but preferably overnight. Once dry, use clean fingers to break up any clumped pieces and store in a sealed container.
Is That All There is To Making Homemade Sprinkles?
I feel like I should have more to write, but making homemade sprinkles is so simple! That’s all there is to it! Follow my recipe below to make your favorite assorted shades and let me know what you think. Feel free to check out local craft stores for oversized bags of nonpareils and sanding sugar so that you can make alllll the colors in the world. Get creative, have fun, and don’t forget to send me pictures. Tune in at the end of this week when I’ll be sharing a quick fun recipe for you to use all your new sprinkles with! Have a great week!
If you like these homemade sprinkles you should check out a few other tutorials:
Learn how to make homemade rainbow jimmies, confetti, nonpareils, sanding sugar, and sugar pearls in all of your favorite custom colors!
Author:Kate Wood
Prep Time:5
Total Time:360
Yield:2 Cups
Category:Dessert
Ingredients
2–2/3 cups powdered sugar
2 tablespoons meringue powder
¼ cup water, plus more as needed
Vanilla extract, if desired
Gel food coloring
Instructions
Combine the powdered sugar, meringue powder, and water in a large bowl or the bowl of a stand mixer. Beat on medium speed using the whisk attachment until thickened to stiff peaks, about 5 minutes. If your mixture is too thick and clumps, add water a teaspoon at a time until you’re about to beat it. Once stiff, color the icing with food coloring as desired. Keep in mind, it’s easier to add more but you can take it out if you add too much! Whisk to combine and begin to make your sprinkles.
For homemade jimmies: Transfer the icing to a piping bag fitted with a number 2 tip. Pipe straight lines onto a baking sheet prepared with a piece of wax or parchment paper. Allow to dry completely overnight and then cut or crumble into your preferred size pieces. Store in an airtight container until ready to use!
For flaky confetti sprinkles: Prepare a sheet pan with a piece of parchment or wax paper. Use an offset spatula to smear a super thin layer of the icing on top of it. Once completely dried (preferably overnight) crumble into flaky bits and store in an airtight container.
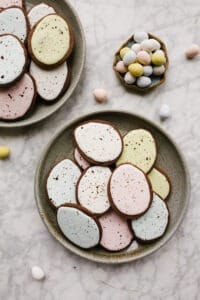
Did you enter this period of quarantine with some butter and a hint of creativity? I’m really hoping so, because today I have a festive and kid-friendly Easter cookie tutorial that you will love. These chocolate cutout cookies are fairly simple and a great recipe to get your feet wet in the decorating arena with. If you have some free time this week (and let’s be honest, a lot of us have TONS lately), this is definitely a treat worth trying out.
Have you seen all the jokes on social media about Quarantine Karen? They basically poke fun at the overachieving Moms who are doing ALL THE THINGS with their kids while out of school during this time. The jokes are comical and rolls eyes at the excessive crafts, homeschooling rituals, and Super Mom tendencies that are emerging in the thick of all this home togetherness. The basic gist is that a handful of humans out there are really thriving in the home while there are others seriously struggling.
Memes and jokes aside, I want to let you know that it’s okay to be exactly who you are in this season. If you’re really struggling at home- maybe you’re buried under schoolwork, stressed under the circumstances, feeling lonely, or slowly going insane with a handful or stir-crazy kids- it’s okay. You can be exactly who you are in this moment, and you’re allowed to grieve and process this new normal in a way that feels healthy for you.
“It’s ok to be exactly who you are in this season.”
On the other hand, if there is grace in your life right now to create and play and achieve and thrive in this season, embrace that too. You don’t need to shrink back or make yourself smaller because an internet full of memes is telling your personality or abilities are just way too much. You be you. We all have grace in our life for different seasons and settings, and it’s okay to flourish in some and be vulnerably in process in others. Make room for yourself, your friends, and the people you rub shoulders with on social media to be exactly who they are, and remember to be kind- to others and especially to yourself. You’re enough exactly how you are.
Chocolate Cutout Cookies
Some of you looking at this recipe for chocolate cutout cookies are already overwhelmed. Like, whose kids are going to cooperate in making decorated cookies at a time like this? Others are like, “YES! A new project!” Either way, please keep reading and consider making these. Granted, any cutout cookie is a bit of production, but these are about as simple as they can get. Lots of reward for the moderate amount of effort they require.
To make these chocolate cutout cookies, we start with a dough. Sugar and cold butter (yep, no softened butter needed here!) whips away in a stand mixer until the mixture comes together in a smooth consistency. Next comes eggs, vanilla, and the dry ingredients. Cocoa powder gives these chocolate cutout cookies their hint of flavor, which is overall not too rich and very kid-friendly. Roll out the dough on a lightly floured surface and trim out shapes using cookie cutters, biscuit cutters, whatever. I didn’t have an egg cookie cutter, but I did have one shaped like a balloon, so I just accommodated. Don’t feel like these must be perfectly egg-shaped- little circles are just as cute.
Frosting the Cookies
After baking the cookies, stir together the icing and add color to it. I use Americolor food gels, but whatever you have on hand would be okay. Frosting consistency is the single more important factor in making a really pretty cookie; be sure to pay close attention to the instructions there. My kids like to “paint” these cookies with some paintbrushes I have specifically for baking. If you don’t have any unused paintbrushes on hand, just squirt the icing in the center of the cookie. Then, spread it out with a small knife or spoon while it’s still wet. Get creative and know that it’s really okay if they’re not perfect.
For the splatter, stir cocoa powder and vanilla extract into a slurry. Fling at the cookie using a little pastry or basting brush. Pro tip: cover your work surface with wax or parchment paper before you do this. Otherwise, you’ll be scrubbing little specks of cocoa powder off of EVERYTHING. These chocolate cutout cookies are the happiest little treats for this time of year, and I really hope you’ll consider making them.
If you’re more interested in a traditional vanilla cookie, check out my favorite recipe here. Finally, on the off-chance that you’re reading about this recipe on the day I’m first sharing it, head over to my IG where I’ll be making them in my IG Stories. My friends at Winn-Dixie asked if I would show you all how to make them, so there’s going to be a little tutorial (kids included!) this afternoon. Happy baking and all my love to y’all. See you next week!
If you like these chocolate cutout cookies you should try:
These chocolate cutout cookies are soft and sweet and really simply to make at home. No royal icing required! Learn how to speckle the cookies like Easter eggs here too!
Author:Kate Wood
Prep Time:20
Cook Time:20
Total Time:120
Yield:About 40 Small Cookies
Category:Dessert
Ingredients
For the cookies:
2–1/2 (350 gm) cups all-purpose flour
¼ cup malt chocolate powder
¼ cup cocoa powder
¼ teaspoon salt
1 cup (230 gm) unsalted butter, cold and cut into small pieces.
1 cup (200 gm) sugar
1 large egg
2 teaspoons vanilla extract
For the icing
3 cups powdered sugar
3–6 tablespoons of whole milk or heavy cream
1 teaspoon vanilla extract
For the splatter:
1/2 tablespoon of cocoa powder
1–1/2 teaspoons of vanilla, plus more as needed
Instructions
To prepare the cookies:
Preheat the oven to 350 degrees.
Combine the dry ingredients and set aside.
In the bowl of a stand mixer, cream the butter and sugar until smooth and well combined, about 2-3 minutes. Scrape the sides of the bowl as needed. Add the egg and extract and cream until combined. Add the dry ingredients and stir on low just until combined.
Dump the dough crumbles out on to a lightly floured surface and work together into one ball with your hands. Using a rolling pin, roll the dough to just over 1/4″ thicken and use a medium sized cookie cutter to cut shapes. If the dough ever gets too soft, refrigerate briefly.
Place shapes on a baking sheet and freeze briefly for about 5 minutes.
Once chilled, bake in the preheated oven for 10-11 minutes, or until the edges are set, and cool on a cooling rack. Allow cookies to cool completely prior to icing.
For the icing:
Sift or whisk powdered sugar to remove lumps.
Add 3 tablespoons of the milk and the extract, whisking until combined. Continue to add milk until it is the right viscosity. You will want thicker frosting for piping. To test viscosity, run your whisk or a knife through the bowl of frosting- your frosting should slowly move back together until you can’t see any trace of the whisk any longer. This process should take about 10 seconds. If the frosting is too thick, it will not pool back together, and if it is too thin, it will pool back together too quickly. The ten second test doesn’t lie. Add more milk for a thinner icing and more powdered sugar if your icing becomes too thin.
Cover tightly in a tupperware or with a wet paper towel if you are not using it immediately, as frosting will dry out and become clumpy. Whisk occasionally and add more milk if it becomes too thick.
Fill piping bag halfway with sugar cookie frosting. Pipe borders around cookies, being careful to not get too close to the edge. Using a paint brush, “paint” frosting into the center of the cookie, filling in to the outside border. (For a good tutorial on this method, check out the Ina Garten video here) I typically will border and fill 4-5 cookies at a time. Continue this process until all the cookies are iced. Set aside for 3 hours, or until icing is set and dry. If you’re in a humid climate, you can use a small fan pointed at the cookies to help expedite this process.
To splatter your cookies:
In a small bowl, mix together 1 tablespoon of the cocoa powder and the vanilla extract until a thin, watery slurry comes together.
Hold your paint brush or natural bristle pastry brush at the base of the bristles. Squeeze, applying a small amount of pressure with your fingers to fan the brush slightly. Dip the tips of the brush in the cocoa/vanilla “paint” and find a spare corner of your covered work space to practice your splatter. While continuing to fan your brush with one hand, use the fingers of your other hand to lightly pull back the bristles and release. This will be a slingshot type of movement and will result in a splatter effect on your work surface. Once you’re confident with your speckling skills, move on to the cookies! Splatter away and allow to dry before storing.
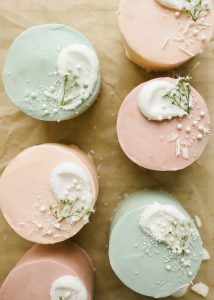
What do Anna Kendrick, Bruno Mars, and my three kids have in common with today’s recipe? They’re tiny and straight-up ADORABLE. If I’ve said it once, I’ve said it a thousand times: fancy pants desserts like these mini layer cakes are my favorite. With soft pastel colors and a pint-sized stature, these little vanilla cakes are a happy treat to share with others. No, this isn’t the most social time of our lives (given the worldwide circumstances), but I’ve never known a time where people need love a little more. Maybe love them via cake?
I’ve been wanting to create a tutorial for simple mini layer cakes on this site for a while. I’ve hesitated because I really didn’t want to provide some set of instructions that required you to buy a ton of mini cake pans, cake rings, or other unnecessary equipment. I finally tooled around with a sheet pan cake and found that the layers, when trimmed out with a cookie cutter and briefly frozen prior to frosting, are actually pretty decent to work with. These mini layer cakes aren’t insanely easy to make, but with a smidge of patience you can totally do this. Scout’s Honor.
Making the Mini Cakes
To make these mini layer cakes, we first bake up a fluffy vanilla cake in a rimmed half sheet pan. This recipe is relies on whipped egg whites for its fluff, but you do need to take care not to overbake it. White cakes are prone to drying out, so bake only until a toothpick inserted comes out clean. Once the cakes have cooled, use a 2″ round cookie cutter (I like this one!) to trim out cake circles. You want to cut out your circles pretty close together; if done correctly, you should end up with enough to make about 7 and a half-ish cakes. I was happy to have an extra layer in case one didn’t come out super clean, but you can feel free to eat those extra layers yourself. No shame. Place the cake layers on a clean sheet pan lined with parchment and freeze briefly so the cakes can firm up. This makes them easier to frost.
Frosting the Cakes
The frosting is a simple American buttercream. You can reference my recent post on stacking layer cakes for a little help here. I opted to frost the cakes entirely, but if you wanted an easier option and were planning to serve them quickly, you could also pipe the frosting onto the cakes for a naked look! Click here for a cute example I found on the internet. Truly, do whatever feels right here and just make something that goes with your vibe.
I opted for pastel hues on my mini layer cakes, and you can find some info on the colors I used in my recipe. As always, I opted for Americolor food gels, but use whatever you have on hand. Keep in mind that food coloring can often change the texture of your frosting, so be sure not to use too much. For decoration, I smeared a bit of white buttercream on top and garnished with assorted white and clear sprinkles. Again, this is dealer’s choice. Fresh flowers, fruit, or confetti is super pretty too.
It feels odd to be sharing recipes for cake with you at a time like this, but I also simple sources of pleasure and joy should be indulged in, especially now. If you’re homebound and looking for a fun project, this could be just the ticket. Give the recipe a try, pop the cakes into the mailboxes of people you love, and be apart of your own personal delicious little love movement. Y’all take care and happy baking.
If you like these mini layer cakes you should check out:
These mini layer cakes are cute and delicious treats for gifting or sharing with a few! Check out the tutorial here!
Author:Kate Wood
Prep Time:60
Cook Time:30
Total Time:120
Yield:7
Category:Dessert
Ingredients
For the cake:
¾ cup (170 gm) egg whites (I use ones directly from the carton), at room temp
1 cup (230 gm) unsalted butter, at room temp
1–1/2 cups (300 gm) sugar
3 cups plus one tablespoon (400 gm) cake flour
2 teaspoons baking powder
½ teaspoon salt
1 cup (240 gm) milk
2 teaspoons vanilla
For the frosting (Recipe makes a bit of extra frosting, but this will be sufficient for getting to decorate the tops!)
1–1/2 cups (340 gm) unsalted butter, softened to room temperature
6 cups powdered sugar
2 teaspoons vanilla extract
Milk or water to thin the frosting
Instructions
To prepare the cake:
Preheat the oven to 350 degrees and prep a rimmed half sheet pan (18”x13”) by lining it with a sheet of parchment paper and lightly greasing the sides.
In the clean bowl of a stand mixer or a large mixing bowl, beat the egg whites on medium-high speed until stiff peaks form. Set aside in another bowl while you continue prepping the cake.
In the same stand mixer bowl you whipped the egg whites in, cream the butter and sugar for 2 minutes. Scrape the sides of the bowl. Combine 3 cups of the flour, baking powder, and salt and add half of this mixture to the butter mixture. Stir on low to almost combine and then add half of the milk and the vanilla. Stir to combine and then add the remaining half of the dry ingredients followed by the remaining half of the milk. Use a rubber spatula to gently fold in the egg whites being careful not to overwork the batter. Smooth the batter into your prepared pan and bake until a toothpick inserted comes out clean, about 19-20 minutes. Be careful to not overbake! The top will be golden and set when the cake is done. Set aside to cool completely- you can expedite this process by popping it in the freezer after cooling on the counter for a bit. Once cool, use a 2” round biscuit or cookie cutter to trim out circles of cake. You should be able to get about 23 circles out of the sheet cake which will make 7 cakes plus 2 extra layers for backup. Feel free to pop the layers on a clean baking sheet lined with parchment paper and freeze briefly while you make the frosting. This will make assembly a little easier.
To prepare the frosting, whip the butter on medium speed using the paddle attachment on your mixer. Continue for about 3 minutes, scraping the bowl as necessary, until pale and smooth. Add half of the sugar and stir to combine. Add the remaining sugar, the vanilla, and a couple of tablespoons of milk or water to help it all come together. Stir and add water or milk a tablespoon at a time until the frosting is smooth. Consistency is important here- make sure the frosting isn’t so stiff that it will pull on and rip the cake layers while assembling, but it also needs to be thick enough so that it won’t just squish out the sides. A good consistency frosting will plop off your rubber spatula but will chill to firm. Pop it in the fridge if it gets too warm.
To assemble the cakes:
Each mini cake will have 3 layers. Mix up your colors as you please. For the colors pictures here, I used Americolor Food Gels. The pinkish one is a 3 parts red, 2 parts blue, and ½ part brown. I recommend adding the color a tiny bit at a time to make sure you don’t mix a color you’re not fond of! The blueish greenish cake is 3 parts blue with ½ part brown. The orange-ish cake is 3 parts deep pink with ½ part brown.
When ready to assemble, smear a little frosting on your cake board or serving plate and stack the first layer. Add about 2 tablespoons of frosting on top and use an offset spatula to smooth. Stack a second cake layer and repeat this process twice to finish with a third cake layer. Spread a thin crumb coat of frosting on the cake and pop it into the fridge or freezer to set up. I placed a cooling rack with a sheet of parchment on it in my freezer so that I could quickly chill the cakes while I was making them. I found keeping the cakes cold while assembling helped make the process simple.
Once your crumb coat has set up, finish frosting the cake with the remaining frosting and decorate as desired! For my cakes, I use a round dollop of white frosting that I smudged with the end of my offset spatula. White large and small nonpareils and clear sprinkles finished them up! Share with someone you love and enjoy!
Have you ever spotted a beautiful cake on Instagram, television, or a website and thought to yourself, “Ugh, I wish I could learn how to do this”? Well consider me your genie in a bottle, because today I’m going to be sharing a few simple pointers to teach you how to stack a layer cake. This is not some super advanced tutorial. This is a quick guide for eager beginners or anyone wanting to polish the skills they already have under their belt. In addition, I’m DYING to answer all of your questions so that I can update this post to include the things you’re interested in learning about, so please feel free to chime in with anything you’ve found to be helpful in your learning experiences. If you’re ready and hungry, let’s dive in!
What Is A Layer Cake?
This feels like a silly question to answer, but let’s be plain as day. A layer cake is any kind of cake with stacked layers! On it’s most basic level, cake is a single layer with frosting, glaze, or some other garnish on it’s top, but a layer cake typically consist of 2 or more layers of cake stacked with schmears of frosting and/or filling. For the purpose of this post we’re going to stick with a 3-layer cake. That was simple, right?
What Do I Need to Make a Layer Cake?
There’s a few basic components required for every cake as well as a few special tools that will make stacking cakes simple for beginners. I have a few of my favorites listed that you can find above on the “Shop” page of my site.
For starters, you’ll need the following: Cake Layers (or a single thick layer of cake that you plan to slice in half) Frosting Filling (if desired) Serrated Knife Offset Spatula (I prefer a small one)
If you’re ready to go to the next level, here’s a few more items to consider purchasing: Cake Turntable Cake Boards Piping Set or Freezer-Safe Ziploc Bag Cake Leveler
If you plan on being serious about learning how to stack a layer cake you may also consider purchasing a cake turntable. When I first started baking, I purchased an inexpensive model from Wilton that I adored for many years. Some time later, I upgraded to an Ateco model that I continue to use today. No need in purchasing anything fancy- just buy what works. A turntable is the single most useful tool for decorating cakes and can make a world of difference in the final outcome of your product.
How To Stack A Layer Cake ?
Let’s take this slow. Heck, I’m going to throw in some numbered steps so we don’t miss a single thing, okay? WE CAN DO THIS! Here we go.
1. Prepare the cake layers.
We can stack basically any cake recipe, but we always want to work with cooled layers. A cake straight from the oven will not stack well. I like to chill my layers in the freezer for a bit to make them extra easy to work with- it helps keep all the crumbs stuck to the cake instead of all over my spatula. Once cooled (or semi-frozen!) use a large, sharp serrated knife to trim the domes off of your cake. We want the layers to be flat. So if your cake looks more like a hill than an ice skating rink, trim it off. Get down at eye-level to the cake and carefully cut off the top. Remember to go slow and not take too much off! You can always trim off more but you can reattach cake if you butcher off too much.
2. Prepare the frosting and filling.
Again, we need cooled frostings and fillings. Pick your poison when it comes to frosting variety, but keep it simple if you’re new to the game. American buttercream is typically easiest to whip up. Frosting consistency is really important here. Too thick or hard and the frosting will stick to the cake and rip off little bits of it as you go. Too thin and the frosting will squish out the sides. I like a frosting that will scoop onto your finger or an offset spatula without falling off but will droop over BARELY when dolloped. No big droops!
With American buttercream, you can typically add water or milk a tablespoon at a time until the frosting thins out to the appropriate consistency. Likewise, you can typically add additional powdered sugar a bit at a time to thicken it up. If your buttercream gets too warm, throw it in the fridge to thicken it up! After all, butter and fat is hard at chilled temps.
3. Prepare your cake board.
This is optional. I love to work with a cake board because I typically am frosting a cake on my turntable. I use a piece of packing tape or a non-slip pad to get my board to stick to the turntable. Place it directly in the center and smooth a small dollop of frosting on the board. This will help to make your first layer adhere to the board. If you’re not using a cake board you can add the frosting dollop straight to the flat serving plate that you’re making it on. The cake turntable and board make a difference here, but you can do it either way.
4. Begin frosting your cake.
Place the first layer of cake on the cake board with the frosting on it. If you’re not using a filling, go ahead and dollop enough frosting to generously cover the entire cake. For most cake layers about 1″ thick, I like about 1/4″ thickness of buttercream on top. Go ahead and plop some frosting on your cake and grab your offset spatula in your dominant hand. With the spatula parallel to the cake top, begin pushing the frosting around to cover the cake, being sure to not actually touch the cake with your spatula at all.
I like to use a subtle rocking motion as opposed to digging the edge of the spatula into the buttercream or cake. Continue this process, adding buttercream as needed, until the buttercream barely hangs over the side of the cake. Then, rotate the spatula barely to dig in a slight edge and twist your turntable like a record player. Keep your hand level and the edge on your spatula tilted slightly so that you can level the frosting top. We started with leveled cakes and we need our frosting leveled too as we stack!
Alternatively, if you plan to use a filling: Fill a piping bag fitted with a large round tip or a large ziploc bag with some frosting. Pipe a “dam” border around the perimeter of the unfrosted cake. Make sure your dam walls are high enough and connected to contain all of the filling. If the filling squishes out the top or underneath, it can make frosting your cake neatly near impossible! Once the dam is complete, spoon in your filling and continue the steps as listed below.
5. Repeat this process with additional cake layers.
For the cake shown in photos, I repeated the process twice as there are three layers. As your stack your cake layers, be sure to press down gently to allow the cake to adhere and line them up as best as you can. If you find your cakes are wiggling or slipping because of loose buttercream, pop it in the fridge to allow the frosting to set up. You’ll wind up with a wonky cake if you try to frost a slippery fellow. Extra time, but worth it.
6. Crumb coat.
A crumb coat is a thin layer of frosting that traps in any cake crumbs. To start, use your offset spatula to push the frosting overhang on the top layer down onto the sides of the cake. This process takes some practice and is hard to get right the first several times. Use additional frosting from the overhang on the lower layers to cover the sides of the cake and add any additional frosting from the bowl as needed.
For our crumb coat, we just want a thin coat of frosting to trap the crumbs, so just do your best to smooth it out. Use your spatula to cover the cake entirely and scrape any extra frosting (sans crumbs!) back into your bowl. Once the cake is coated, pop it in the fridge for the frosting to firm up. The length of time here is dependent on how cold your cake layers were to begin with, so just check your cake occasionally until firm.
7. Finish frosting your cake.
Some people prefer to use a bench scraper here, but I almost always prefer my offset spatula. For a naked cake, smear just a thin layer of frosting all over the cake and smooth out the edges as able. For a more opaque layer of frosting, go ahead and dollop a hefty scoop on top and smooth it onto the top with angled offset spatula. Spread more on the sides of the cake and use a bench scraper or the spatula to smooth and decorate. This is an exercise that takes a lot of practice, so cut yourself some slack the first 15 times you do this, okay? If all else fails, go for messy, rustic frosting and claim you did it on purpose. Cool? Once finished, store the cake as indicated in your recipe or serve immediately!
A Few More Tips On How to Stack A Layer Cake :
I’ve had to learn a lot the hard way. Here’s a few pointers from mistakes I’ve made far too often:
1. Don’t add too much filling to your cake.
Jam, curd, or other running fillings cake easily spill out the top of a dam or squish underneath. Be sure your dam has adhered to the cake layer it is on top of and don’t overfill it! Let your dam be about 1/8″ higher than the filling and add your next cake layer gently.
2. Master the cake to frosting ratio.
Some recipes will produce extra thick layers of cake that are intended to be torted (or trimmed into layers). Use a large serrated knife here to slice through your cake layer and cut it into appropriately thick layers. Most of my recipes produce cakes that are 1 to 1’1/4″ thick, so about 1/4″ of frosting is appropriate here. If you wind up with thicker layers, consider torting or adding additional frosting between layers. For thinner layers, consider less frosting.
3. Don’t overwork your frosting.
This is hard to do. I get it. The more your attempt to smooth and perfect a finished frosted cake, the more likely you are to overwork or deflate your frosting. This can change the color, texture, and mouthfeel of the frosting. Do your best to not overwork and keep in mind that pristine cakes come with practice.
4. Transfer with care!
I like to slide a large offset spatula under the cake board to help shimmy it off the turntable. I usually need to do this when popping the cake in the fridge or when transferring it to its serving plate. They make cake lifters specifically for this purpose, but I don’t actually have one. I find a large offset spatula works fine. Do what feels right!
5. Make sure your frosting is the right consistency.
I can’t emphasize this enough. If you notice your frosting is difficult to work with, go ahead and fix it before you get too far into the frosting process! The messiest cakes I’ve ever made were when I didn’t take the time to address my frosting consistency. See above for quick tips.
6. Decorating layer cakes is an entirely different topic.
Admittedly, I’m not terrific at decorating cakes, so I usually like to stick with basics: flowers, sprinkles, or large piped dollops of frosting. For cake decorating inspiration, I recommend checking out Tessa Huff’s site. She decorates beautiful and attainably intricate cakes. This is a great place to start.
A Few Last Minute Tips on How to Stack a Layer Cake:
You can’t learn how to stack a layer cake if you don’t have a good baked cake. Here’s a few tips that have helped me:
1. Use room temperature ingredients.
The ingredients in most cake recipes will emulsify together better when not at extreme temperatures. So what do you do when you forget to set your ingredients out in advance? Set your eggs in a cup of warm water to quickly bring to room temperature and feel free to nuke milk in the microwave at a low temperature in 10 second intervals till it’s no longer ice cold. As for the butter: consider slicing it into tablespoon pads and resting at room temperature while you set out the rest of your ingredients, or, nuke in the microwave for 8 seconds per side of butter.
2. Use parchment paper to line the bottoms of your pan.
Yes, it can be a pain to cut out rounds of parchment, but I use it every time. Why? Because the only thing more annoying that cutting out parchment rounds is baking a beautiful cake only to have chunks of it remain stuck to the innards of your pan. If you’re feeling really aggressive, you can purchase pre-cut rounds of parchment online and they make life so much easier. Just do it.
3. Do not overmix.
If you read a recipe that says “mix just until combined”, do just that. Overmixing your batter will cause your cake to be chewy and dense… not usually what we’re going for.
4. Make sure your baking powder and soda are fresh.
If you open your cabinet and the baking soda says it expired in 2009, throw it out. I’m talking to you, Mom.
5. If you don’t keep buttermilk on hand, don’t fret!
I sometimes will use 1 tablespoon of white vinegar for every scant cup of milk when I need a quick substitute for real buttermilk. Works like a charm.
6. Don’t overbake!
Toothpicks cost like, $1 at the store. And I’m pretty sure you can steal them from hostess stands at most chain restaurants. So keep some on hand and when the cake looks just barely firm in the middle and is no longer jiggling in the pan, test it. Moist crumbs should come out. If it’s not done, set the timer for one minute and try again. And in the midst of all that checking, try not to open and close the oven too much. You’ll end up with a cake crater big enough to put your face in. On second thought, this isn’t such a terrible outcome so do whatever you want. No judgement here.
7. Allow to cool a bit in the pan before flipping out on to a cooling rack.
We need more crafts. I’m not always one for a DIY, but when it’s edible, super cute, and multi-purpose, COUNT ME IN. I came up with these sugar cookie gift tags this year because I found myself kinda in charge of not one, not two, but three different Valentine’s parties, and I wanted a tiny sweet bite that would add a cute and personal touch to each gathering. I got rave reviews when I sneak-peeked them on my IG stories, so I decided to make up a little tutorial for you guys here. They’re really simple, and with the right recipe (see below!) you’ll be sure to have success with them in your own kitchen too! Let’s get started.
What is a Sugar Cookie Gift Tag?
These sugar cookie gift tags are basically small, buttery sugar cookies topped with a piped, semi-hard set icing. The teeny tiny hole in the corner allows for a simple ribbon or piece of kitchen twine to be laced through it to make whatever it is you’re going after. I’ve provided a few ideas below (Necklaces! Gift Tags! Place Card Settings! Garland!), but you could certainly modify this tutorial to use a different shape cookie cutter or to apply the twined hearts in another manner. This is a choose your own adventure kind of craft, so feel free to think outside the box.
How to Make Them
To make these sugar cookie gift tags, we start with the perfect cookie dough. This is a simple dough made of butter, sugar, flour, vanilla, salt, and baking powder. It’s fairly simple to work with and will cooperate with the craft by not puffing or expanding too much in the oven. Once you’ve prepared your dough, roll it out on a floured surface and use a cookie cutter to trim out shapes. I used this cutter for my hearts, but you can pick whatever you prefer. It’s important to keep your cookies thick enough to withstand a hole being poked in them. 1/4″ thickness is a a great sturdy size to start with.
Once the shapes have been trimmed out, move them to a baking sheet lined with parchment paper and poke small holes in the corners, centers, or wherever. I used a small wooden skewer, but you could also grab a chopstick or anything else that is small with a blunt end. Poke the hole and gently work the skewer in a small circle to ensure that the hole has been poked all the way through. Once your cookie sheet is full with cookies spaced out about 2″ apart, place the pan in the freezer to set up about 5 minutes. If your dough happens to have gotten really warm, pop it in the fridge for 30 minutes or an hour to make sure it has set through.
Prepping the Icing
Once you have removed your baked sugar cookie gift tags from the oven, grab that same skewer and gently ensure your hole is still there. You want to do this right when the cookies come out of the oven so that they don’t set up before your hole is completely poked through. Allow the cookies to cool and, in the meantime, make your icing.
Powdered sugar and milk come together for this simple frosting. The trick is achieving the right viscosity so that the icing doesn’t spill off the sides. To test it, run your whisk or a knife through the bowl of frosting. Your frosting should slowly move back together until you can’t see any trace of the whisk any longer; this process should take about 10 seconds. If the frosting is too thick, it will not pool back together, and if it is too thin, it will pool back together too quickly. The ten second test doesn’t lie. Add more milk for a thinner icing and more powdered sugar if your icing becomes too thin. Keep in mind that if you add food coloring, this will change the viscosity of the icing; be sure to check thickness after coloring has been added.
Icing the Cookies
Prepare a piping bag with a small round tip. I prefer a #3 tip. Fill the bag with icing and pipe, pipe away! Start with a single cookie to test it all out and then finish with the remaining. I like to begin by piping a border and then filling in with additional icing. You can spread in the filler icing with a food safe paint brush (used strictly on food); otherwise use or a small offset spatula. Whatever works for you works for me! Do 2 cookies at a time to get in a flow and then allow them all to dry completely. Keep in mind that some food colorings can keep icing from setting well. I like to use Americolor food gels.
Storing the Cookies
Once your sugar cookie gift tags are made you can use them in any manner you prefer! Freeze them ahead of time and gently thaw them for a make-ahead option, or just make them up to 3 days in advance kept at room temperature. If you can’t wait that long, feel free to just dive right in and eat them immediately. I gave one to Aimee on a necklace, and she thought she was the coolest kid on the block. These sugar cookie gift tags are a cutie treat for Valentine’s or whatever other holiday you might be pushing for. Give them a try and be sure to send me photos! I can’t wait to see. Happy baking to you and happy (almost!) Valentine’s!
If you like these sugar cookie gift tags you should try:
These sugar cookie gift tags are cute little crafty edibles to make with kids for parties!
Author:Kate Wood
Prep Time:60
Cook Time:15
Total Time:1 hour 15 minutes
Yield:50, depending on size of cookie cutter
Category:Dessert
Ingredients
For the cookies
3 cups all-purpose flour
2 teaspoons baking powder
1/4 teaspoon salt
1 cup sugar
2 sticks unsalted butter, cold and cut into small pieces
1 egg
1–1/2 teaspoon princess cake and cookie emulsion (or 1 teaspoon vanilla and 1/2 tsp almond extract)
For the icing
3 cups powdered sugar
3–6 tablespoons of whole milk or heavy cream
1 teaspoon almond extract, vanilla extract, or bakery emulsion
Instructions
For the cookies
Preheat the oven to 350 degrees.
Combine the dry ingredients and set aside.
In the bowl of a stand mixer, cream the butter and sugar until smooth and well combined, about 2-3 minutes. Add the egg and extract and cream until combined. Add the dry ingredients and stir on low just until combined.
Dump the dough crumbles out on to a lightly floured surface and work together into one ball with your hands. Using a rolling pin, roll the dough to just over 1/4″ thicken and use a medium sized cookie cutter to cut shapes. If the dough ever gets too soft, refrigerate briefly.
Place shapes on a baking sheet and freeze briefly for about 5 minutes.
Once chilled, bake in the preheated oven for 10-12 minutes and then cool on a cooling rack. Allow cookies to cool completely prior to icing.
For the icing
Sift or whisk powdered sugar to remove lumps.
Add 3 tablespoons of the milk and the extract, whisking until combined. Continue to add milk until it is the right viscosity. You will want thicker frosting for piping. To test viscosity, run your whisk or a knife through the bowl of frosting- your frosting should slowly move back together until you can’t see any trace of the whisk any longer. This process should take about 10 seconds. If the frosting is too thick, it will not pool back together, and if it is too thin, it will pool back together too quickly. The ten second test doesn’t lie. Add more milk for a thinner icing and more powdered sugar if your icing becomes too thin.
Cover tightly in a tupperware or with a wet paper towel if you are not using it immediately, as frosting will dry out and become clumpy. Whisk occasionally and add more milk if it becomes too thick.